Our new payment pages focus on offering more functionality than our original template - and is especially suited for digital product downloads.
If you’re new to the Payment Page Builder, we recommend giving this introductory help doc a read first (it will be handy throughout your build too). And then let’s get you building!
Below is a breakdown of how to get started and the high-level settings available to you throughout the build of your payment page.
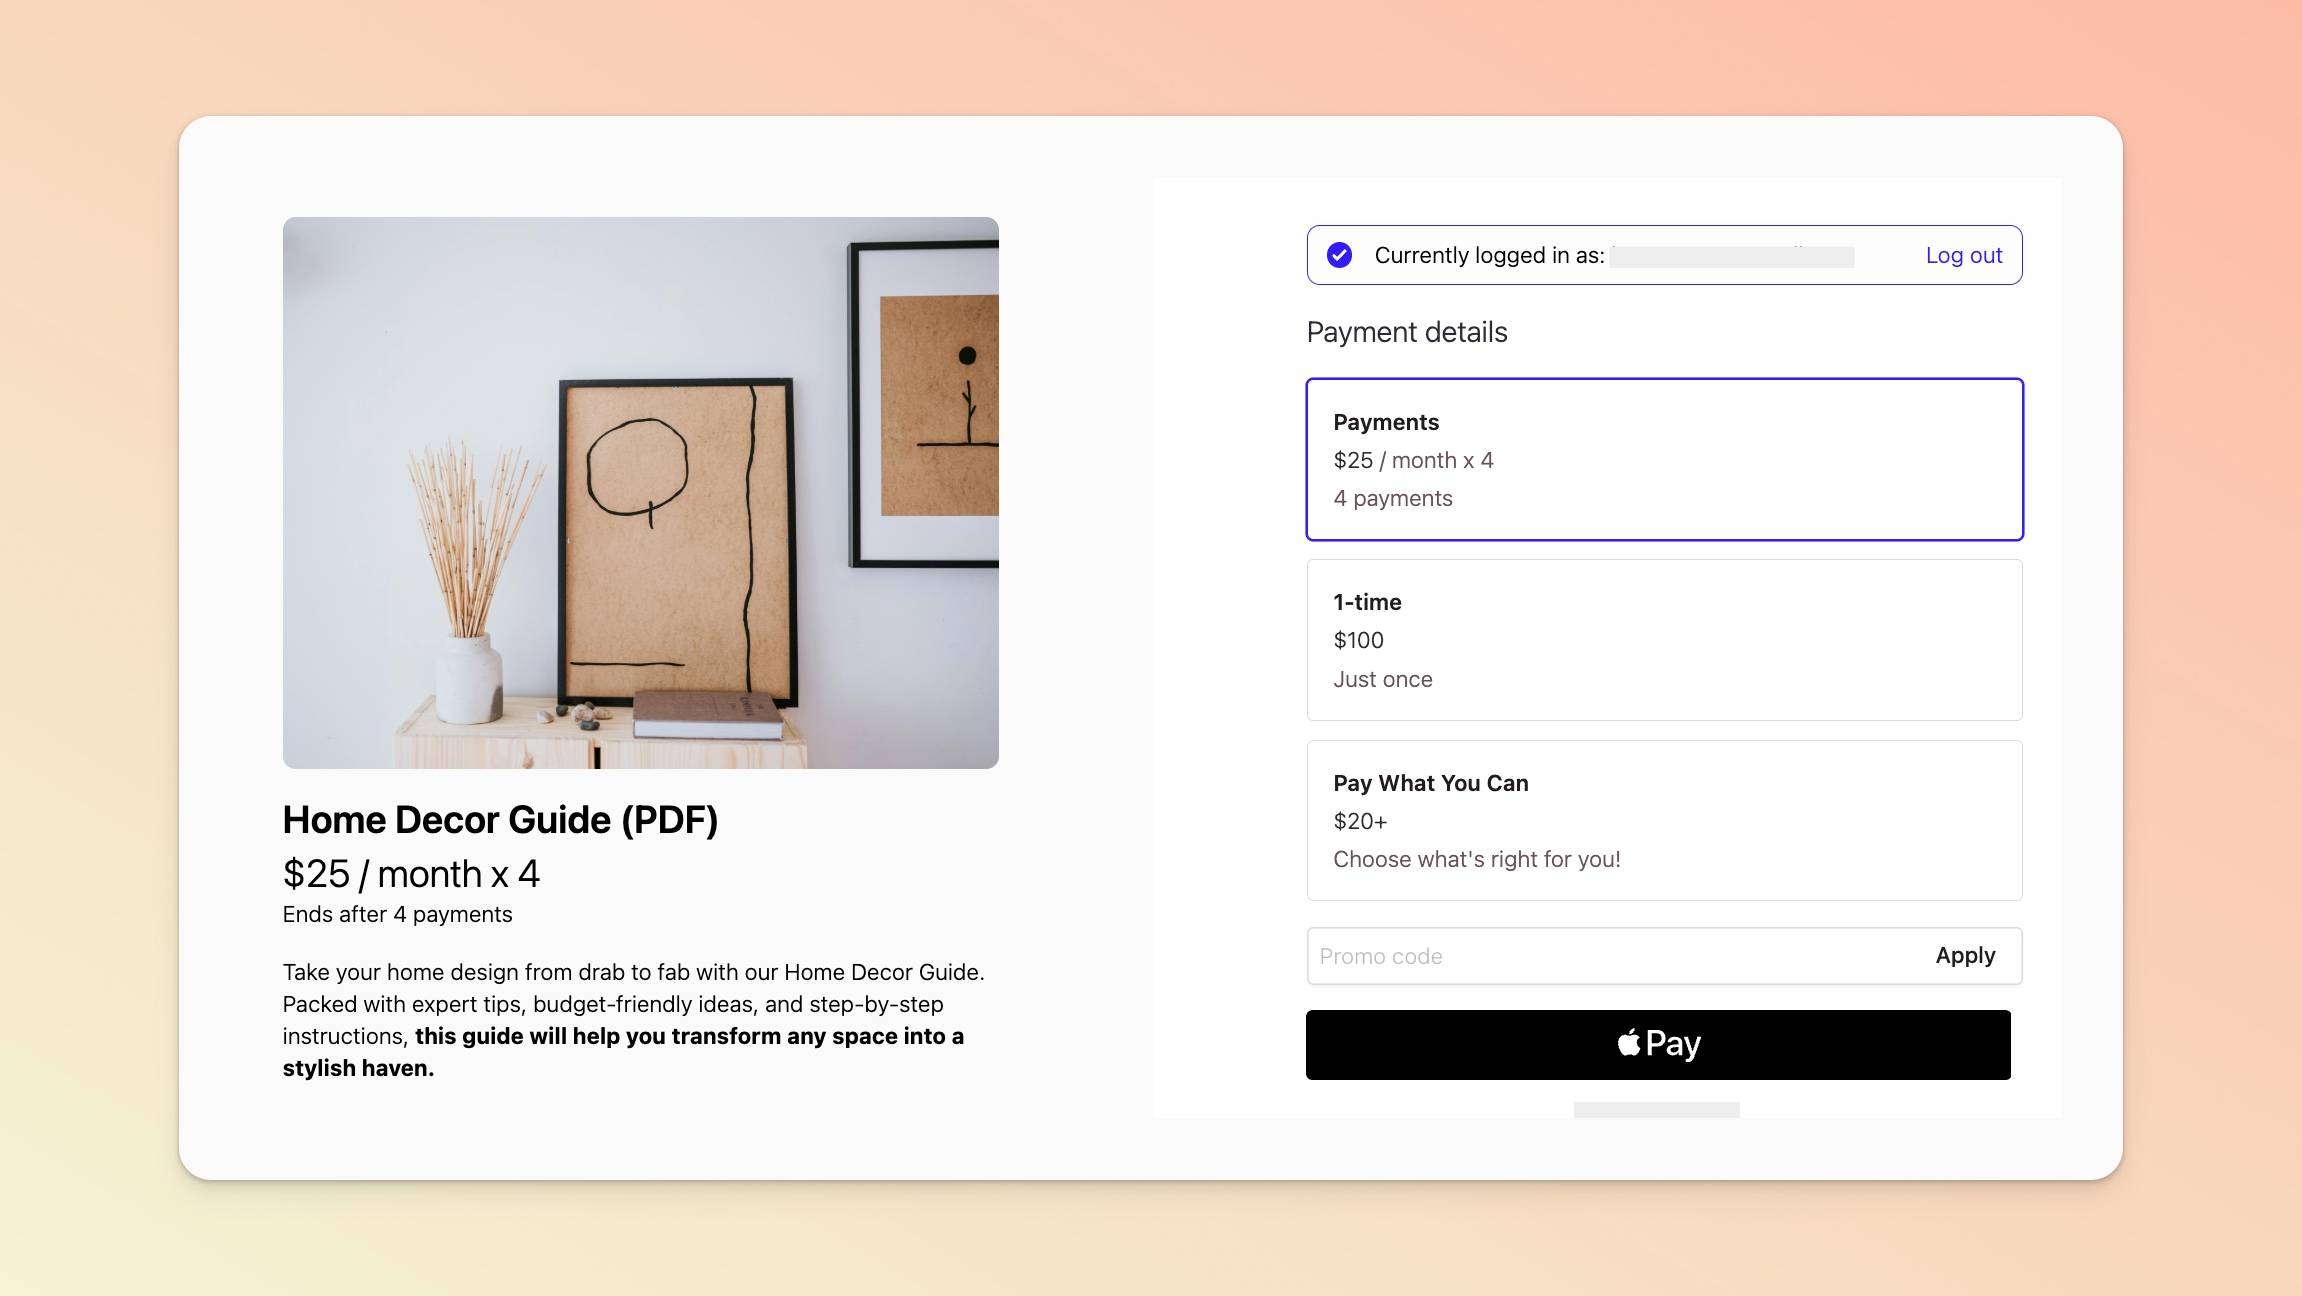
You can create a clean, brief, elegant payment page (like the one pictured below) or one with more bells and whistles (including your own custom CSS).
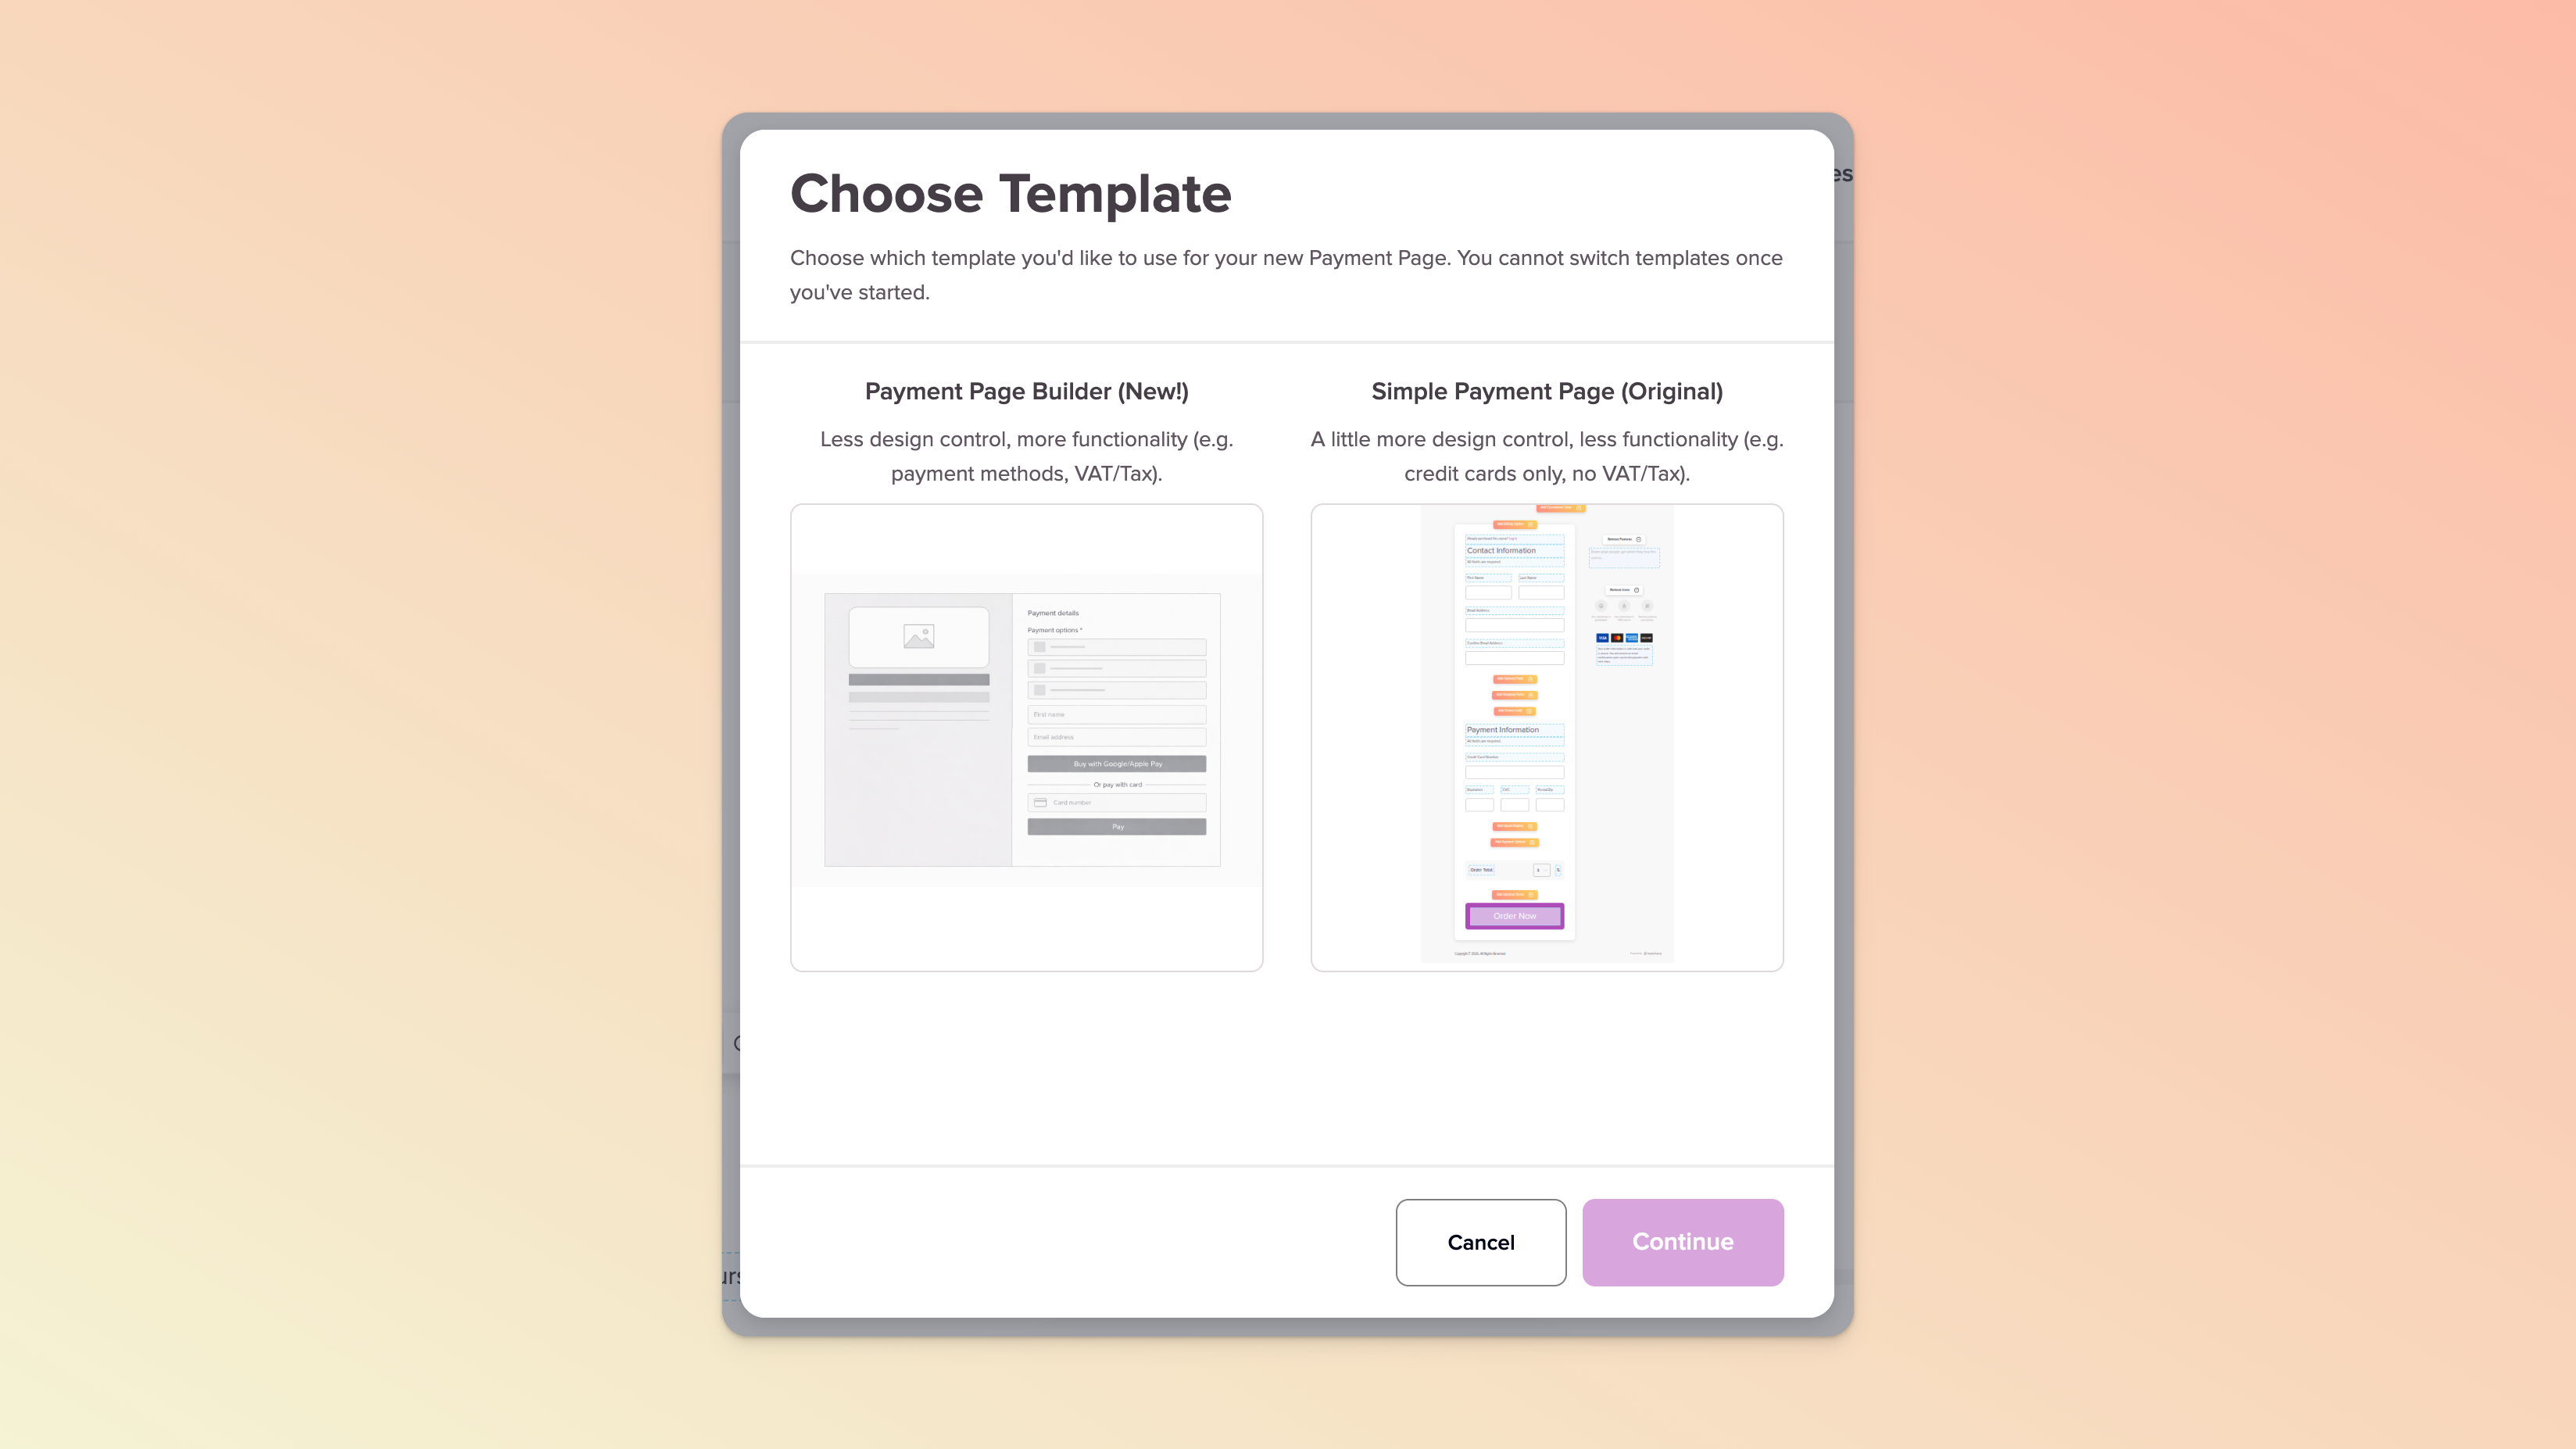
Much like with our traditional payment pages, create or find the course in which to host the payment page and click into the course to edit it. In the Payment Pages section of the left sidebar menu, click + Add Payment Page. Select our new Payment Page Builder in the popup that appears. (If you’d prefer to stick to our original template, please visit this help doc instead.)


Details: Including product title, pricing model, currency, and any discounting/promotional pricing. Please see our Prices and Payment Options section for more.
Description: For you to explain your offer (additional images can be included here) and has a character limit of 1,000.
Image: With a one image limit. Recommended dimensions are 1280 x 720 [4:3] and please note that, currently, full-width images are not possible (this template is a two-column page format).
Variants: If you choose to offer multiple pricing options in the Details tab, the in the Variants tab is where you can define the different payment options you’d like to offer, e.g. $20/month or $200/year.
File Downloads: With an option to upload one or more files using our built-in file manager (many different formats are accepted but the maximum file size is 50MB). Once uploaded, it’s possible to then select or deselect the files you’d like to link to this payment page (read more about how customers access their files, etc.) i.e. a deselected file will not be made available to a customer who uses that payment page.

Gifting: If you want to enable customers to buy this course/product as a gift for others, you can enable this functionality in this tab and, to some extent, manage the text/field labels that your customers will see. In the After Payment > Confirmation tab, you will be able to insert text that the buyer will see on successful checkout. Note that, if a user chooses to make a gift purchase, this confirmation screen will override your standard confirmation screen. Learn more about what happens at/after a gift purchase.
Checkout Fields: Enabling you to add multiple fields to capture customer information and even opt-ins e.g. a checkbox in which customers have to accept your terms & conditions (T&Cs) / policies (select Terms as your field’s Data Type 😉 and drop some context into the Label and, optionally, include a URL to your terms in the designated space but most definitely make this field required). Be sure to set your Data Type for every additional field you add (except for a multiline field - you can leave Data Type undefined for those). Customers’ first name, last name, and email addresses are the minimum required fields. If enabled, Stripe Tax will require/display additional fields. To make use of conditional logic, we recommend first creating all your fields (before setting any of them as required) and only then enabling and setting the conditional logic of the specific fields you want to show/hide as needed. Any custom fields added here will not apply to gift purchases.
Promo Codes: Enabling you to accept promo codes or coupons (see our dedicated help doc on how to create and manage these).
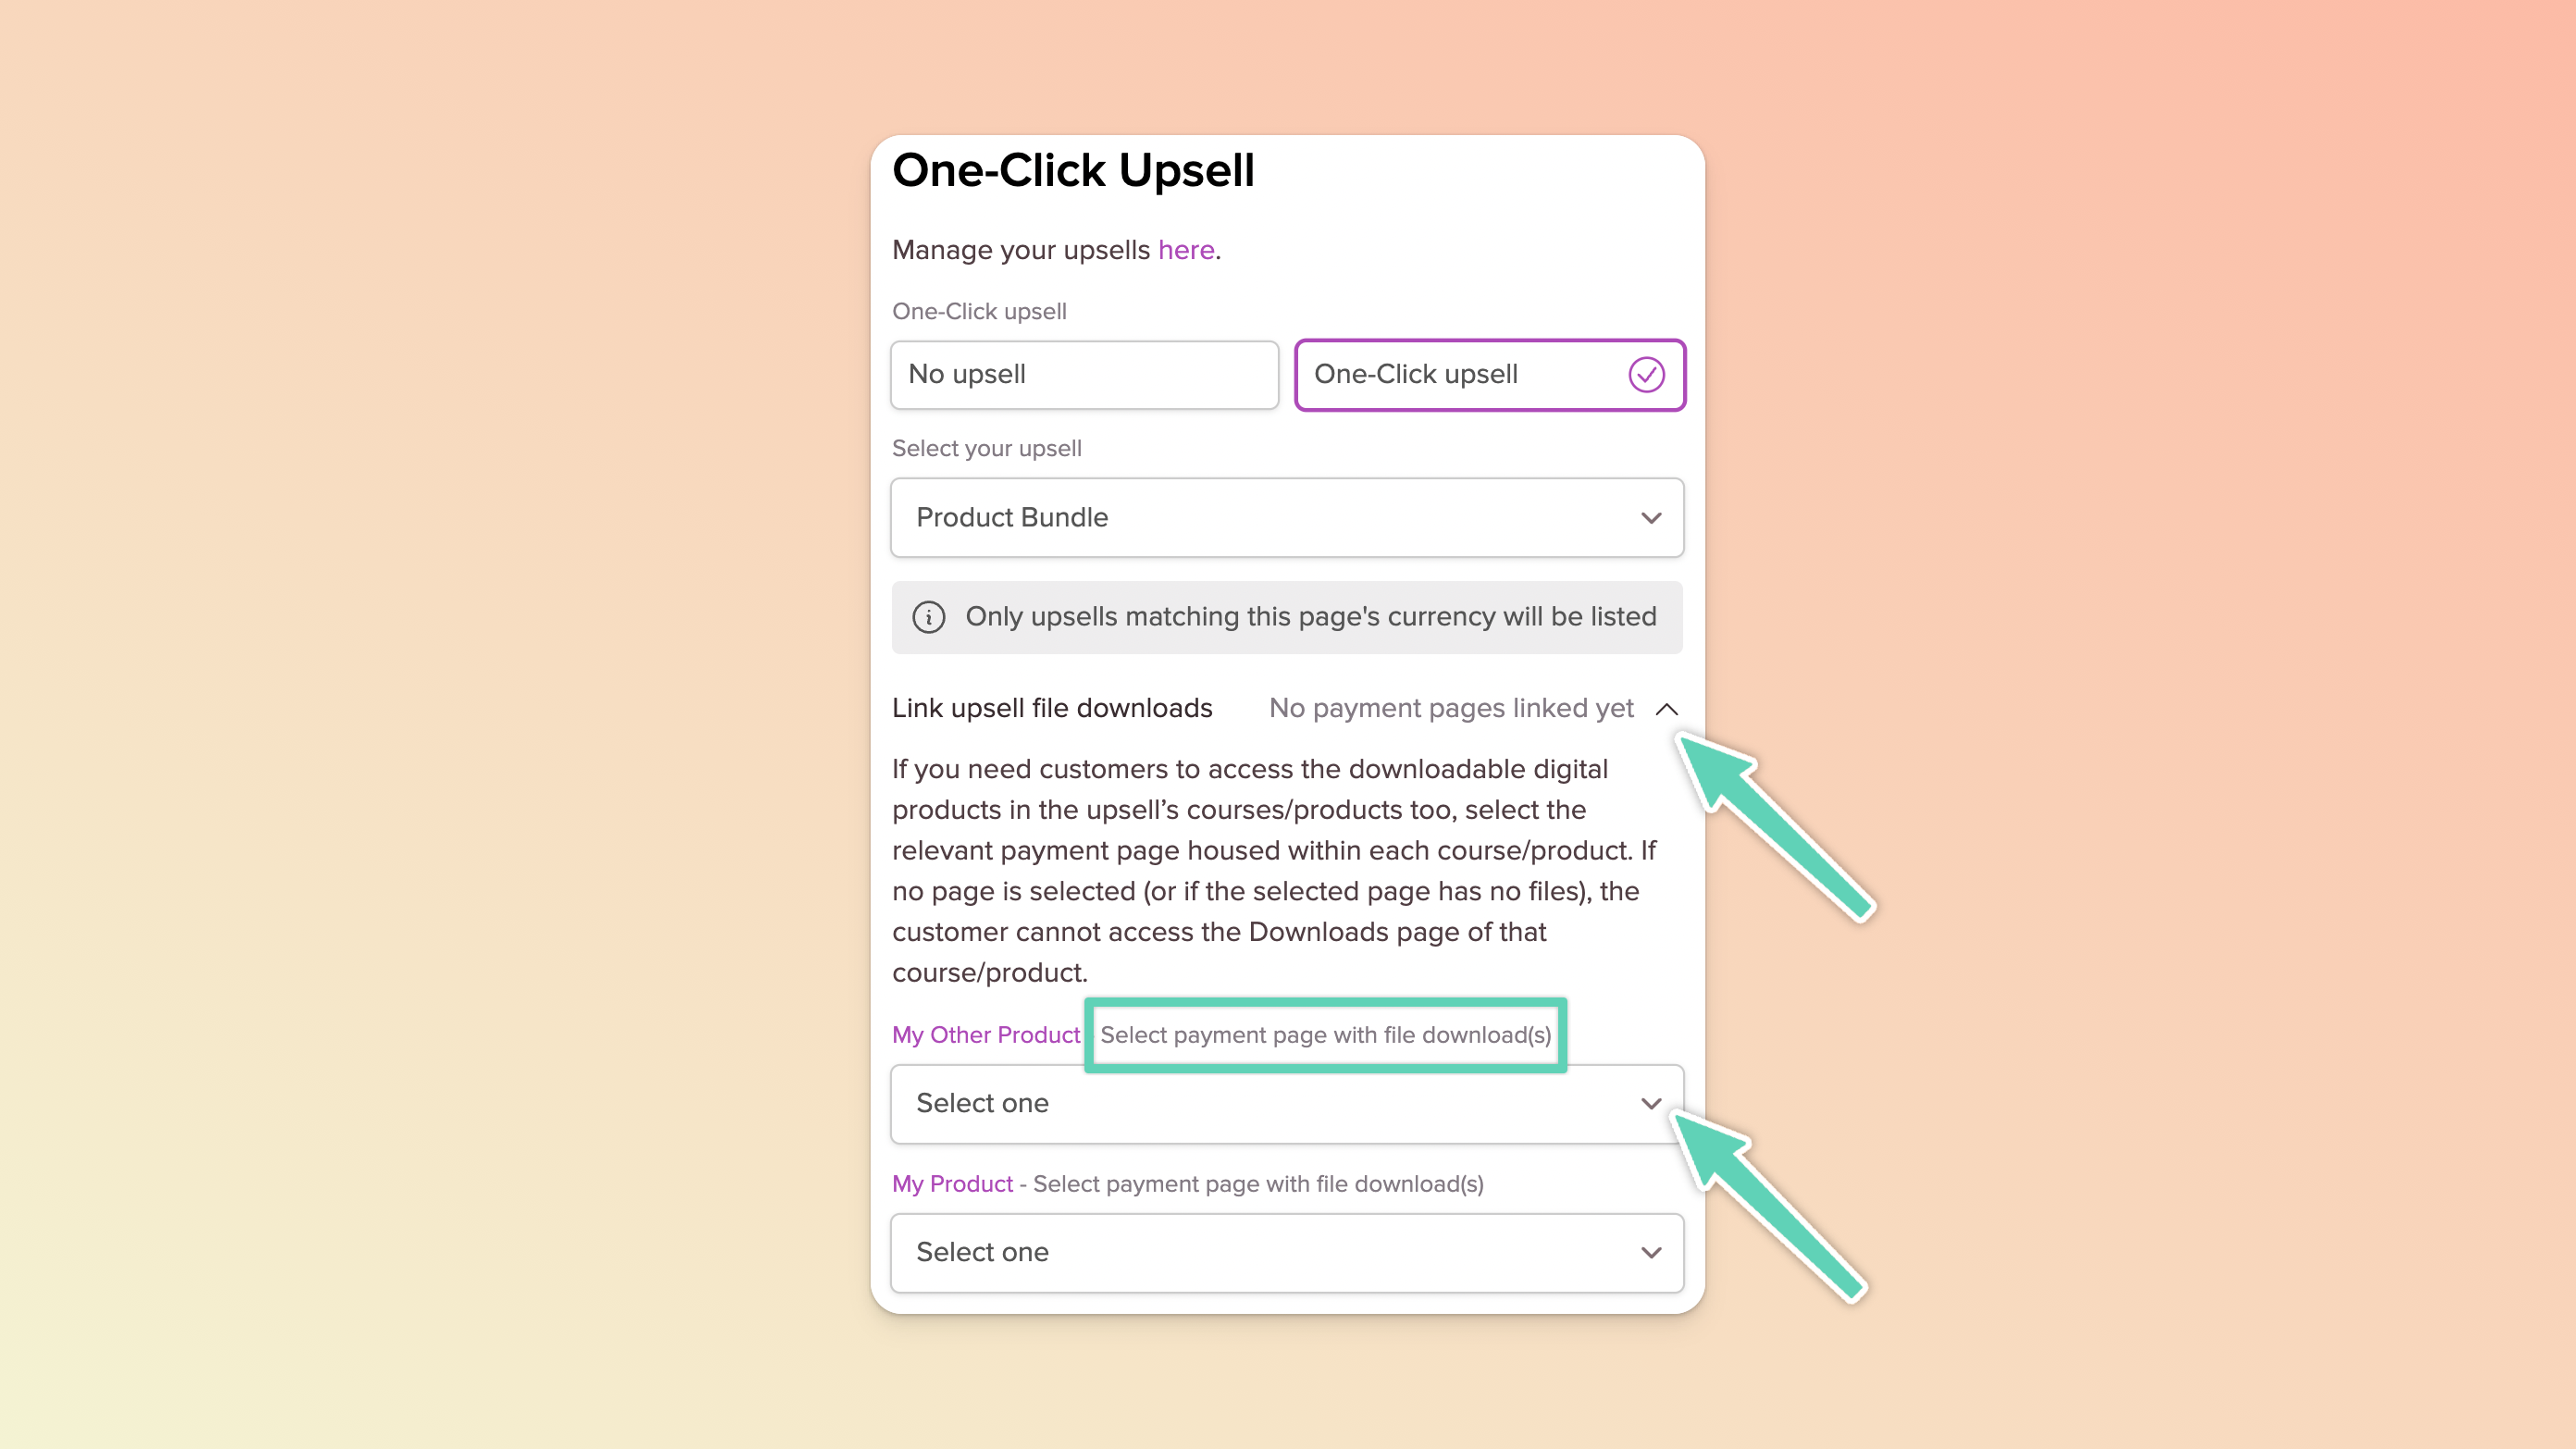
One-click Upsell: Set up an upsell (a.k.a order bump) to display on your payment page. See our dedicated help doc on how to create and manage upsells. You can only add one upsell and it must be in the same currency as your payment page.
Payment Methods: See our dedicated section on payment methods. Please note that until you have a Stripe account connected, this tab may not be visible.
Stripe Tax: To help you calculate and collect the tax on your sales (Stripe Tax requires additional setup - please see this guide for more). Please note that until you have a Stripe account connected, this tab may not be visible.
Colors: Define primary text, background, and button colors. Note that, to ensure consistency, your choice of button color will be applied to elements on, for example, your payment confirmation page too.
Custom CSS: The Payment Page Builder offers limited styling out-of-the-box. Introduce your own custom CSS for more customisation. See our dedicated help doc on custom CSS.
Custom Labels: Use this area to translate some of the payment page text to a language other than English.
On successful purchase, you can either:
send a user directly into your course, or
display a confirmation message, or
display your own customised confirmation message, or
redirect your user into another Teachery course page (select the “Next Page” option) or to an external URL (select the “Redirect to URL” option).
Here’s a little more info about your after-payment options/settings:
Confirmation > Confirmation Messages: Choose to either use our default confirmation message or write your own custom message. You can insert dynamic product, customer, and payment info into your custom message by clicking the + Add Variables button. If you’ve added any additional fields in the Checkout tab of your payment page, these will also now appears as “variables”. If you’re selling a download(s), you can choose to either display the file(s) as a list (which customers can immediately download on successful purchase) or display a button which will direct customers to your Downloads page. Learn more here about how this experience differs.
Confirmations > Gift Purchases: You will only see and be able to update this section if you enabled gift purchases in the Product > Gifting tab. You can insert the text you’d prefer for users to see on successful checkout and make use of special placeholders/merge tags that will automatically populate the buyer’s email address, the gift recipient’s email address and the date on which they will receive their welcome email.
Integrations: If you use Mailchimp, MailerLite, Kit, or Flodesk as your email provider, use this area to connect them to your checkout process.
Email Notifications: Enable this if you’d like to receive an email every time a sale is made.
Custom Code: A space for you to add custom code to the <head> tag of a payment page. ⚠ Proceed at your own risk.
Tracking Conversions: See our conversion tracking guide here.
Facebook Pixel: See our Meta Pixel guide here.
Page Settings: Manage your payment page’s URL/link and page name (which will appear in the left sidebar menu when you’re editing the course).
Google Index: If you’d like your payment page to be discoverable by Google’s search engine, you can enable this here. It’s disabled by default.
Countdown Timer: Use this feature to set a deadline on your payment page. Visit the Expiry Settings tab to define the text you want to display to customers once the countdown timer has expired or, alternatively, you can enable a redirect to kick in on expiry. To make checkout available again, simply disable the toggle in the Countdown Timer section of the payment page.
Quantity Limit: Limit the number of sales or enrolments you will accept. Refunded purchases are not counted toward this limit. Visit the Expiry Settings tab to define the text you want to display to customers once the limit has been hit. To make checkout available again, simply increase the quantity in the Quantity Limit of section of the payment page.
Expiry Settings: Set the message your customers will see when either you hit your defined sales limit (see Quantity Limit above) or if you enabled a countdown timer that has hit its deadline. If you instead want to redirect customers on expiry, you can set your URL here too. To un-expire a payment page and make checkout available again, simply adjust your sales limit and/or countdown timer (see above.)
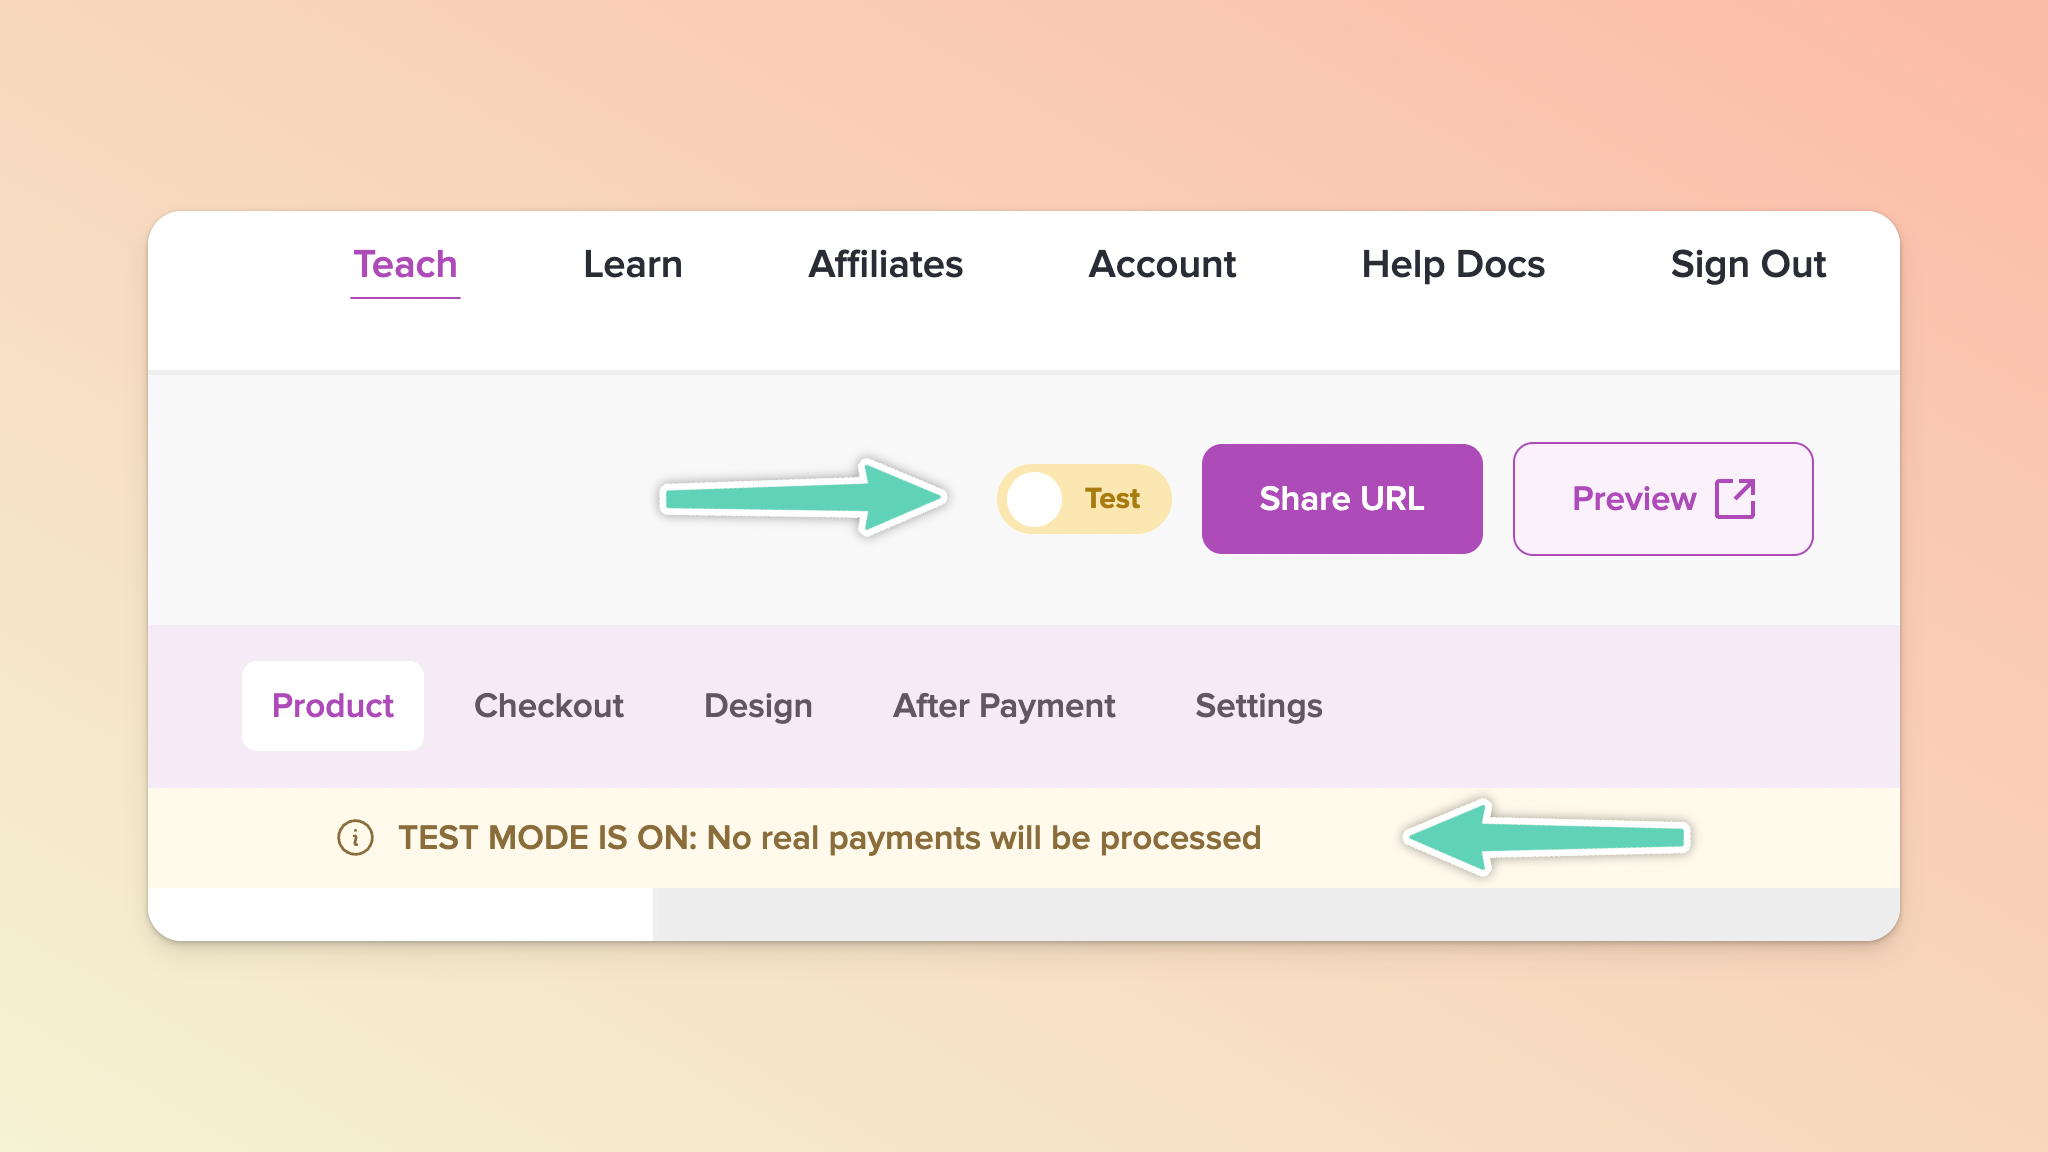
To get a better feel of your payment page’s checkout experience (especially immediately after purchase), you can turn on Test Mode. Look for the the Test Mode toggle in the top right section of your Payment Page Builder.
You can simulate a real purchase (without processing a real payment) either directly in the preview panel or, alternatively (and recommended), copy your page’s URL and open it in an incognito/private window to complete a test purchase. (Use the test card number provided and any expiry date and CVC number.)

Despite offering Test Mode (see above), we still cannot stress this recommendation enough:
If you want to see the exact experience (you and) your customers will have (and to ensure that taxes are being captured correctly or email provider integrations are working), making a real purchase of your own course will be useful. You will get to see both sides of the transaction and ensure everything is working as it should.
Click the Share URL button in the top right of your payment page
Click the Copy to Clipboard in the popup that appears
Open that link in an Incognito or Private Window
Put the payment page to the test (e.g. if you have multiple payment plans available, confirm the page reflects your selection) and complete the checkout
If you want to refund your purchase at any point, you can do so via your test customer’s Customer Profile via the Customers page.
Instead of making a real payment, you can create yourself a 100%-off promo code just for testing purposes (be sure to make it a tricky promo code and/or consider limiting it to one use). But we still strongly recommend placing an order with a real payment to ensure welcome emails, Stripe receipts, refunds, taxes, etc. are all rendering/working as they should.
With some high-level understanding of what to expect, we think you’re ready to start building. Here are some additional guides to read and bookmark:
