Inside the editor of any Course or Theme you create in Teachery you'll find a "Course Emails" section in the left sidebar.
There are two emails we want to help you out with...
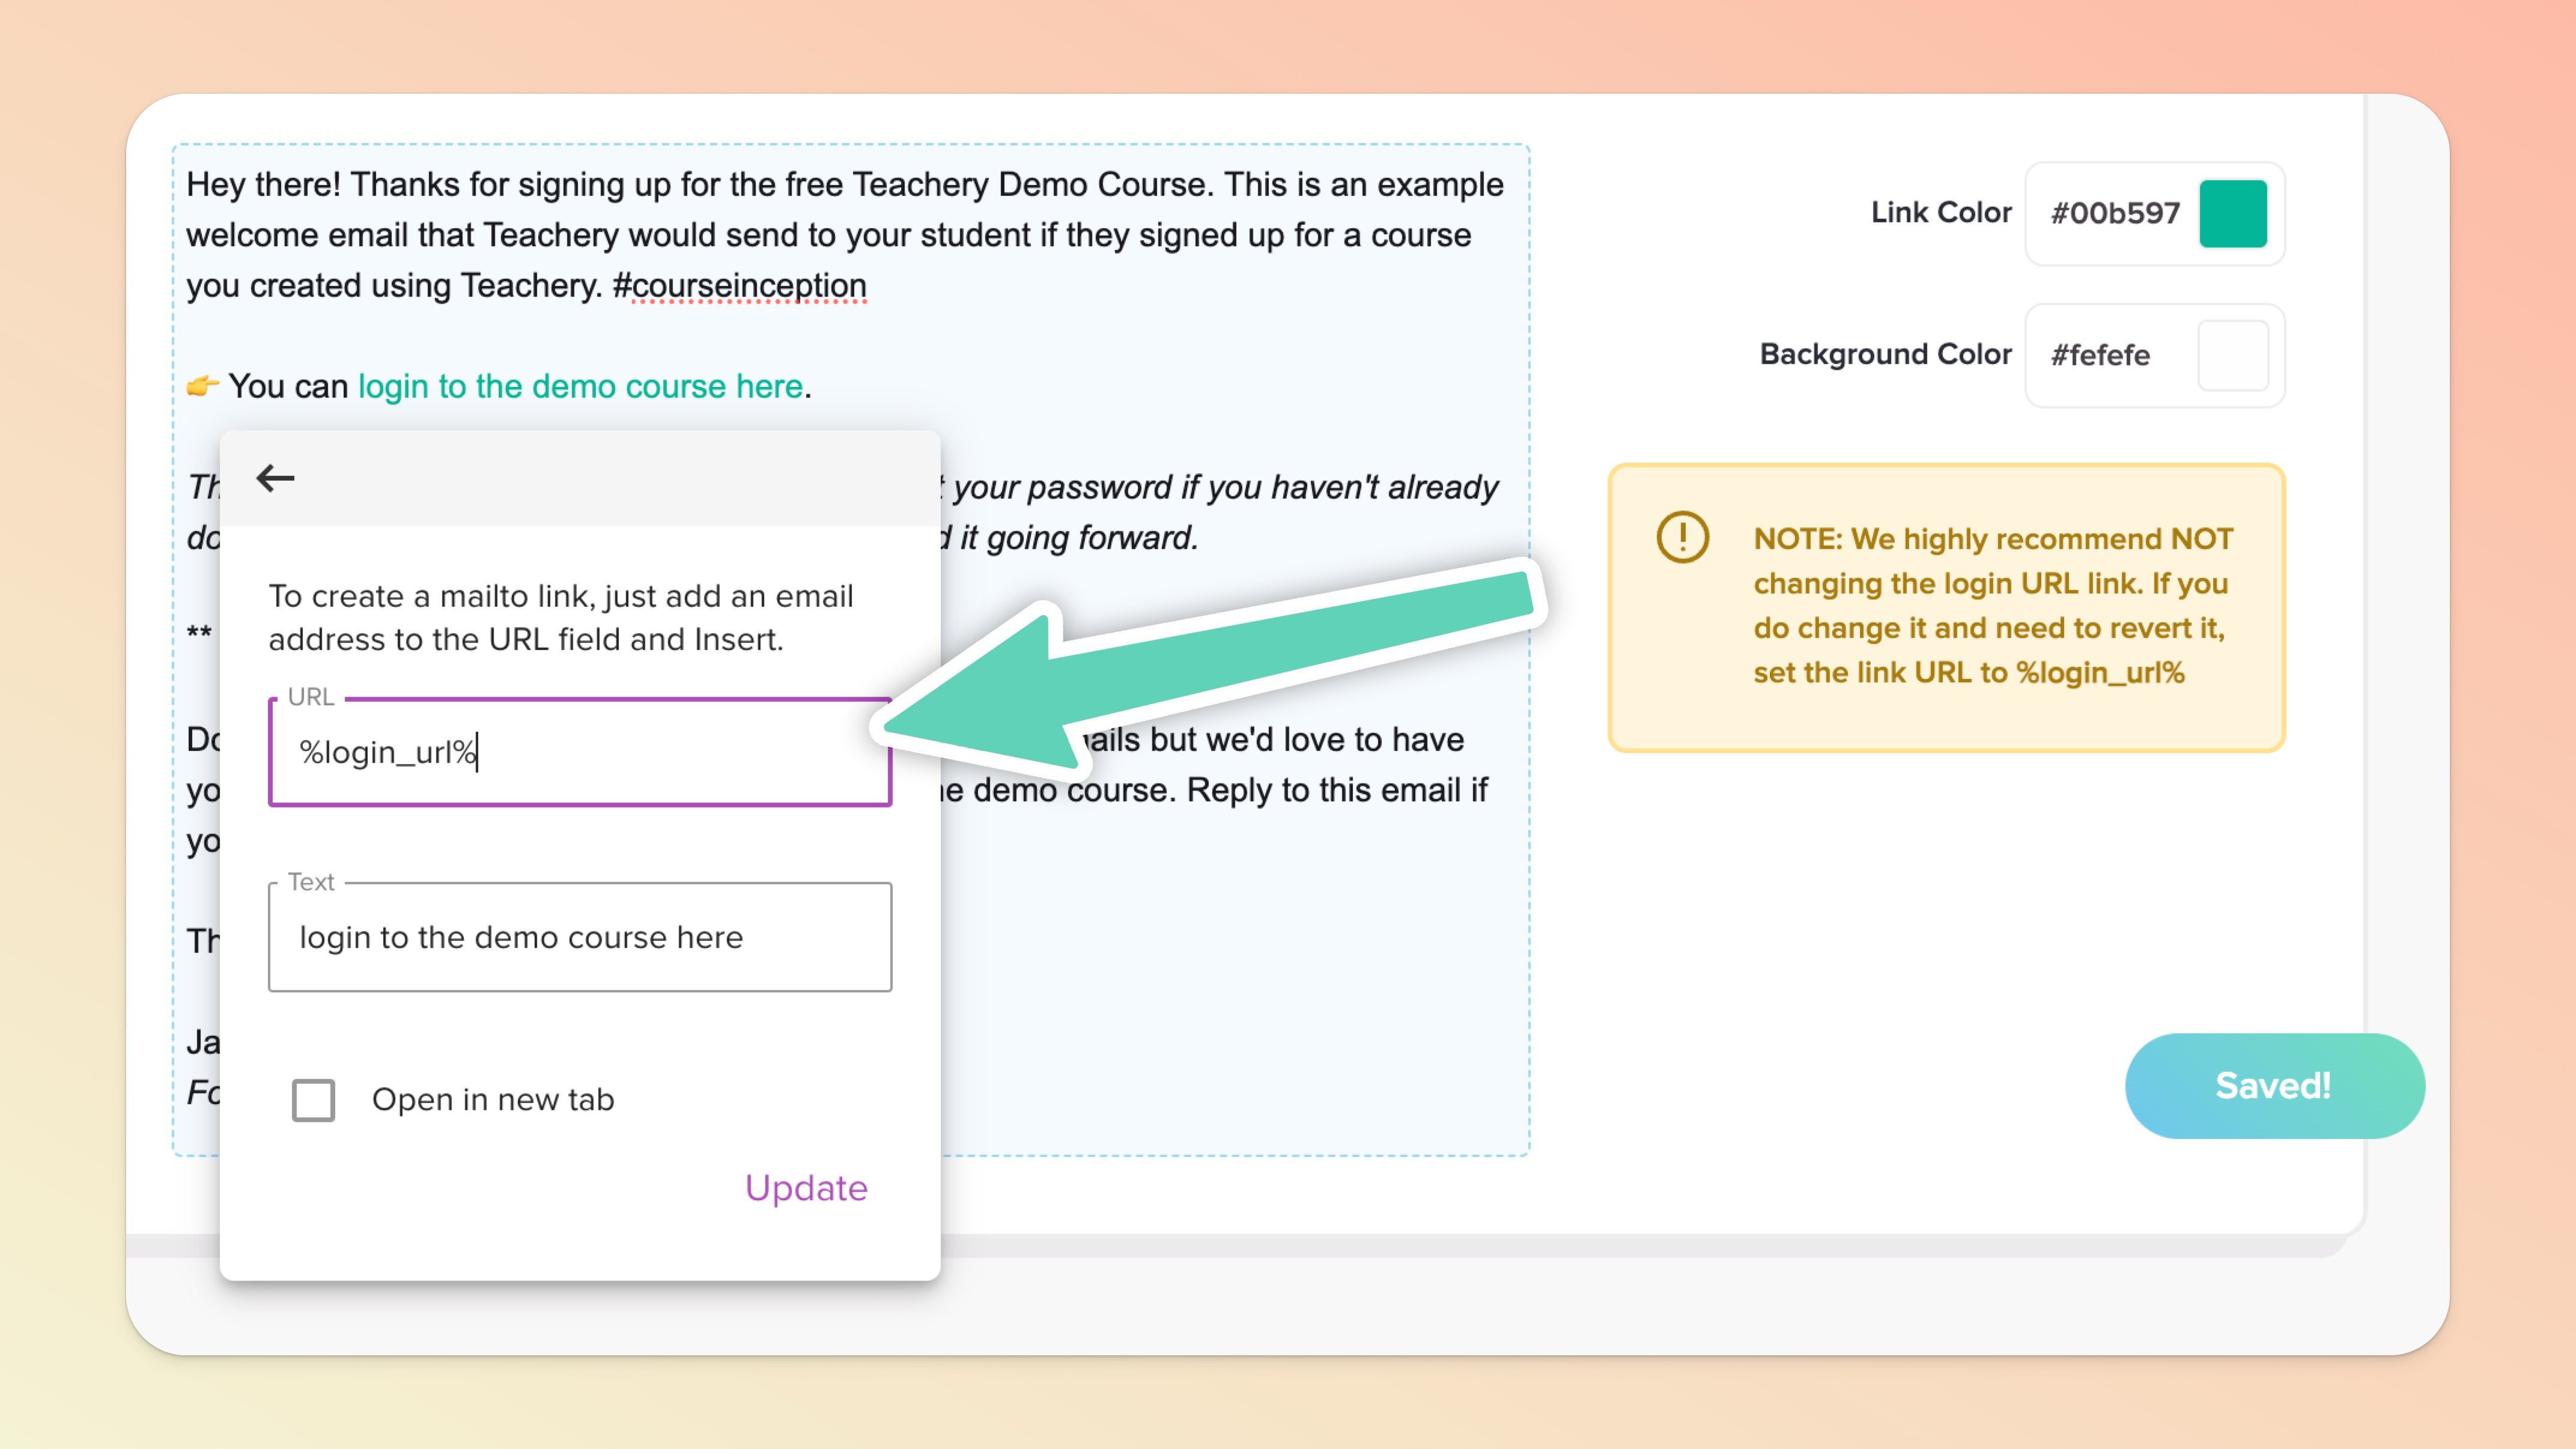
By default, we send a new customer a welcome email that you can customize. This email includes their purchase information and a “smart” login and/or download link (depending on the course/product) which ensures a smoother onboarding. You can add your logo, change the email background and link color, and customize the text in this email.


From the main Teach page, click into the course/theme/product you want to edit.
In the left sidebar menu, look for the Course Emails / Theme Emails / Product Emails section.
Click the Welcome Email option and start editing.
The onboarding experience and welcome email works slightly differently depending on various factors: whether it’s for a course versus a product, if the customer is a new Teachery user versus an existing user, and also depending on whether they’re added manually or via a standard purchase.
Courses (Standard Purchase)
If you’re using our original payment page template or using the “Send user into Course” option of our new payment pages, the customer will be prompted to set a password immediately after a purchase (if they’re new to Teachery), alternatively, they may be prompted to log in with their existing credentials.
If users have already set a password once before in any of your courses (or another creator’s courses) on Teachery, they will always use the same login credentials and won’t be prompted to set a password again. That said, if they’re using an altogether different email address for this purchase, they are creating an all-new Teachery account and will be prompted to set a password.

The “smart” login link we include by default in the course welcome email serves to get your customers onboarded quickly and with fewer hurdles. It will take them directly into the course material. This unique link will eventually stop working, at which point, when clicking it, users will land on your course login page and be prompted to sign in. Resending a welcome email will temporarily “revive” the “smart” link.
Products (Standard Purchase)
On successful purchase of a product, a customer will immediately land on the purchase confirmation page which will list your downloads (unless you’ve chosen to set a redirect after payment). A Teachery account will be created for them in the background but they won’t be prompted to set a password (see more below).
Instead of a “smart” login link that comes with courses, our system will automatically add “smart” download links in your welcome emails (assuming you have attached downloadable files in your payment page).
If a customer ever needs to retrieve their downloads long after their initial purchase and clicks their welcome email link(s), they may be prompted to log into Teachery first. Customers who are brand new to Teachery just need to use the reset password option available on that login page. Existing Teachery users can simply use the same login credentials they use throughout Teachery. Alternatively, you can resend the welcome email to the customer.
More about how products function here.
Manually Added or Bulk Imported
For customers who are manually added, either individually or by bulk import, the course “smart” link will work the same but they may not be prompted to set a password at any point. Not a problem! Next time they click on any of the “smart” links in their course/product welcome emails, they will land on your course/product login page and simply need to use the reset password function to get going again.
If you’ve built your course’s payment page using our Payment Page Builder or you’ve built a product, depending on what you’re selling and what route you want your customers to follow after successful checkout, here’s what to expect with your welcome emails:
If you’re selling a course, be sure to keep the welcome email’s default placeholder of %login_url% so that customers can navigate directly to your Teachery course. Note that if you’re selling a theme, the placeholder to use instead is %start_using_url%.
If you chose the setting to Redirect to URL after a successful checkout, you can include the additional placeholder of %redirect_url% (this is optional).
If you’re selling downloads and you chose to display a confirmation message (on successful checkout) with either a list of your downloads or a button to your downloads, our system will automatically include in the welcome email either a hyperlinked list of each of your downloads or one single link to your Downloads page, depending on whether you chose to display a list or button. Learn more about how customers access downloads here.
If you’re making use of a course bundle in any way and have many many courses/products, you can disable the welcome emails in all courses/products except for the “main” course/product (this is the bare minimum required for onboarding the customer smoothly). This way, your customers won’t be overwhelmed with emails and it will reduce the likelihood of your emails being marked as spam. 📣 That said, if any of these linked courses/products have their own downloads attached to them, do not disable their welcome emails.
In the case of any form of upsell, please note that your “main” course’s/product’s welcome email will have the upsell labeled simply as {+ Add-On}. We have to keep the verbiage generic but we did still want to include something to indicate that an upsell was included in the purchase. If you have Stripe receipts turned ON in your Stripe account, your customers will receive a specific separate email with that as well.
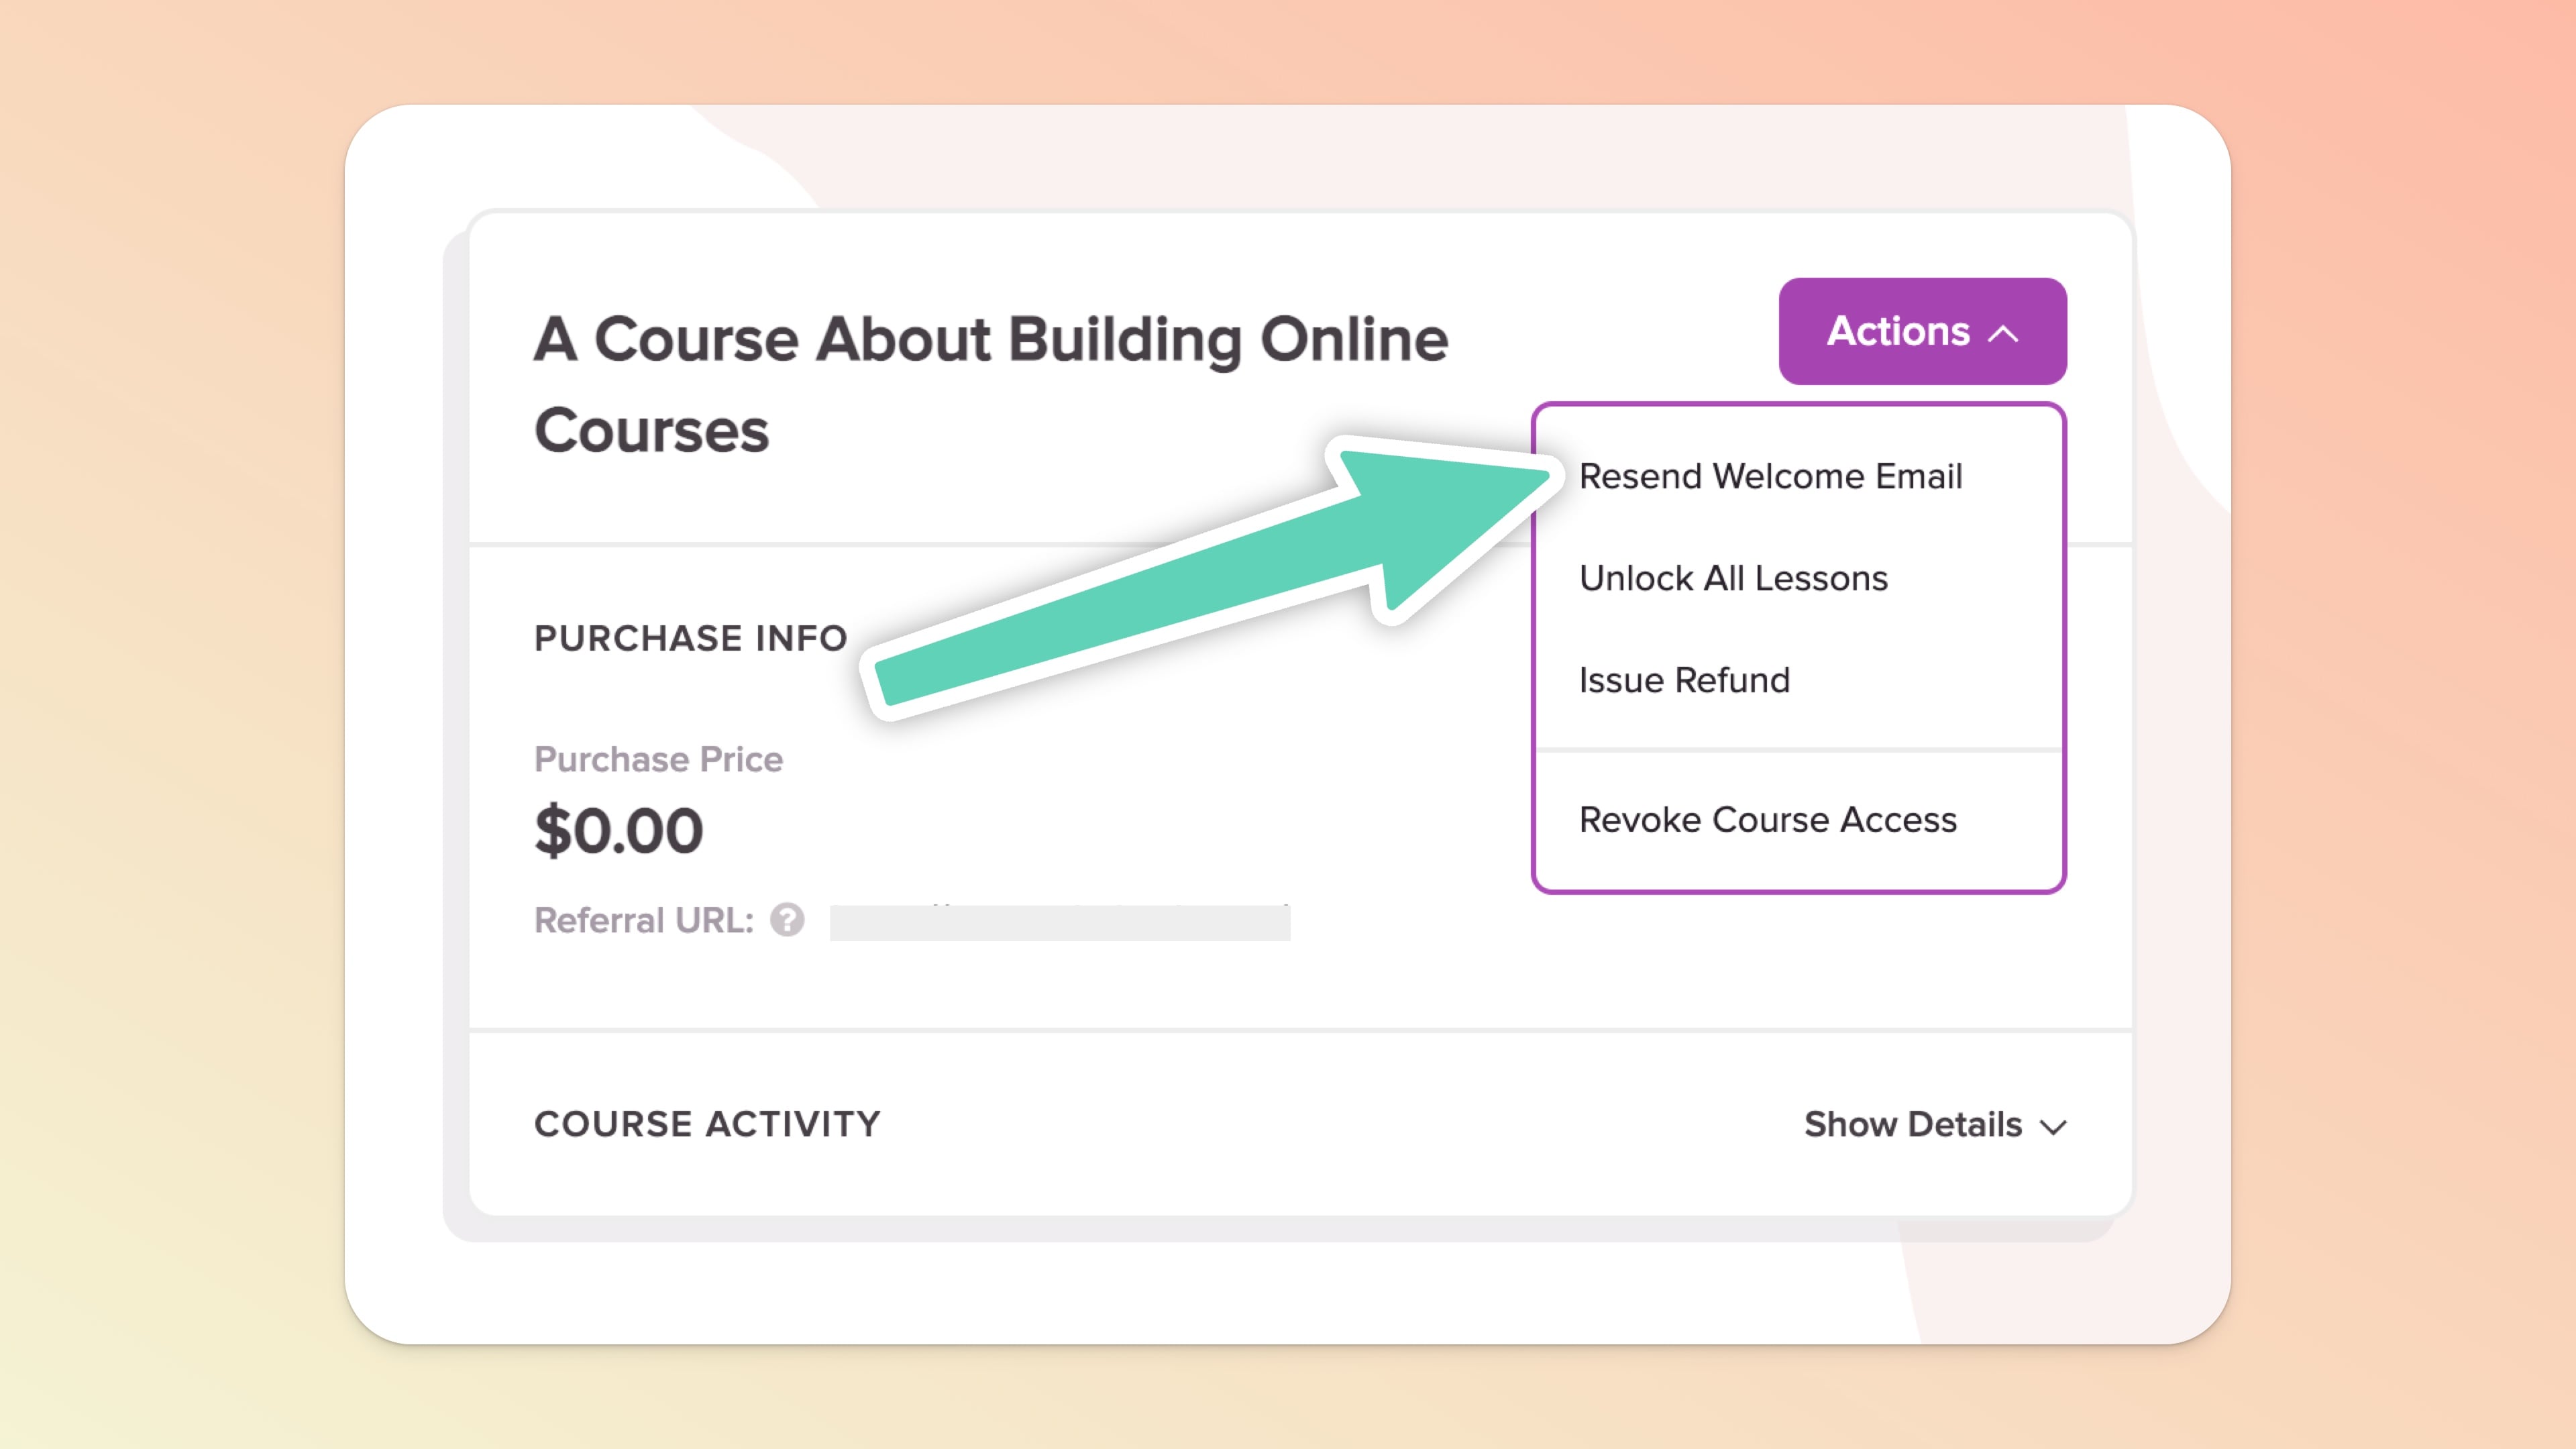
Head to your Customers page, search for your student's name or email address, click their name to jump into their Customer Profile.
Look for the appropriate course card and click the "Actions" button in the top right.
You'll find a "Resend Welcome Email" option. That will resend the welcome email and get your student back in action!

Inside your course, there are “Completed” buttons at the bottom of each course lesson (these are on by default).
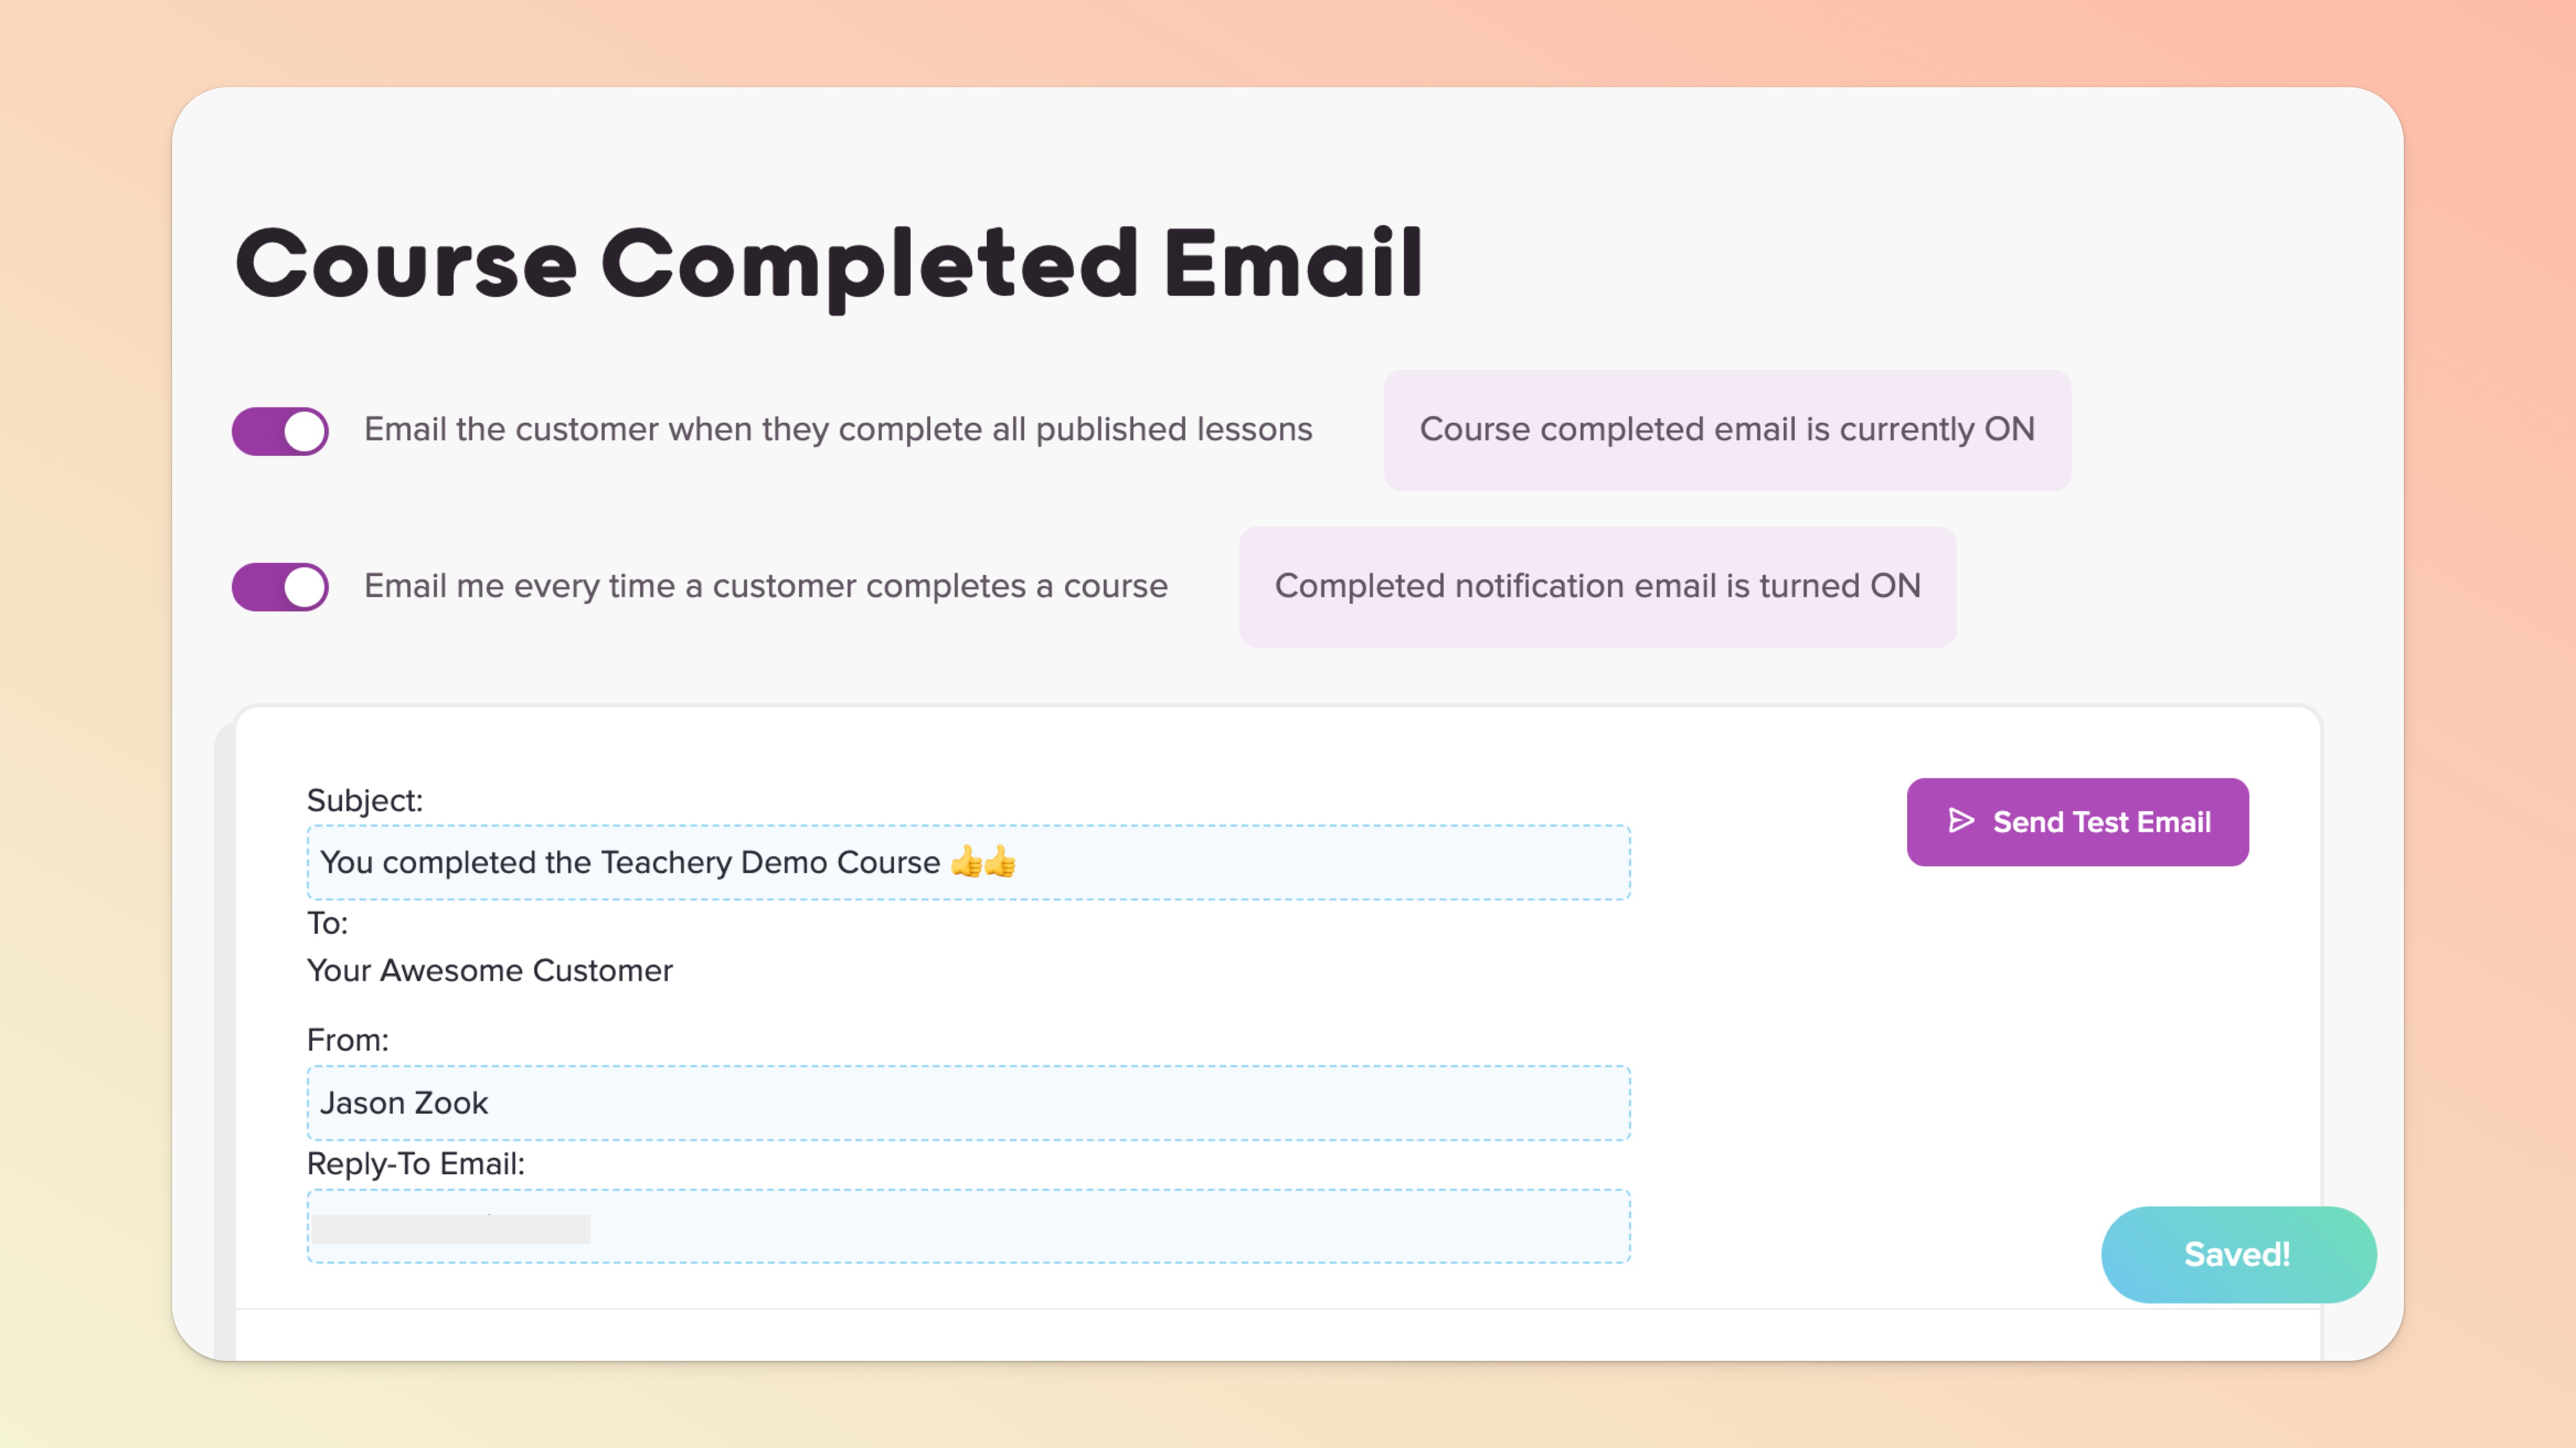
If your student goes through ALL your course lessons, hitting the completed button on ALL lessons, there is a Course Completed Email that automatically gets sent to your student.
From the main Teach page, click the course you want to edit
In the left sidebar, look for the Course Emails section
Click the Course Completed Email link and start editing 🌟
You can add your logo, change the email background color, and customize the content of this email like the Welcome Email.
Some course providers offer this service for you, but from extensive research we've heard that automatically generated certificates can have issues and can cause support headaches.
Instead, we recommend keeping this process very simple!
Does a generic Completion Certificate work?
If yes, create your Completion Certificate using Canva or any design program that works for you. Then, download the designed certificate as a PDF, JPG, or PNG file.
Edit your Course Completed Email and upload your Completion Certificate to it.
Done and done!
Need a person-specific Completion Certificate?
If yes, then you'll create the Completion Certificate for your individual customer. Instead of adding the certificate to the Course Completed Email, you'll simply email your customer directly ✔.
You can turn these emails OFF and send your own emails, but we recommend leaving the Welcome Email on, as it has the important course login and password data.
