One of the things we know about Teachery is that we don't integrate with ALL the email providers or payment processors. Well, this is no longer an issue with our Zapier integration!
Already know about Zapier? Get started with our Teachery Zap Templates here (these are just a few examples to get you started, feel free to make your own Zaps using Teachery) - https://zapier.com/apps/teachery/integrations

If you want to sell your course outside of Teachery using something like PayPal, Clickfunnels, Thrivecart, Gumroad, etc, this is the zap you'll use to take the payment info and zap your customer INTO your course in Teachery.
(This is also a great zap to add your new customer to an automated email sequence you have for your course - do this in the same zap, too!)
When someone buys your course using our Teachery Payment Pages, you can zap their information into your email provider, customer spreadsheet, or many other options.
(This is great if you use an email provider other than Mailchimp, Kit, Flodesk, or Mailerlite as we already integrate directly with them).
If you take payment outside of Teachery and want to automate revoking a customer's course access when their payment plan is canceled, you can do this via Zapier. You can also use any other action your heart desires to trigger this!
If you use Teachery's Landing Pages to capture email addresses, you can then zap those email addresses into your email provider of choice or into a spreadsheet (or anything else you want to do with that data). If you read the step-by-step for options #1 and #2 this set up will be a piece of cake 👌.

If you want to send data from another payment provider (or any other app) into Teachery, this is for you.
If you take payment through PayPal, Clickfunnels, Woocommerce, Gumroad, Thrivecart, Etsy, Shopify, etc, or someone signs up for your email list (or any other app in Zapier), you can pass their name and email address directly into your Teachery Course.
We'll be looking at an example if you have a PayPal buy button on your website where someone can purchase your course and you want to automatically add that customer into your Teachery Course.
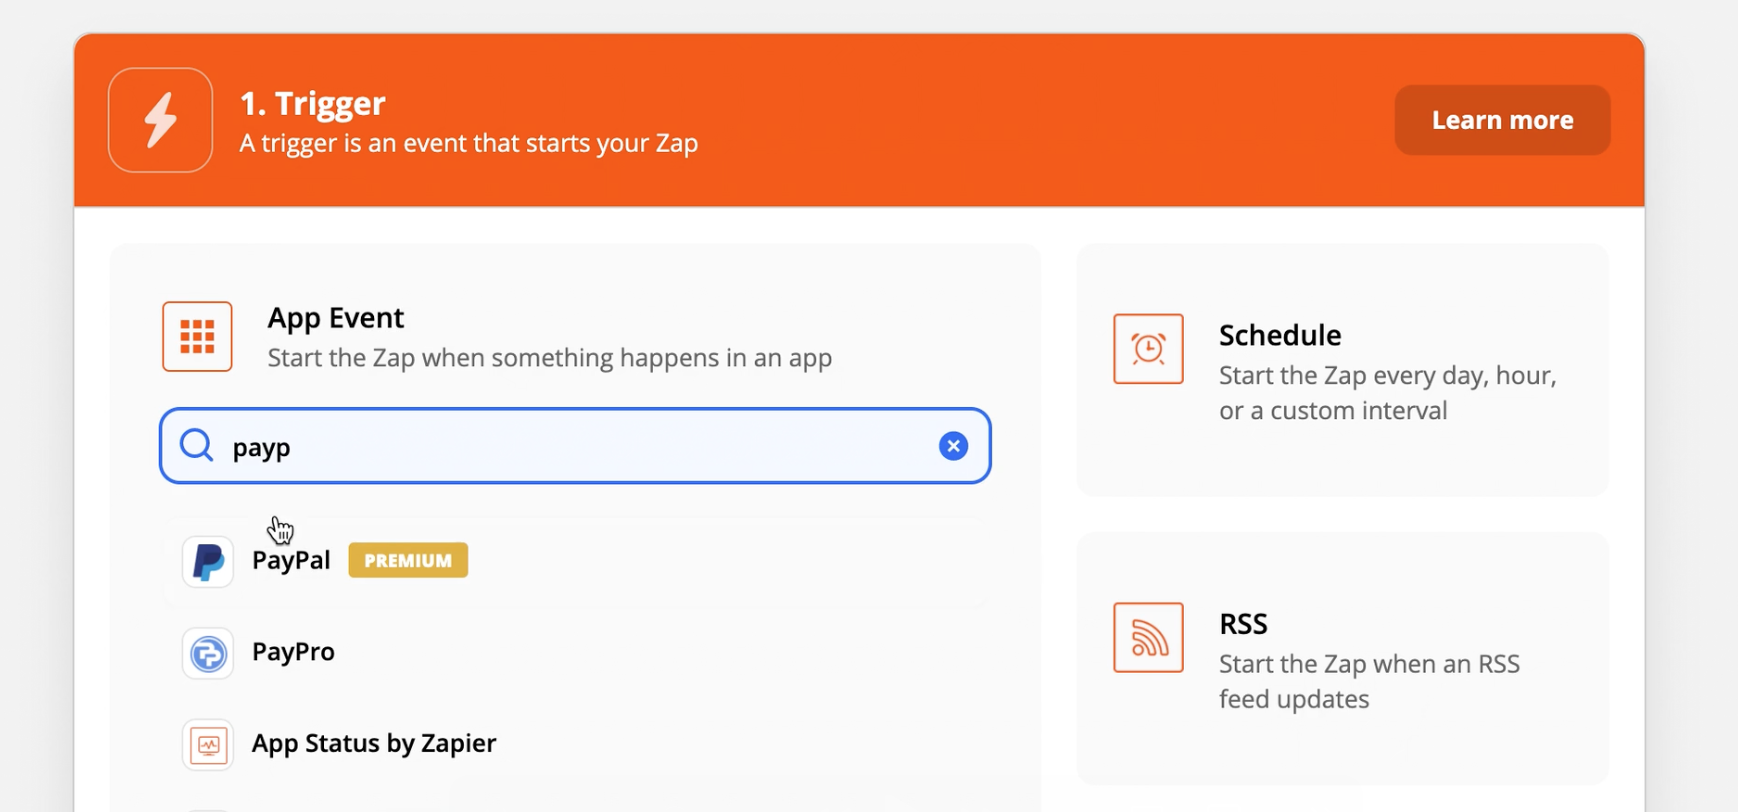
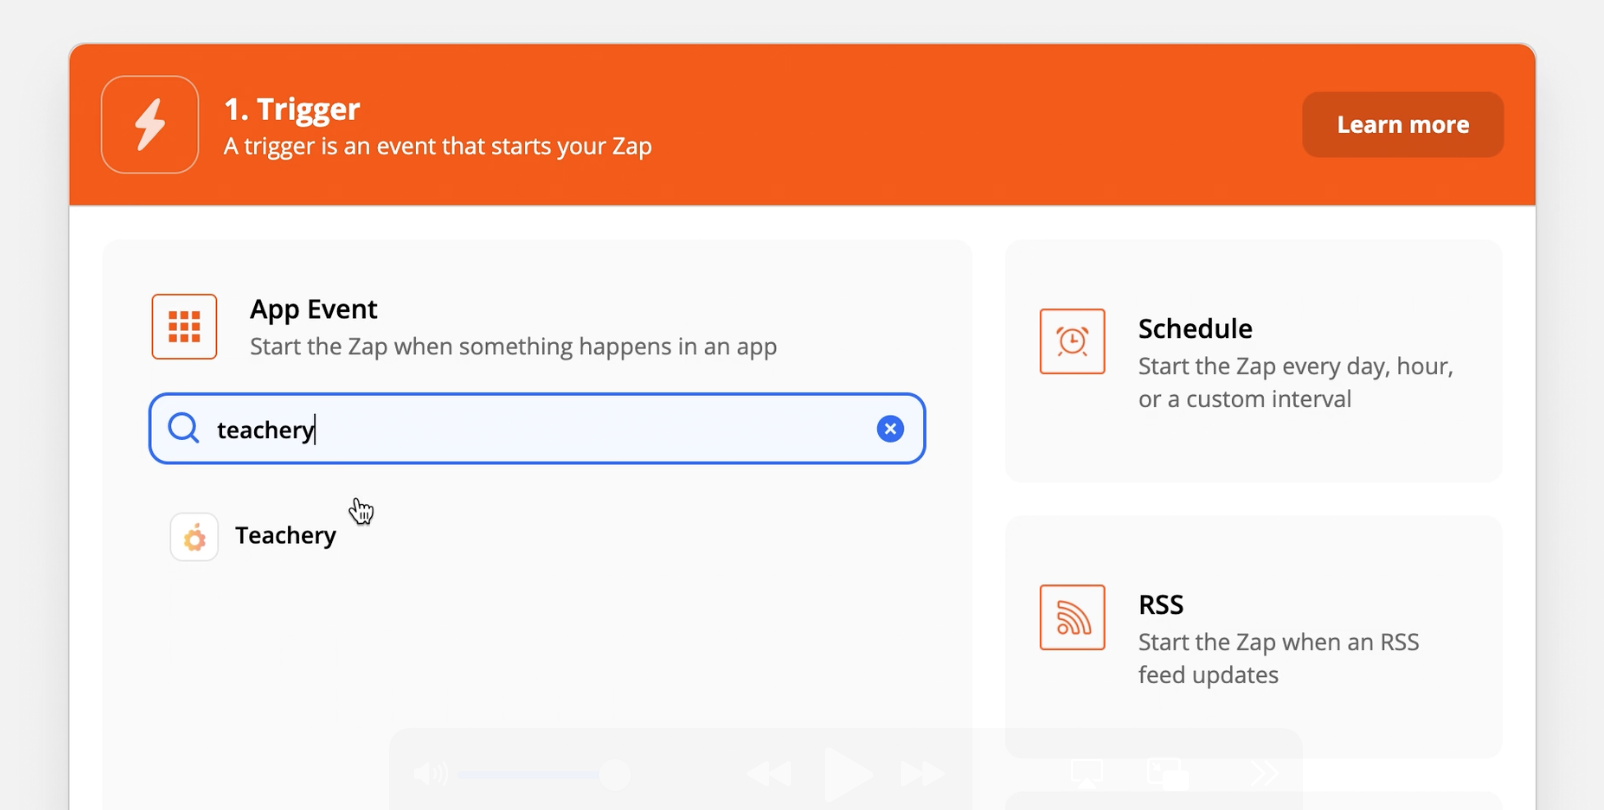
STEP #1: In Zapier, you're going to create a new Zap and choose your app of choice to start with (where the data is coming from that you want to send into Teachery). Our example will be PayPal.
NOTE: Many apps in Zapier are able to be used on the free Zapier account but PayPal is one that requires a paid Zapier account.
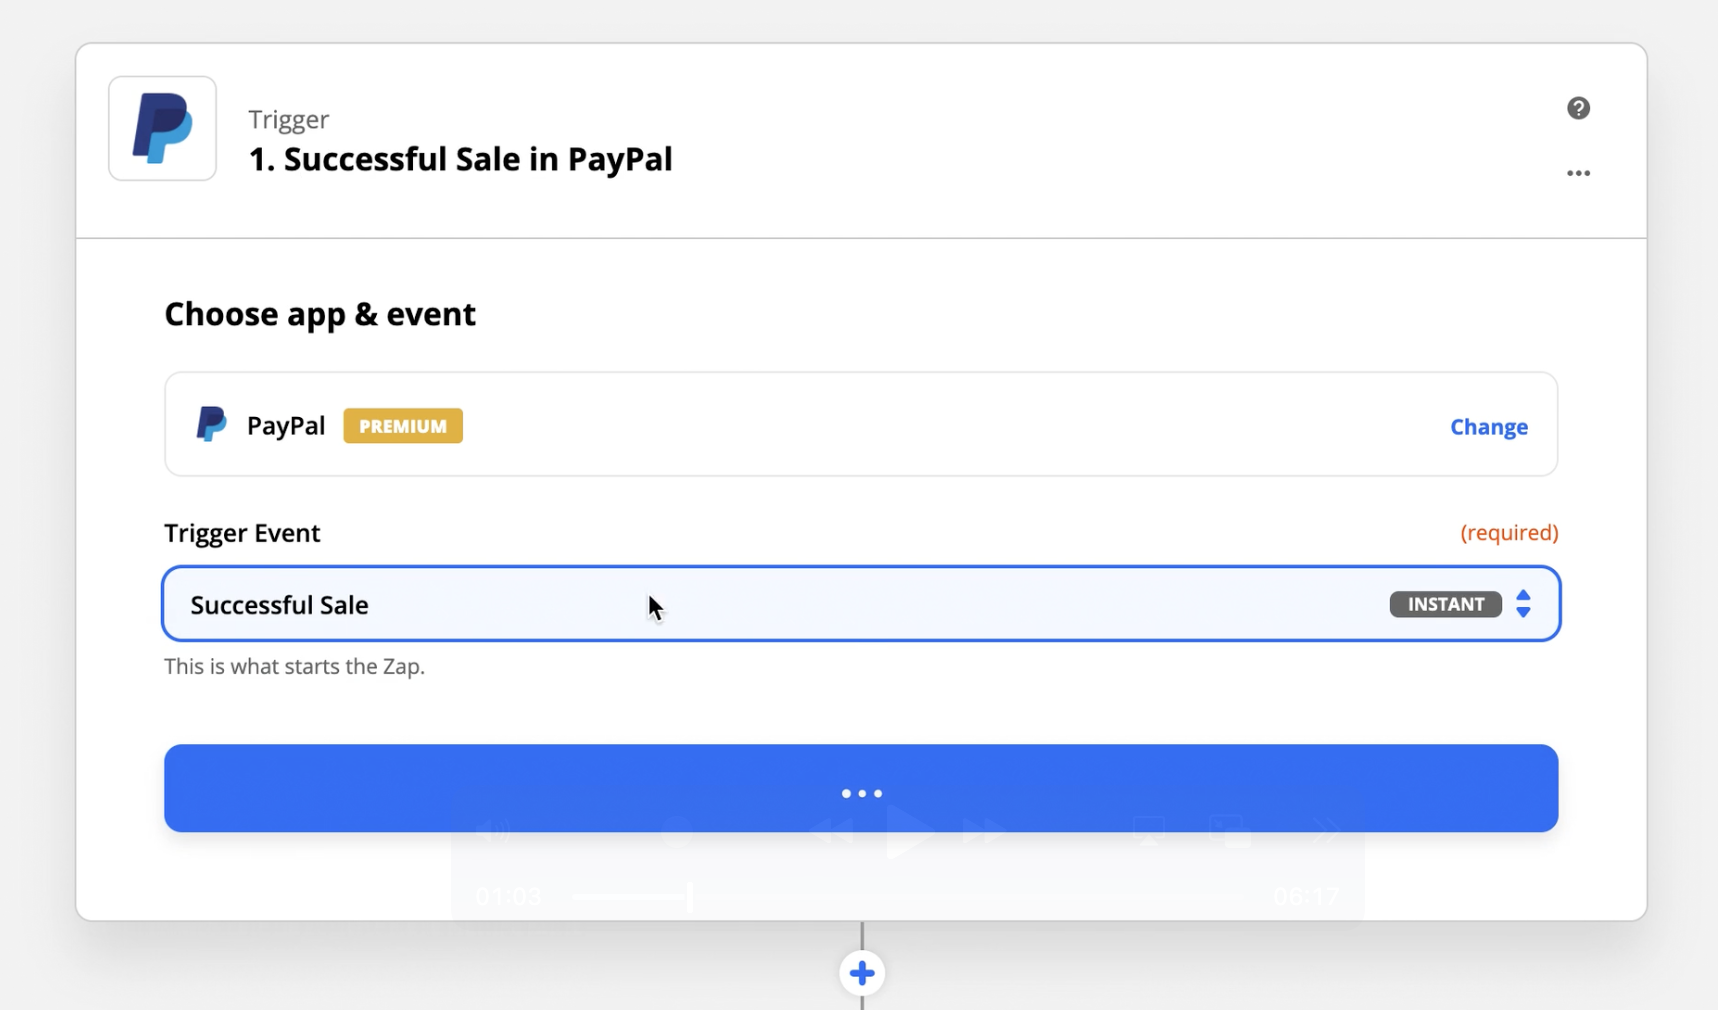
STEP #2: Select your Choose Trigger Event and you'll want to select the first "Successful Sale" option. This means ANY sale that comes through your PayPal account will trigger this Zap.
NOTE: In the walk-through video above, there's a section where we show you how to add a Zapier Filter just for this example!
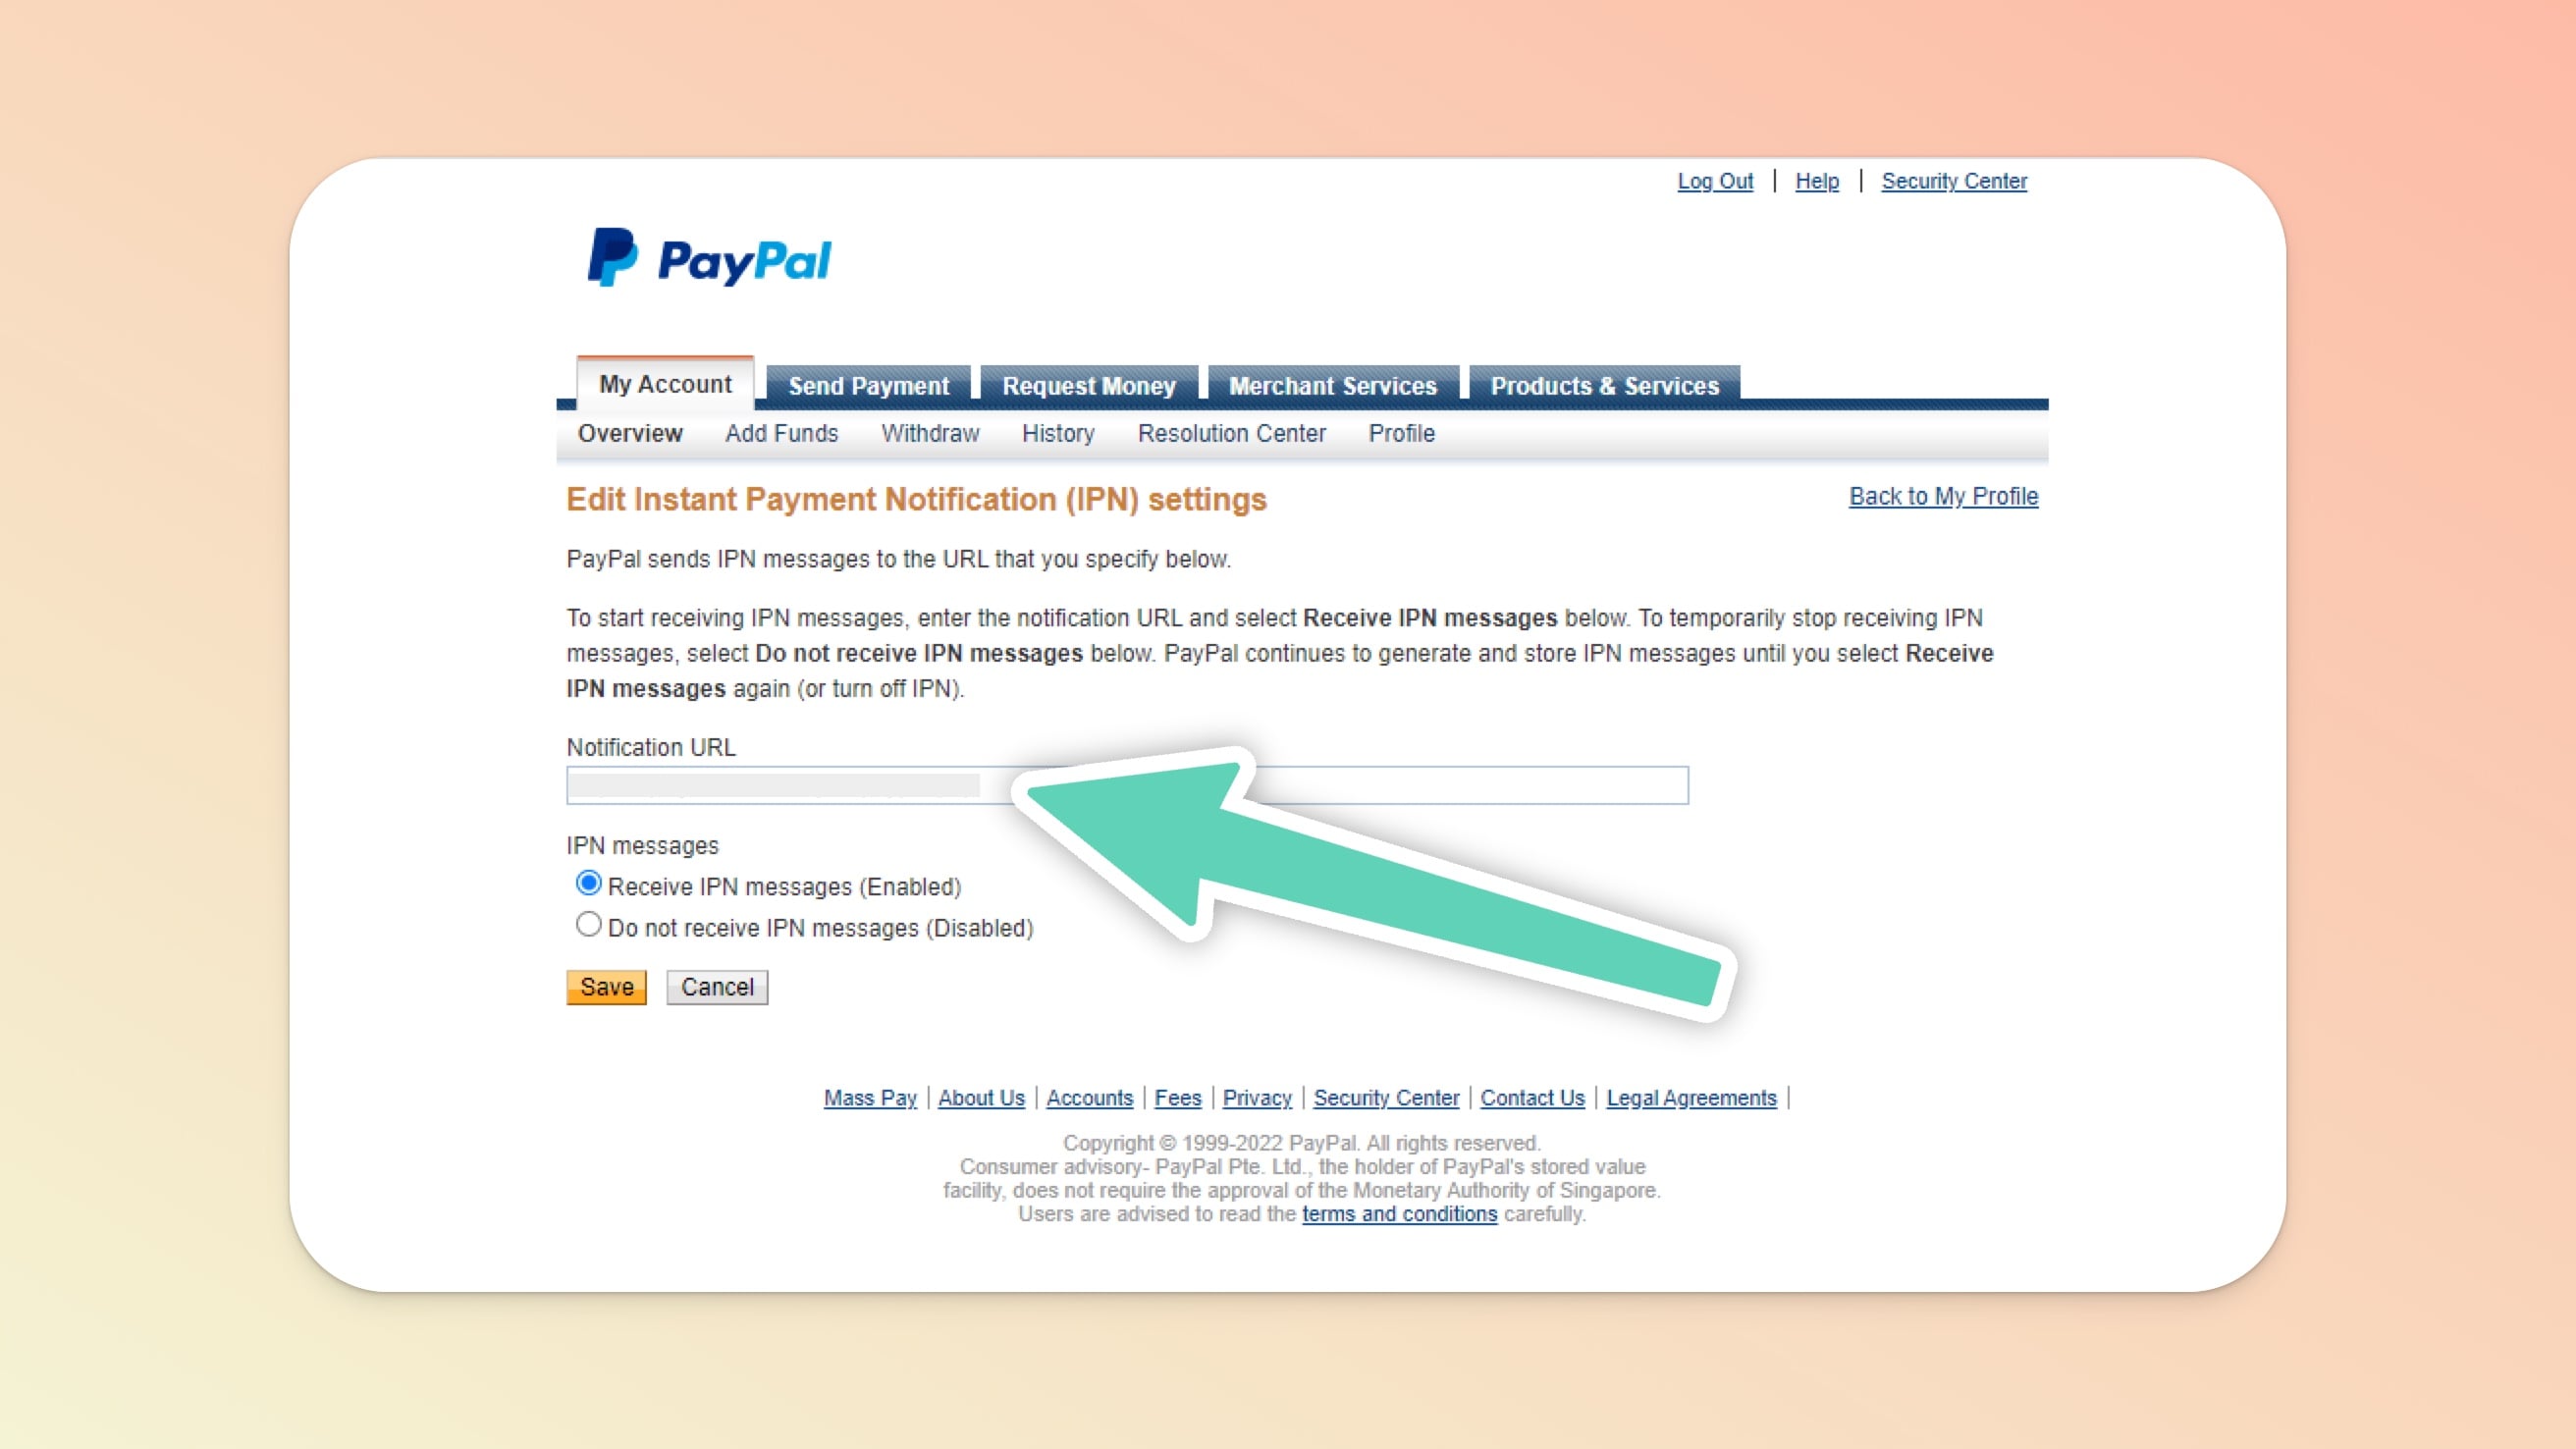
STEP #3: Add the Zapier webhook URL to your PayPal IPN Notification settings. This is the link Zapier provides of where to add this to your PayPal account.

If you cannot find where to add your IPN Notification URL in your PayPal account feel free to Google it (only because PayPal changes the location of this setting from time to time). Once you add this IPN URL you'll continue.
STEP #4: Pull in your Test Data from PayPal and review it. This is great for you to be able to see where the Email Address, First Name, and Last Name are located in the PayPal purchase data (you'll use these in the Teachery step of the Zap!)

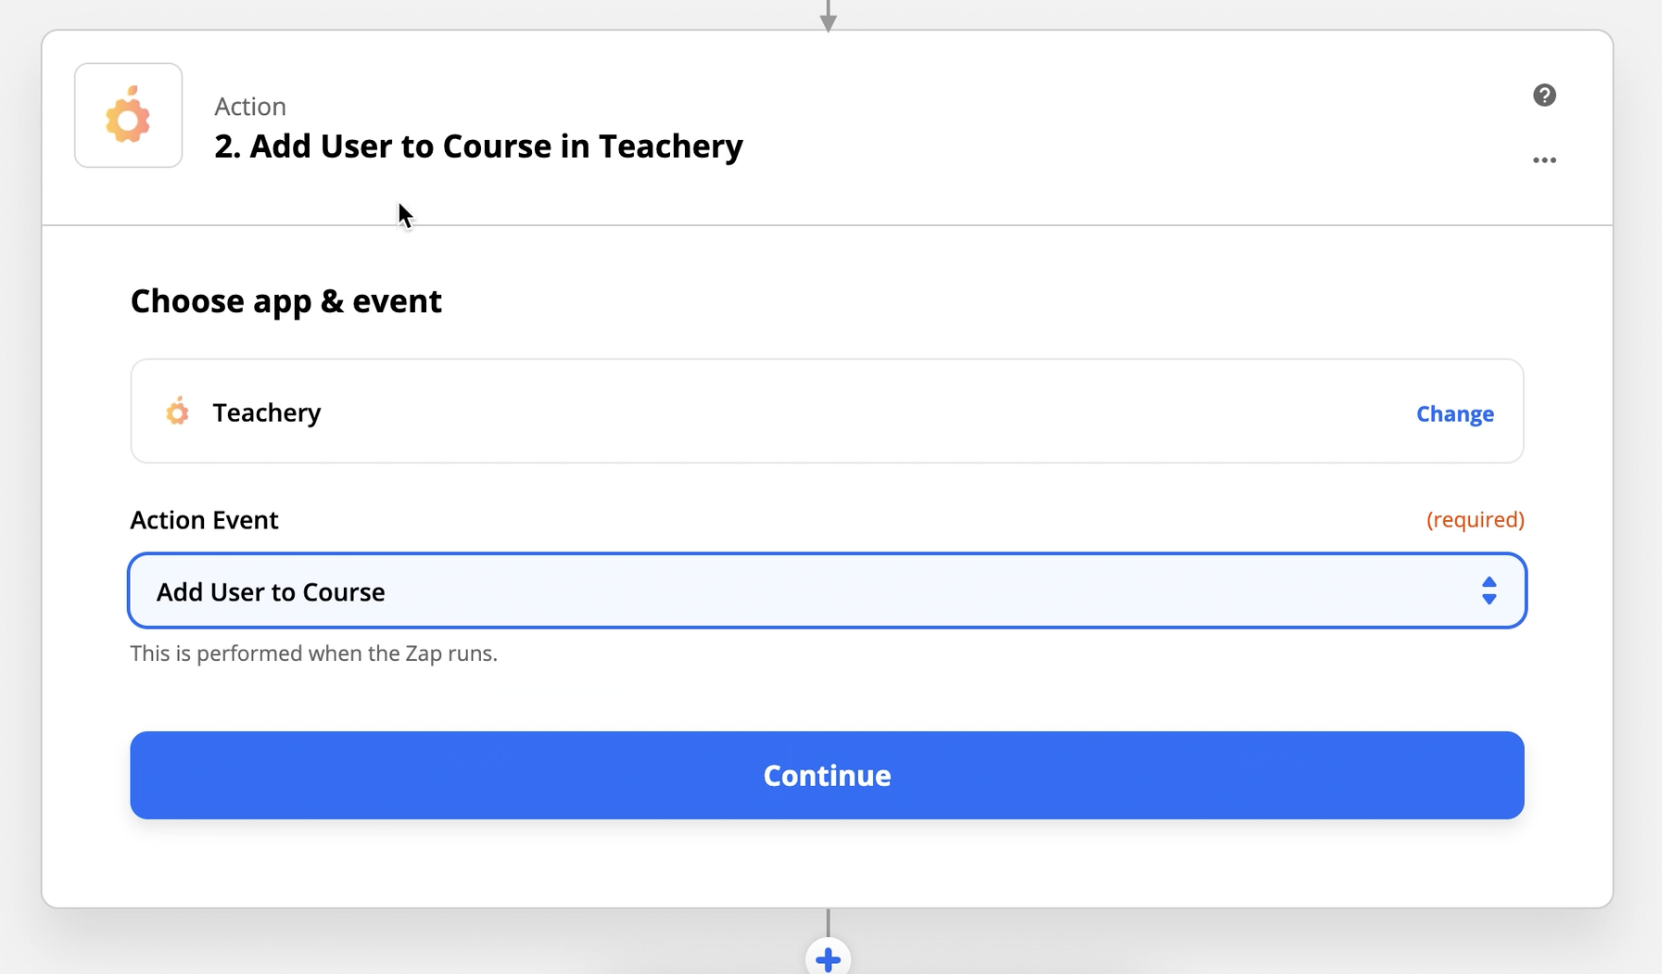
STEP #5: You're done with the first trigger of your Zap! Now let's connect your Teachery account as the second step in the Zap.
STEP #6: In the Choose Action Event the only action available will be "Add User to Course" which is what you want. This means you'll take the data FROM PayPal and add it TO Teachery.
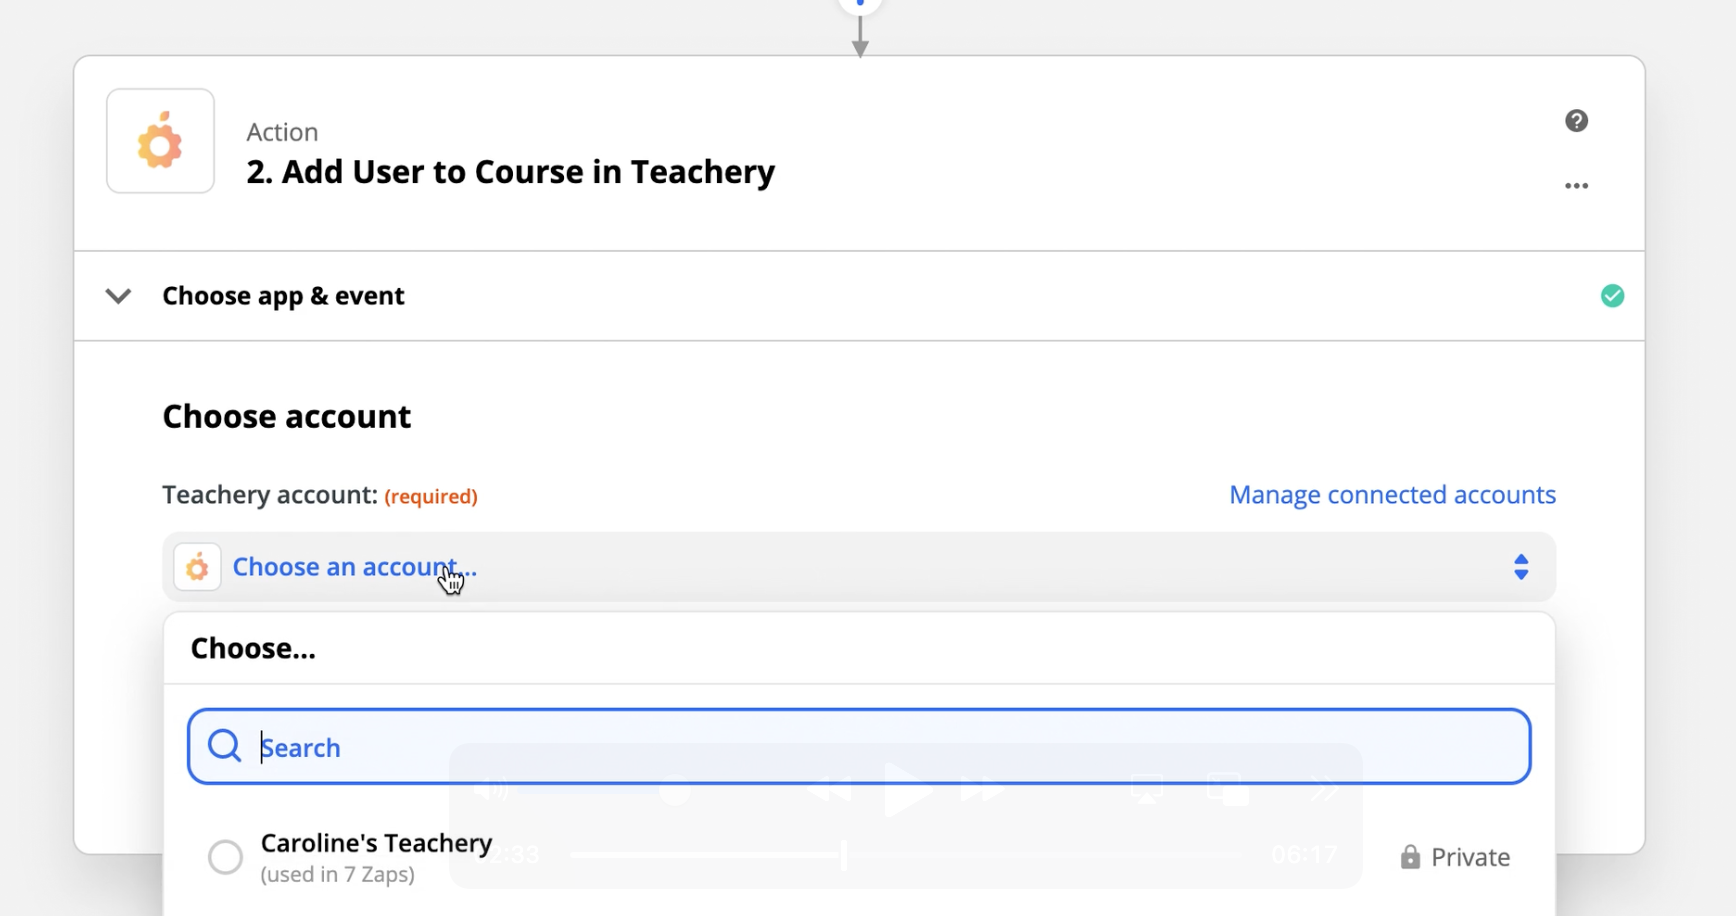
STEP #7: You'll connect your Teachery account to Zapier. Click the + Add a New Account link (I've already added my account in this screenshot)
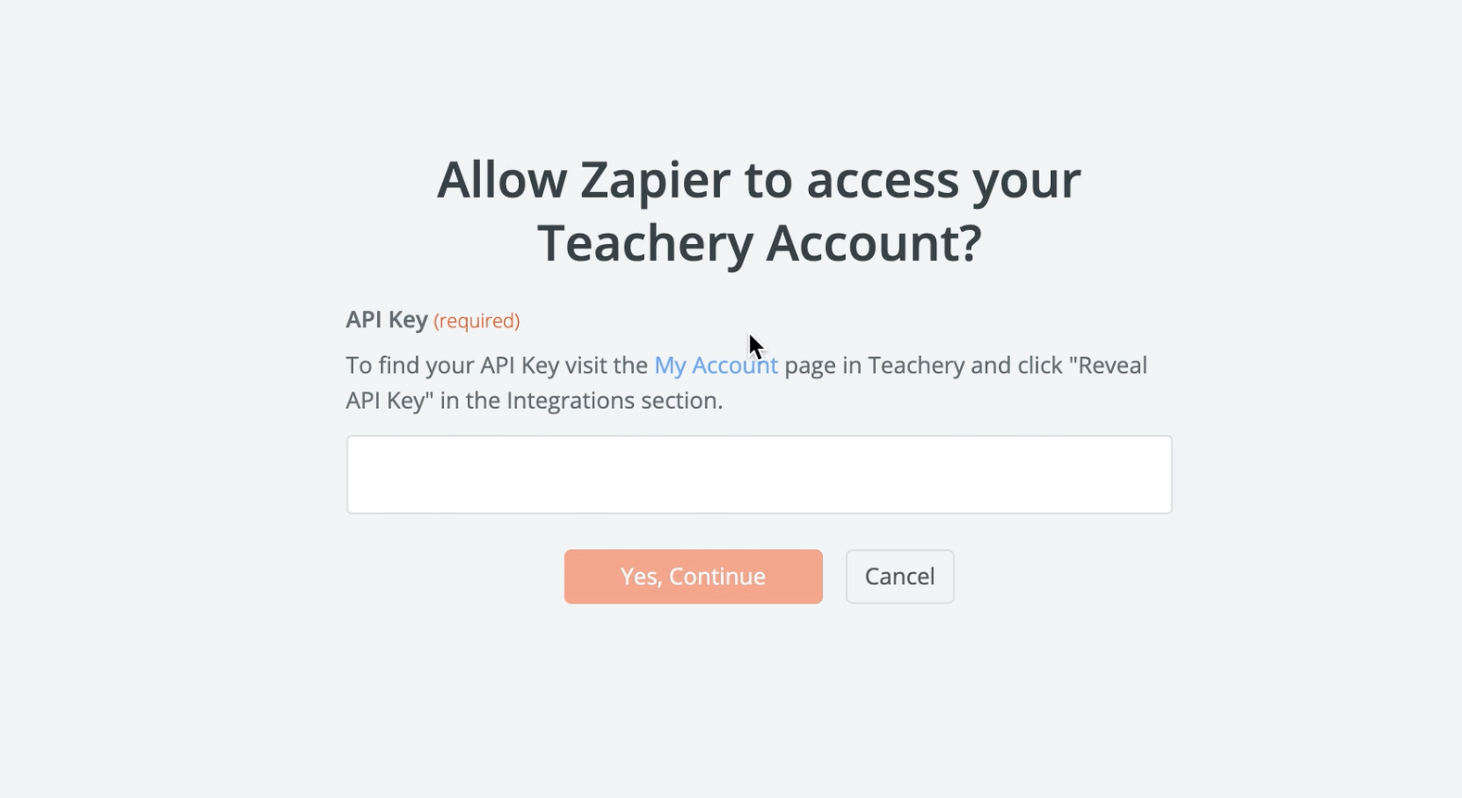
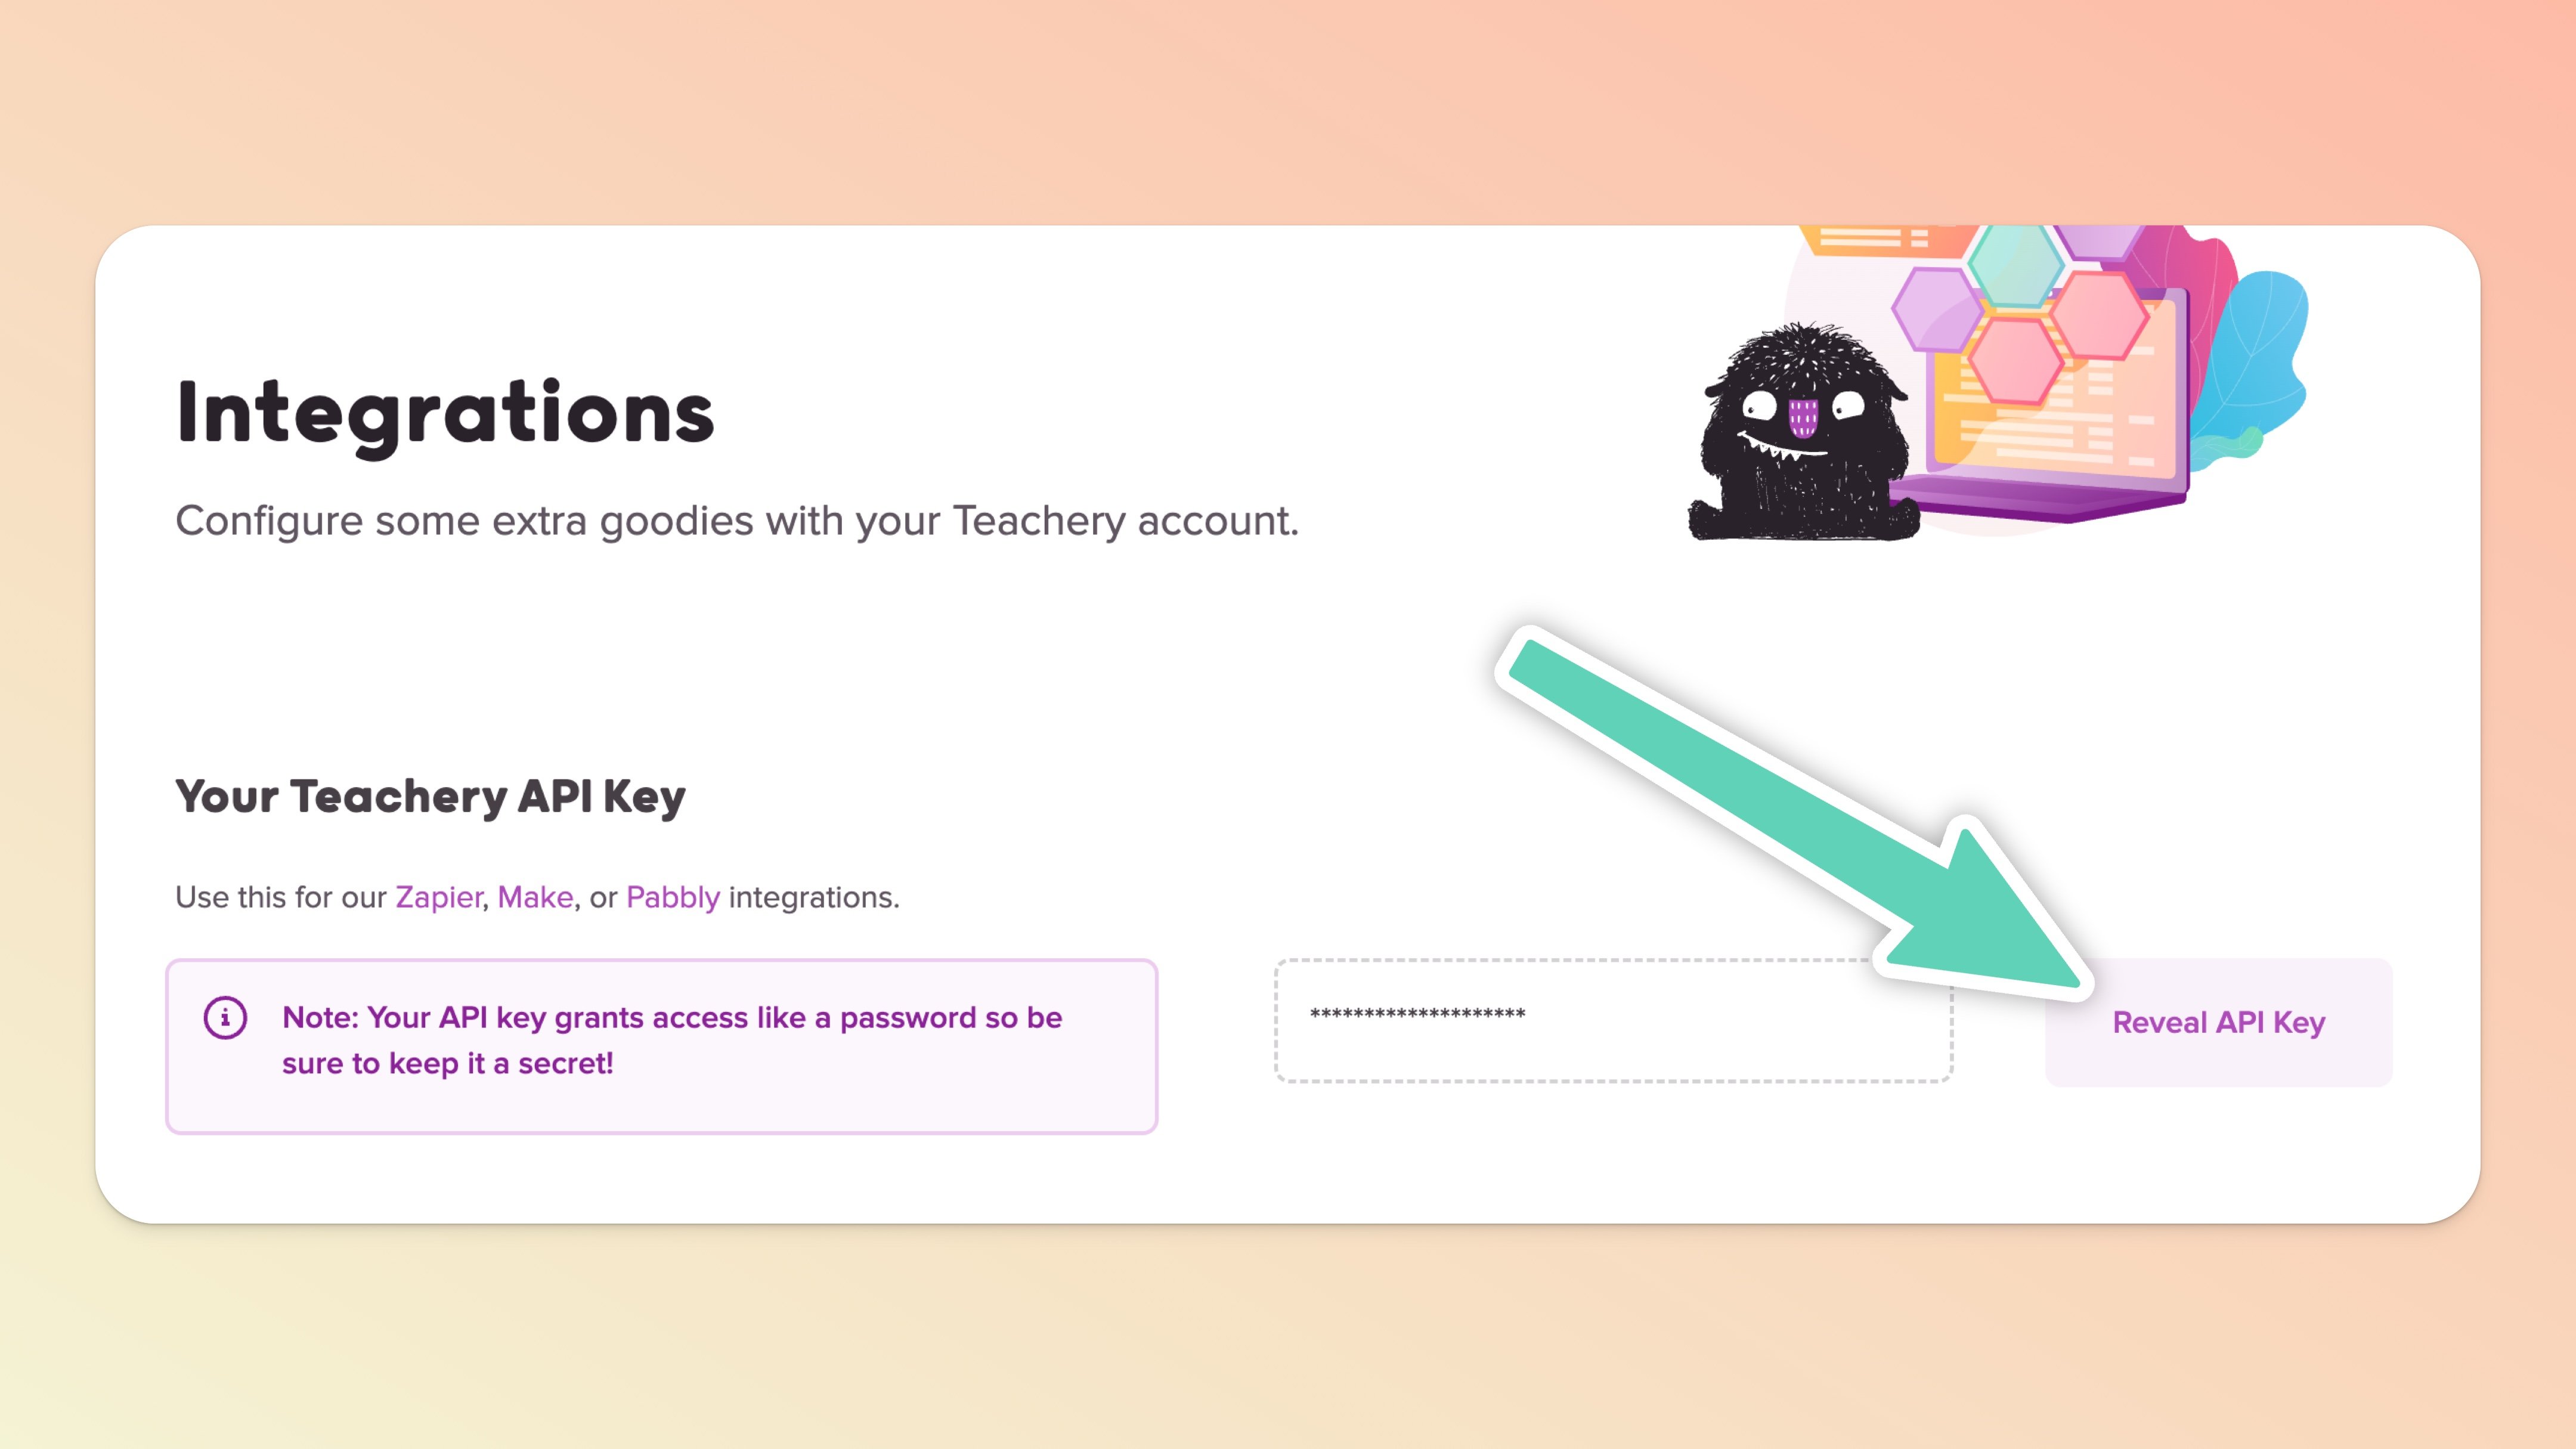
STEP #8: Zapier will open a pop-up window and ask you for your Teachery API Key. You can find this in your Account > Integrations section.

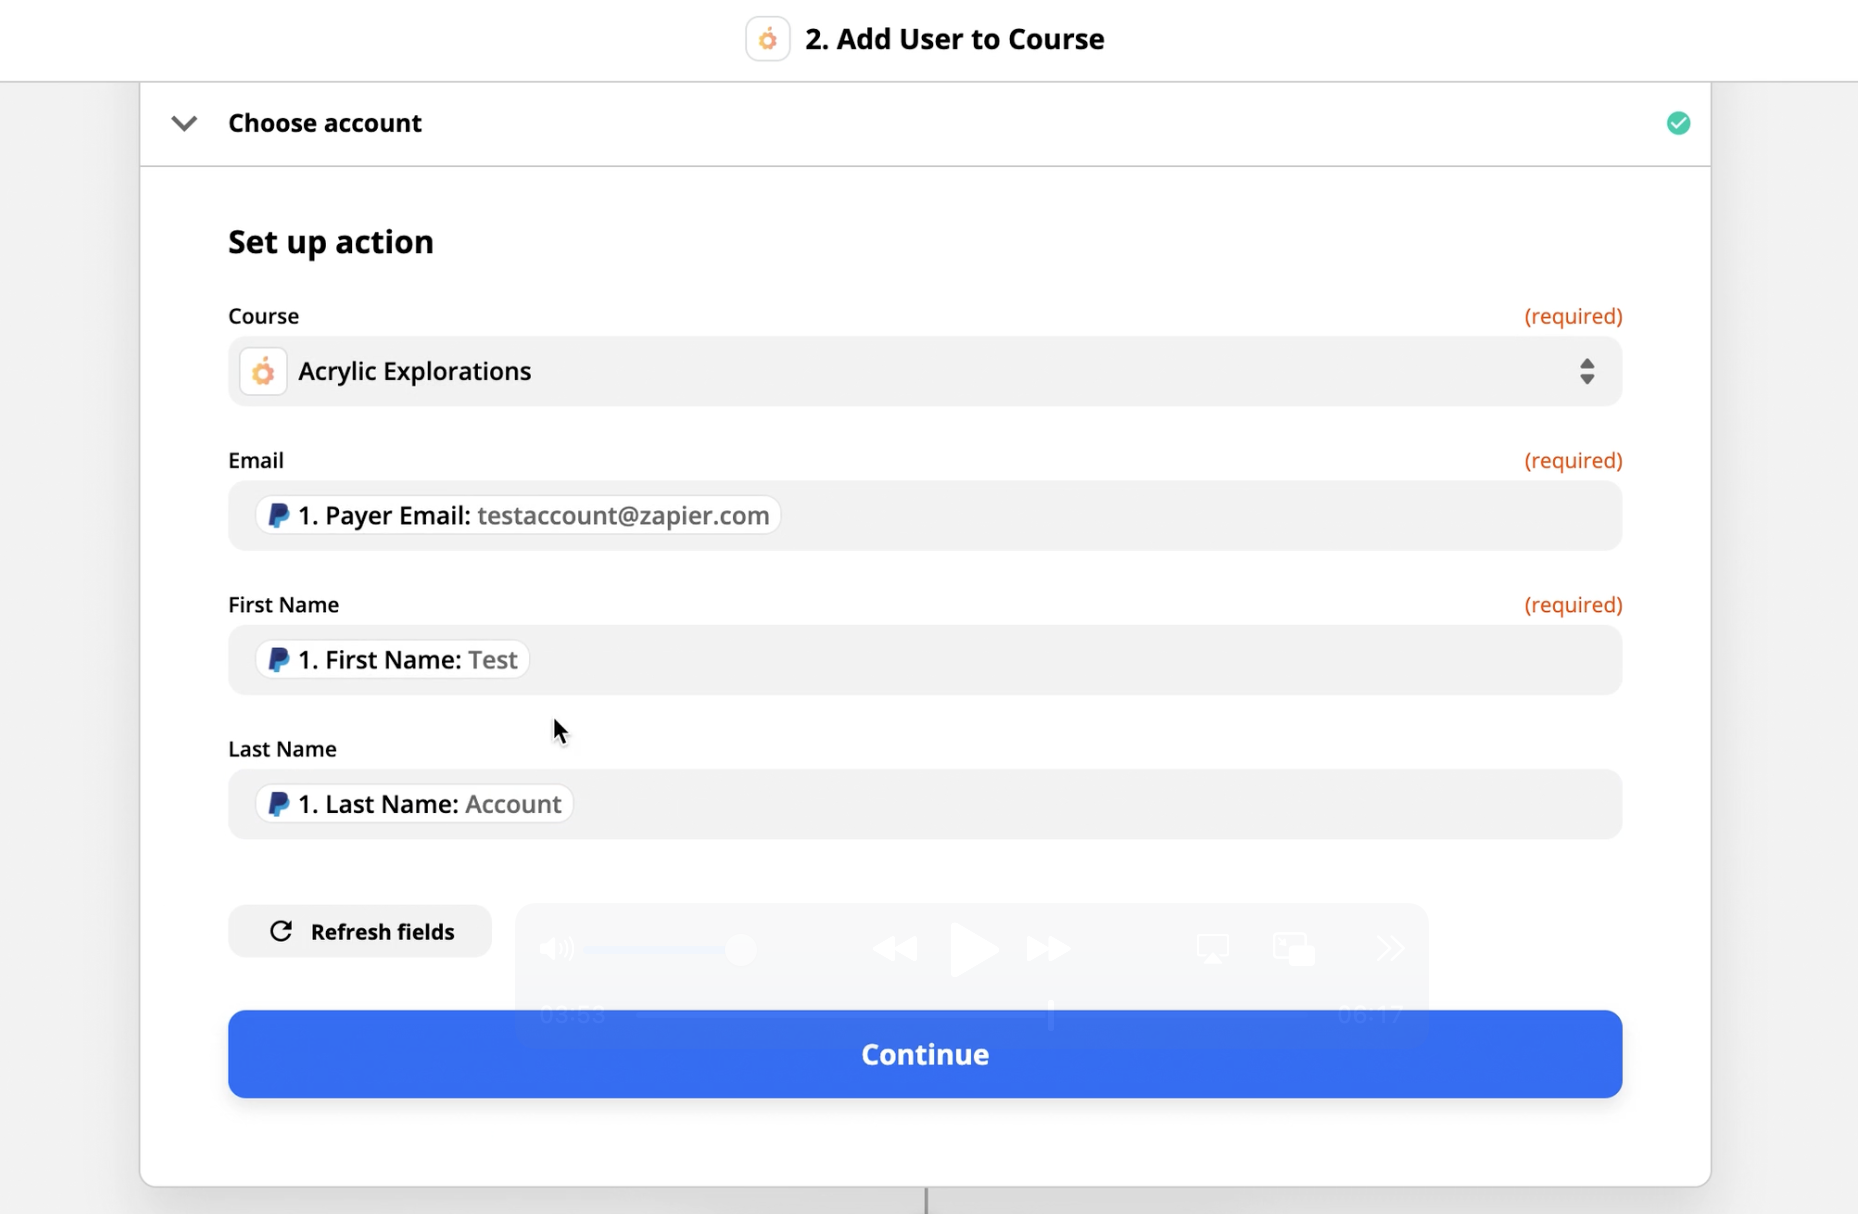
STEP #9: You'll choose what Teachery Course to zap your PayPal data into and then choose what PayPal data to pull from moving forward (this is where the Test Data from PayPal comes in).
If you have multiple courses in Teachery, you'll see them in the dropdown list.
For Email, you'll select the "Payer Email"
For First Name, you'll find the "First Name" field*
For Last Name, you'll find the "Last Name" field*
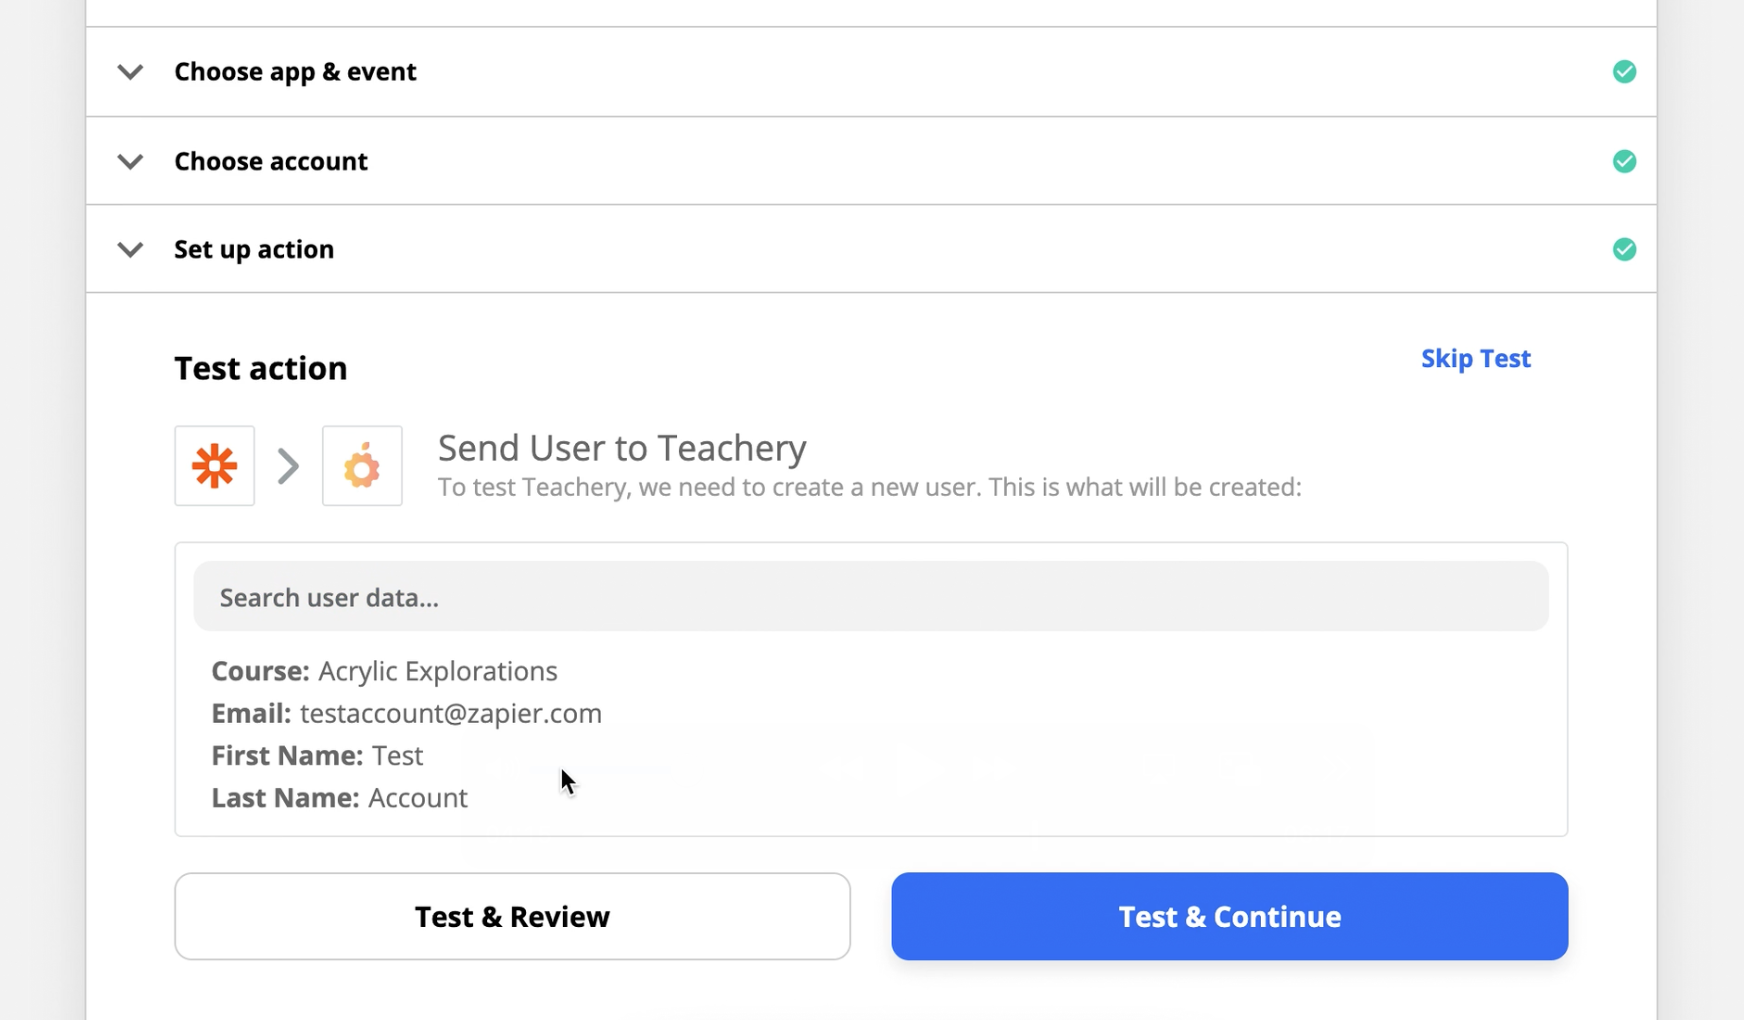
STEP #10: You'll Test & Review or Test & Continue.

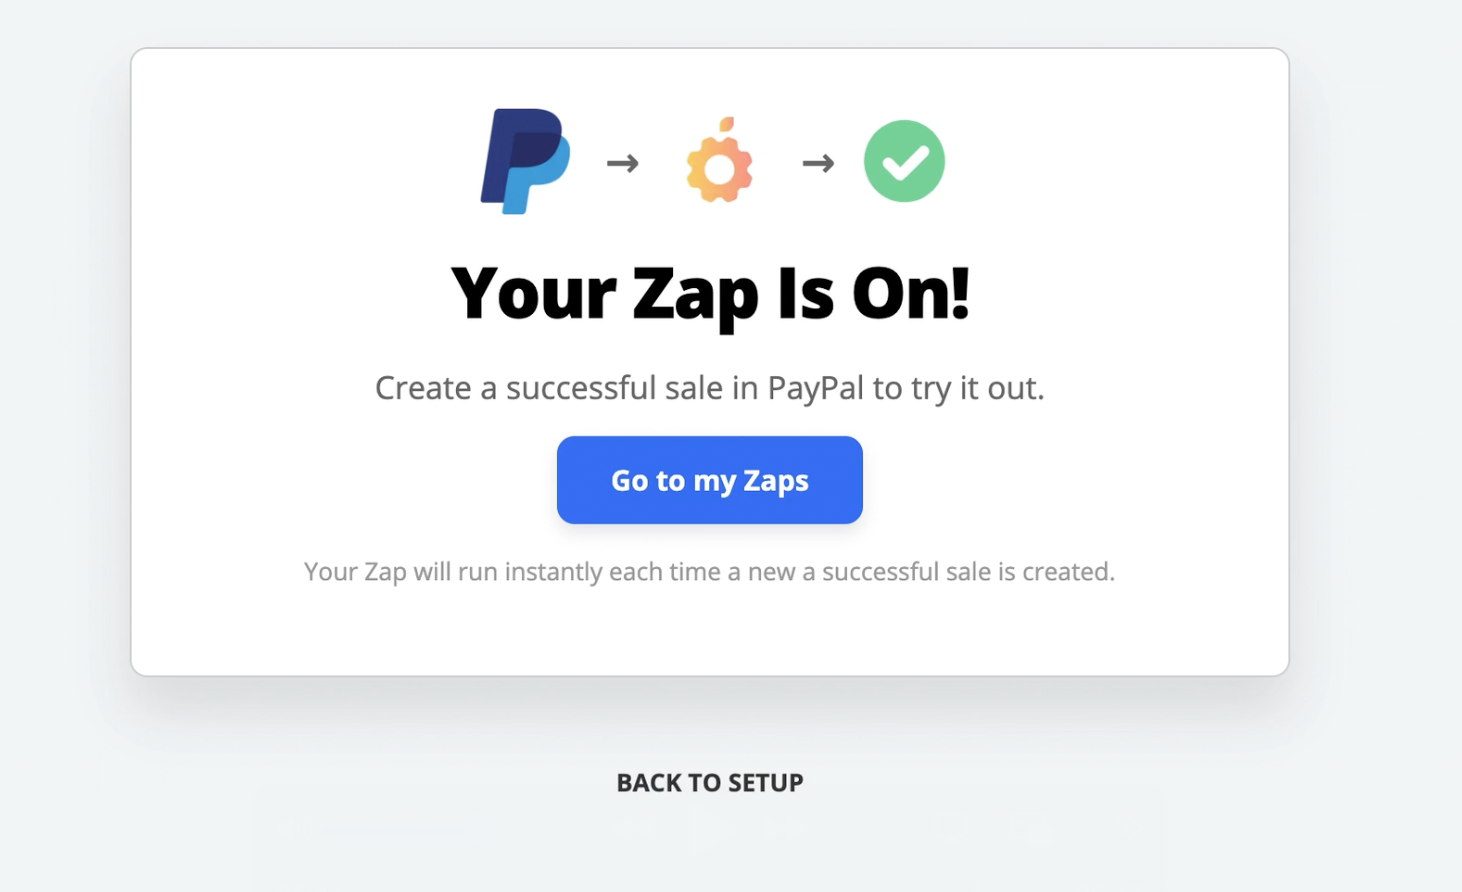
🎉 STEP #11: Your Zap is done and ready to be TURNED ON! (Don't forget!) Also, this is a great time to name your Zap OR if you want to add another step to the Zap you can also do that before turning it on.
After a customer purchases your Teachery Course using a Teachery Payment Page you'll send their name and email address to your email provider (or any other app in Zapier).
In this example, we'll be grabbing the customer information from a Teachery Payment Page purchase and sending that information to an email provider (Active Campaign or Drip).
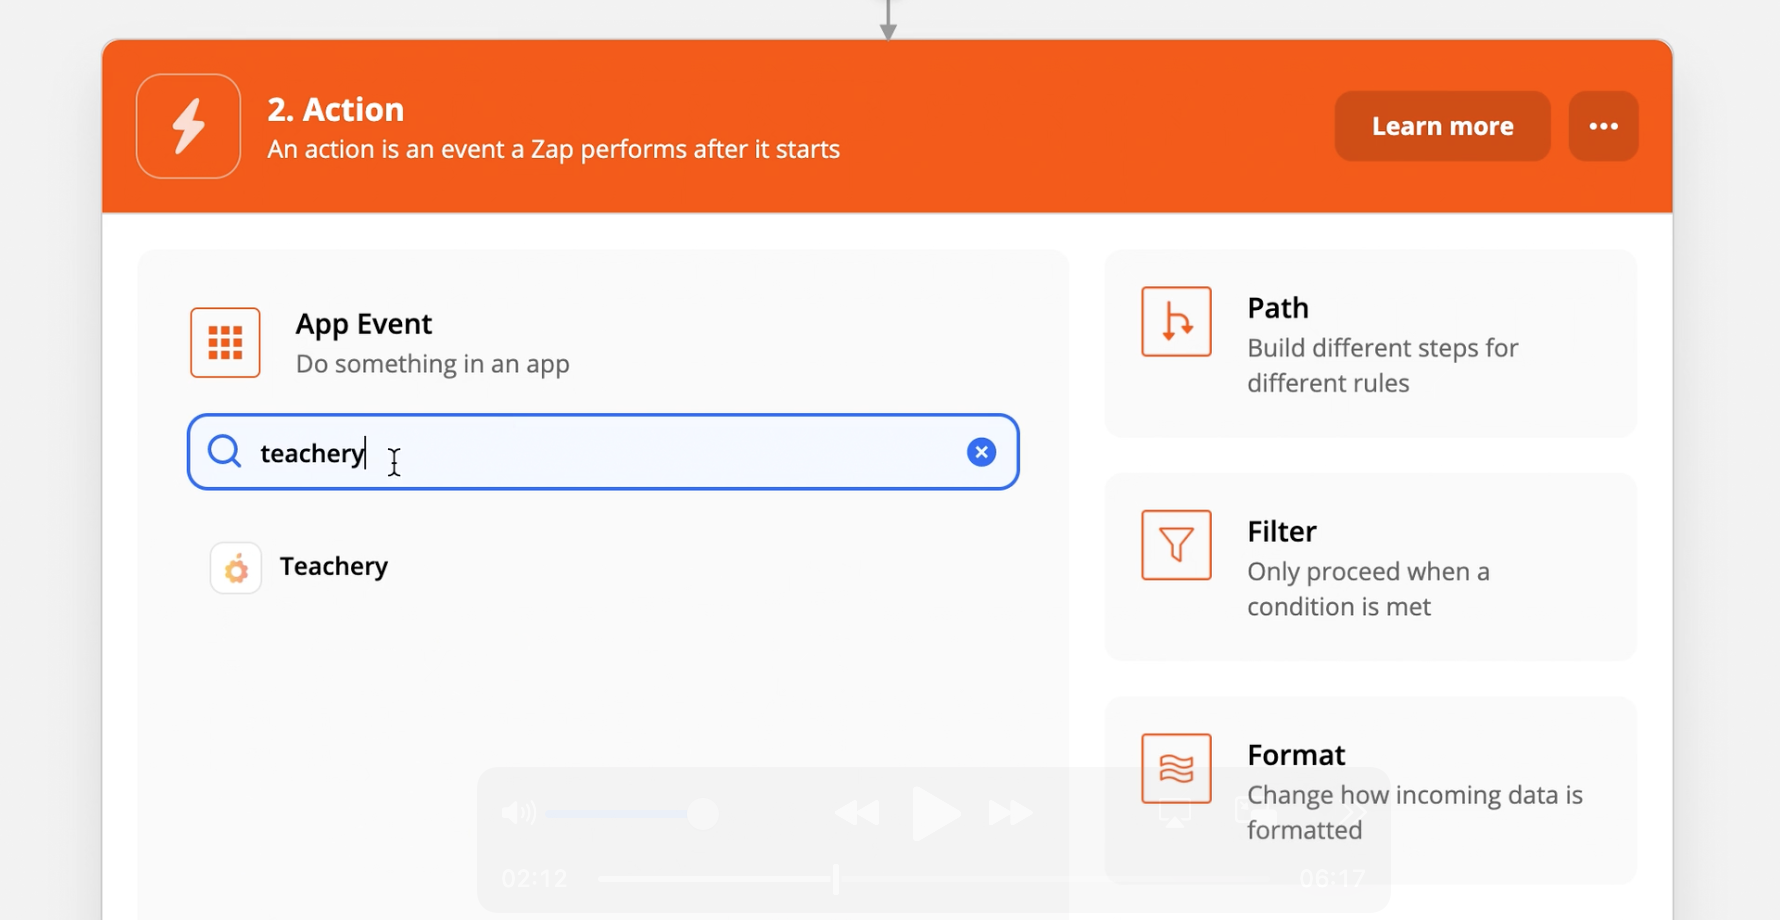
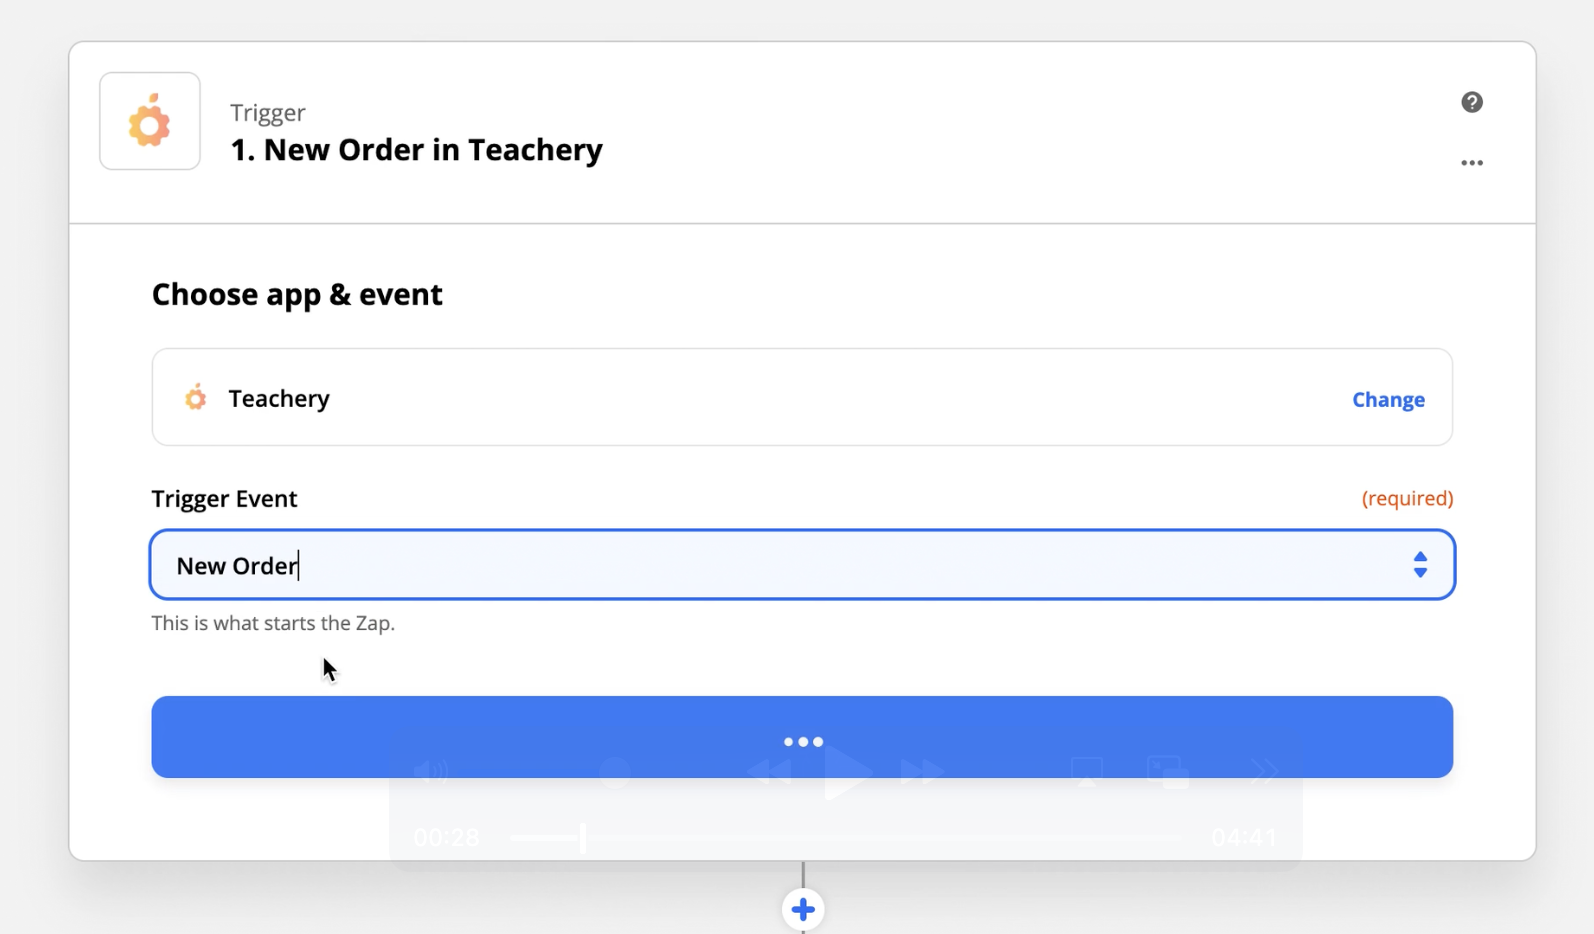
STEP #1: In Zapier, you're going to create a new Zap and search for Teachery:
STEP #2: You'll select "New Order" in the Choose Trigger Event dropdown
STEP #3: You'll connect your Teachery account to Zapier. Click the + Add a New Account link (I've already added my account in this screenshot)
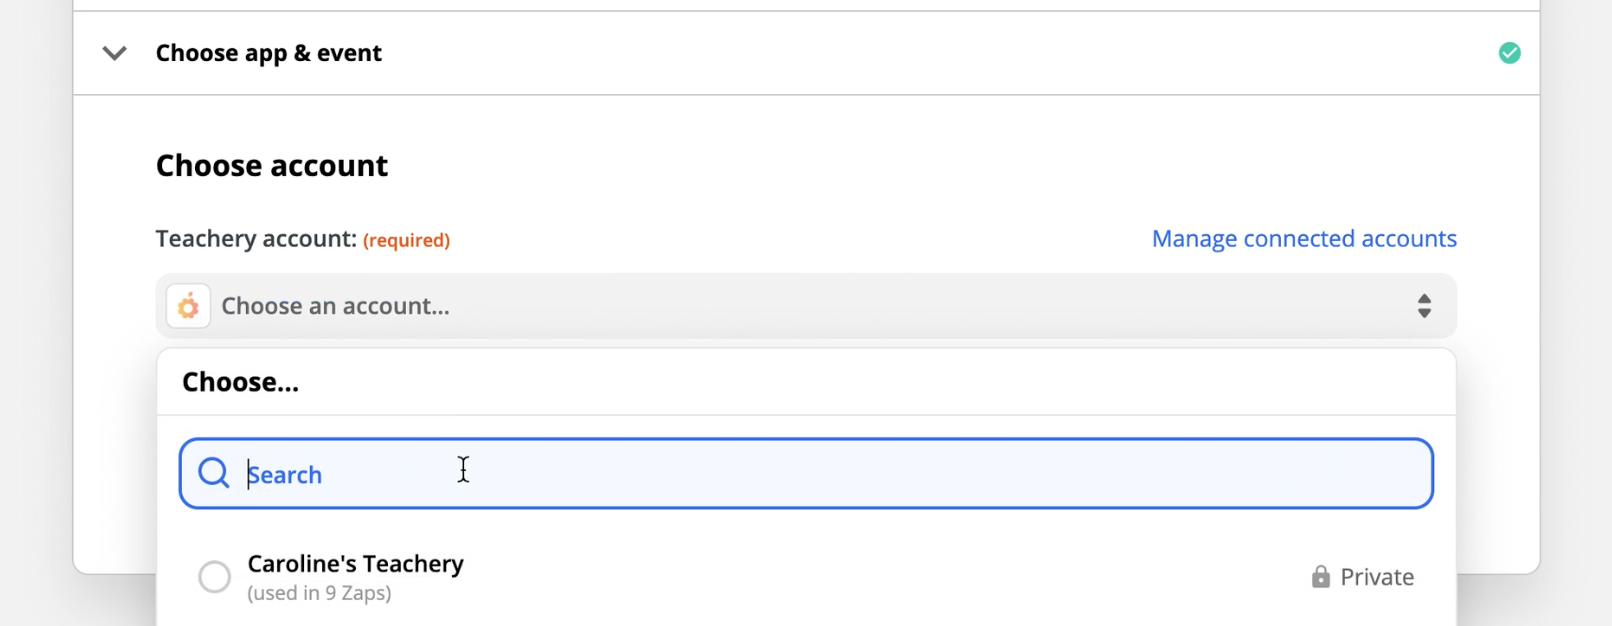
STEP #4: Zapier will open a pop-up window and ask you for your Teachery API Key. You can find this in your Account > Integrations section.
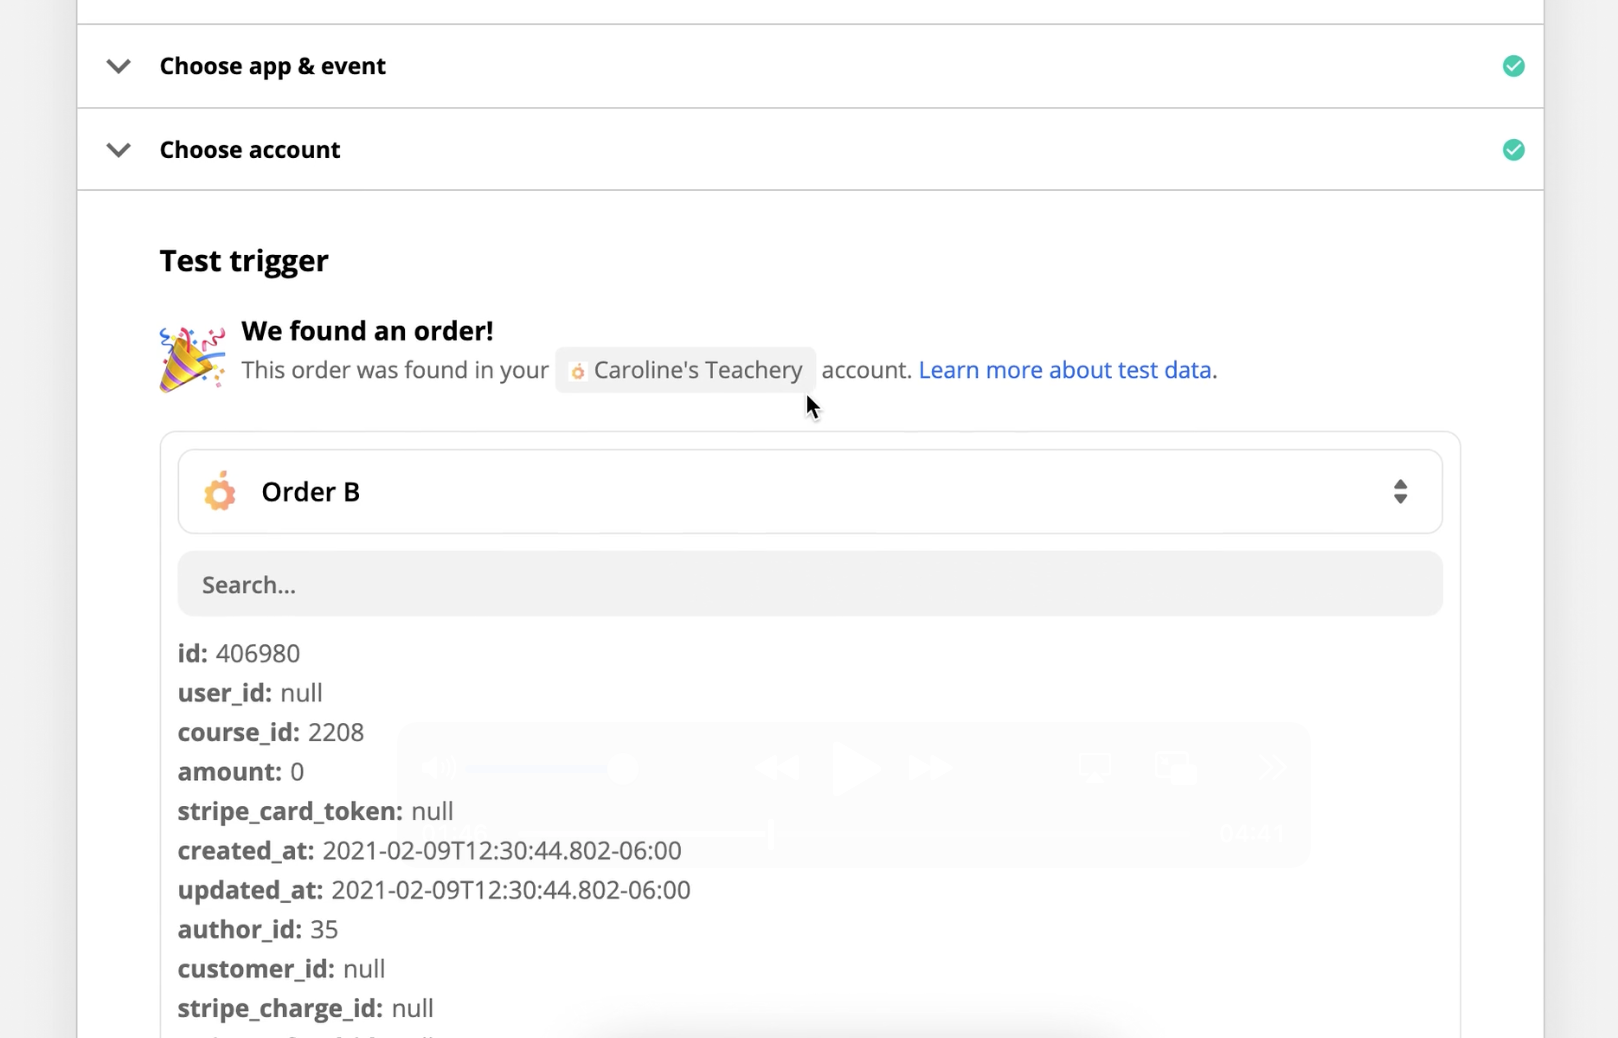
STEP #5: Grab some Test Data from your Teachery account. ⚠ If you DO NOT have any purchases of your courses yet, there won't be any test data (we recommend adding one purchase of your own course to have data to test with - you can refund your test purchase, but keep the customer info in Teachery).
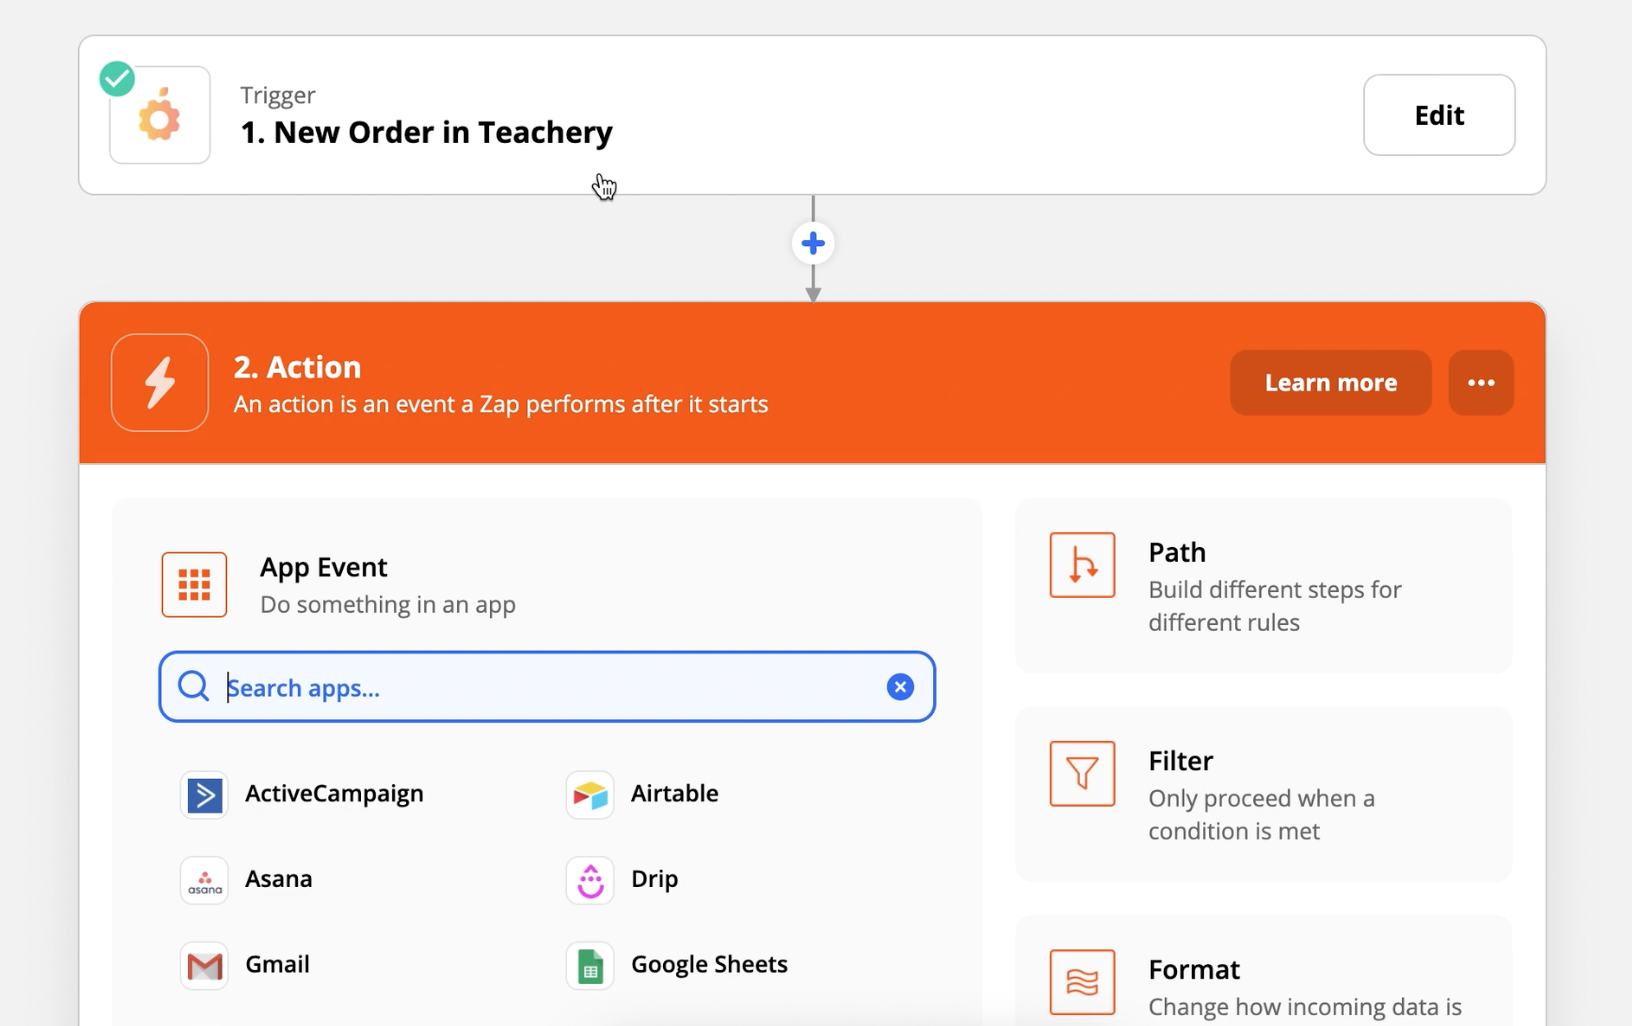
STEP #6: Once you finish grabbing Test Data, you can move on to the second step of your Zap, which is where you choose what app you'll zap your Teachery data INTO. Shown below, if you use Active Campaign as your email provider, you would Create/Update Contact.
NOTE: Depending on where you want to send your Teachery Customer data, the Action Event will be different!
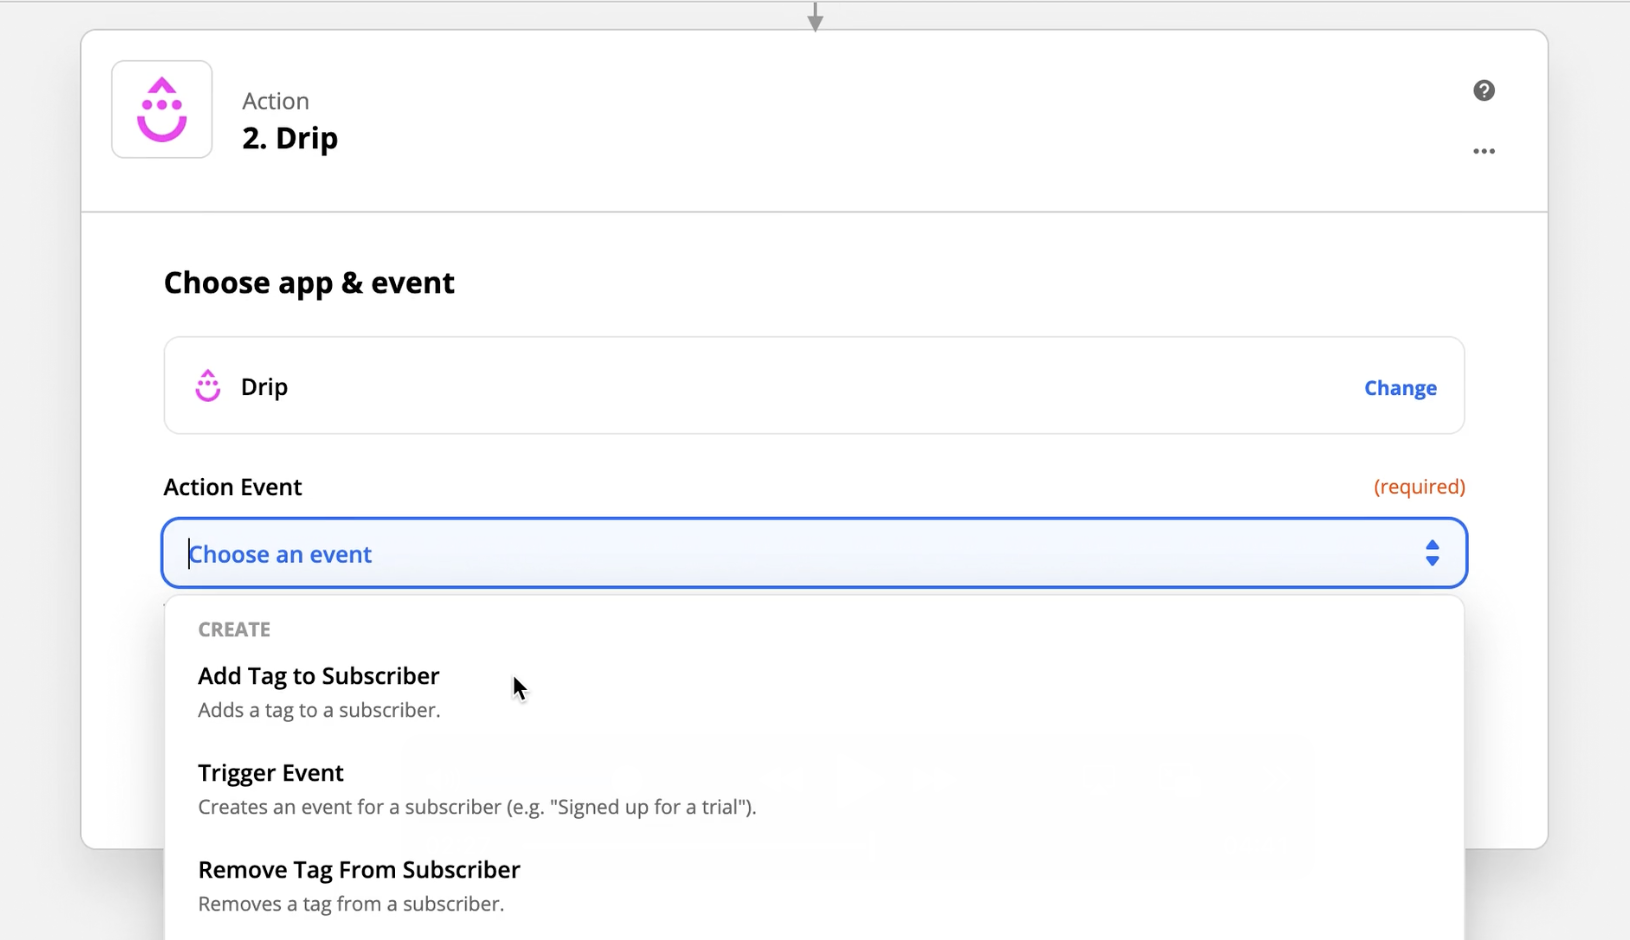
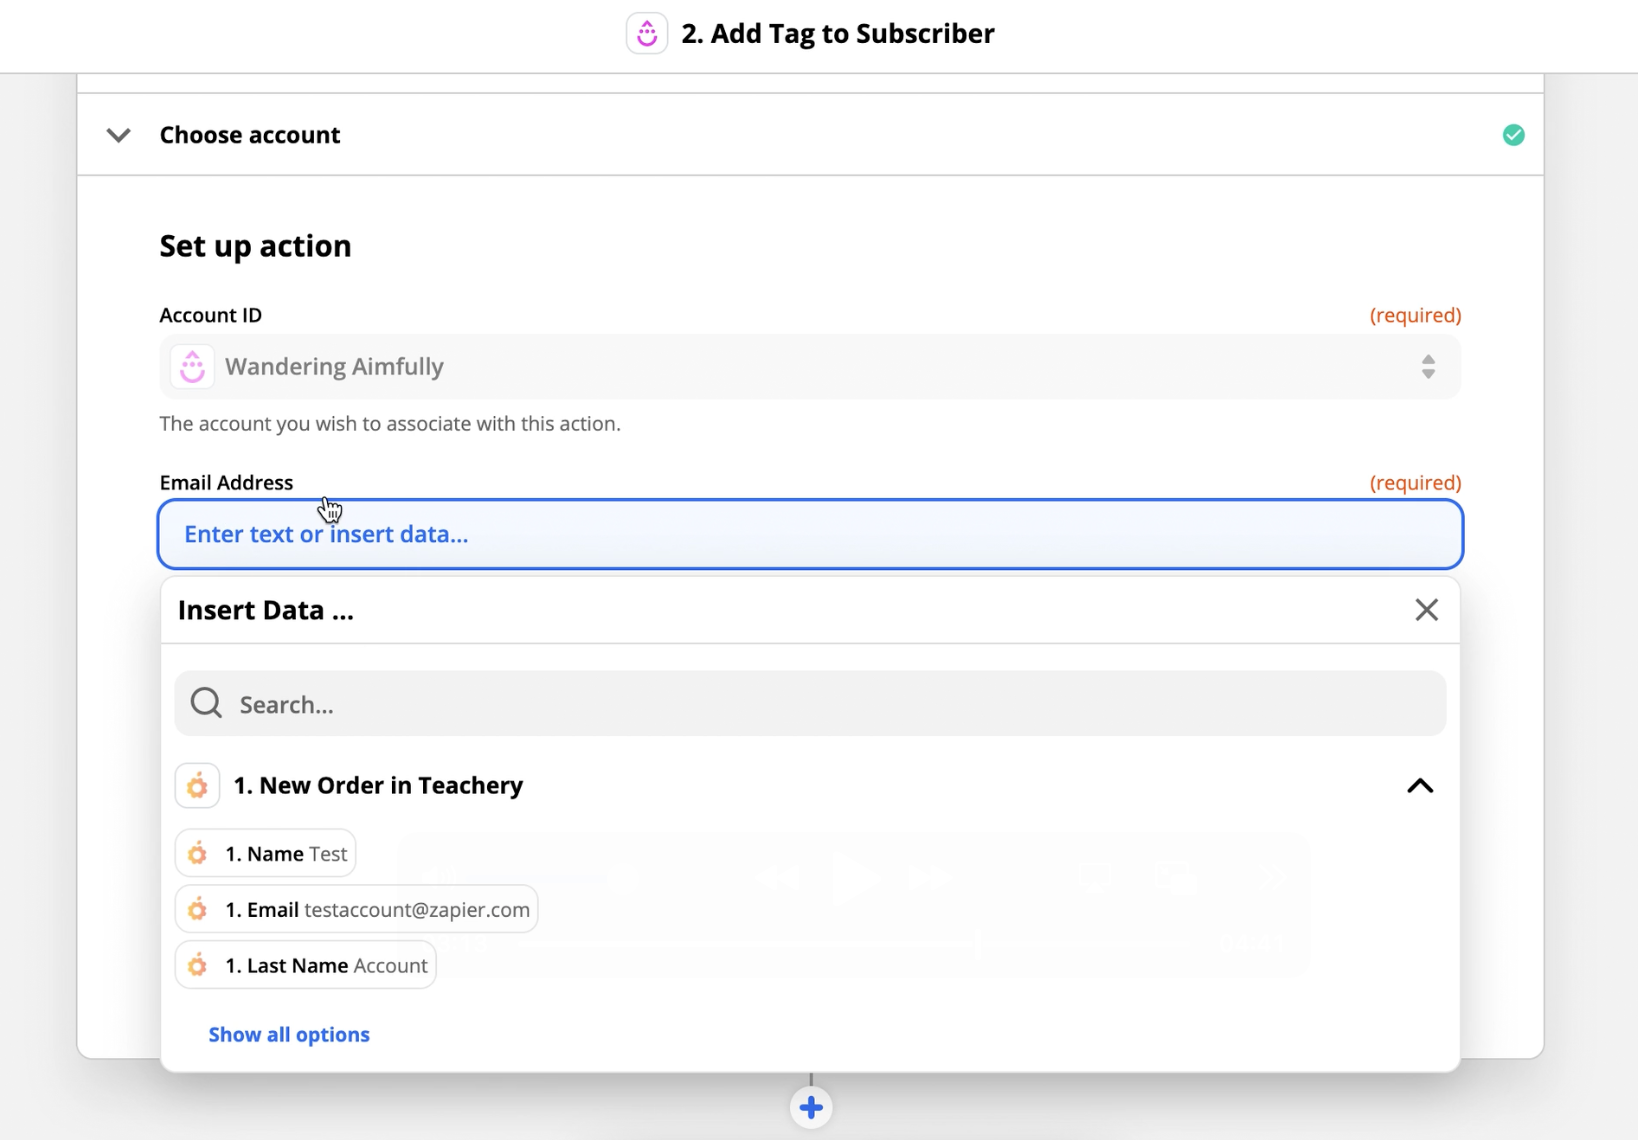
STEP #7 (EXAMPLE): This is showing Drip (another email provider) where you're at the final screen in Zapier to choose what data you want to bring from Teachery INTO Drip.
You can see the Email Address field has the email data from Teachery added. This is what will get pulled from each purchase in Teachery and sent to Drip.
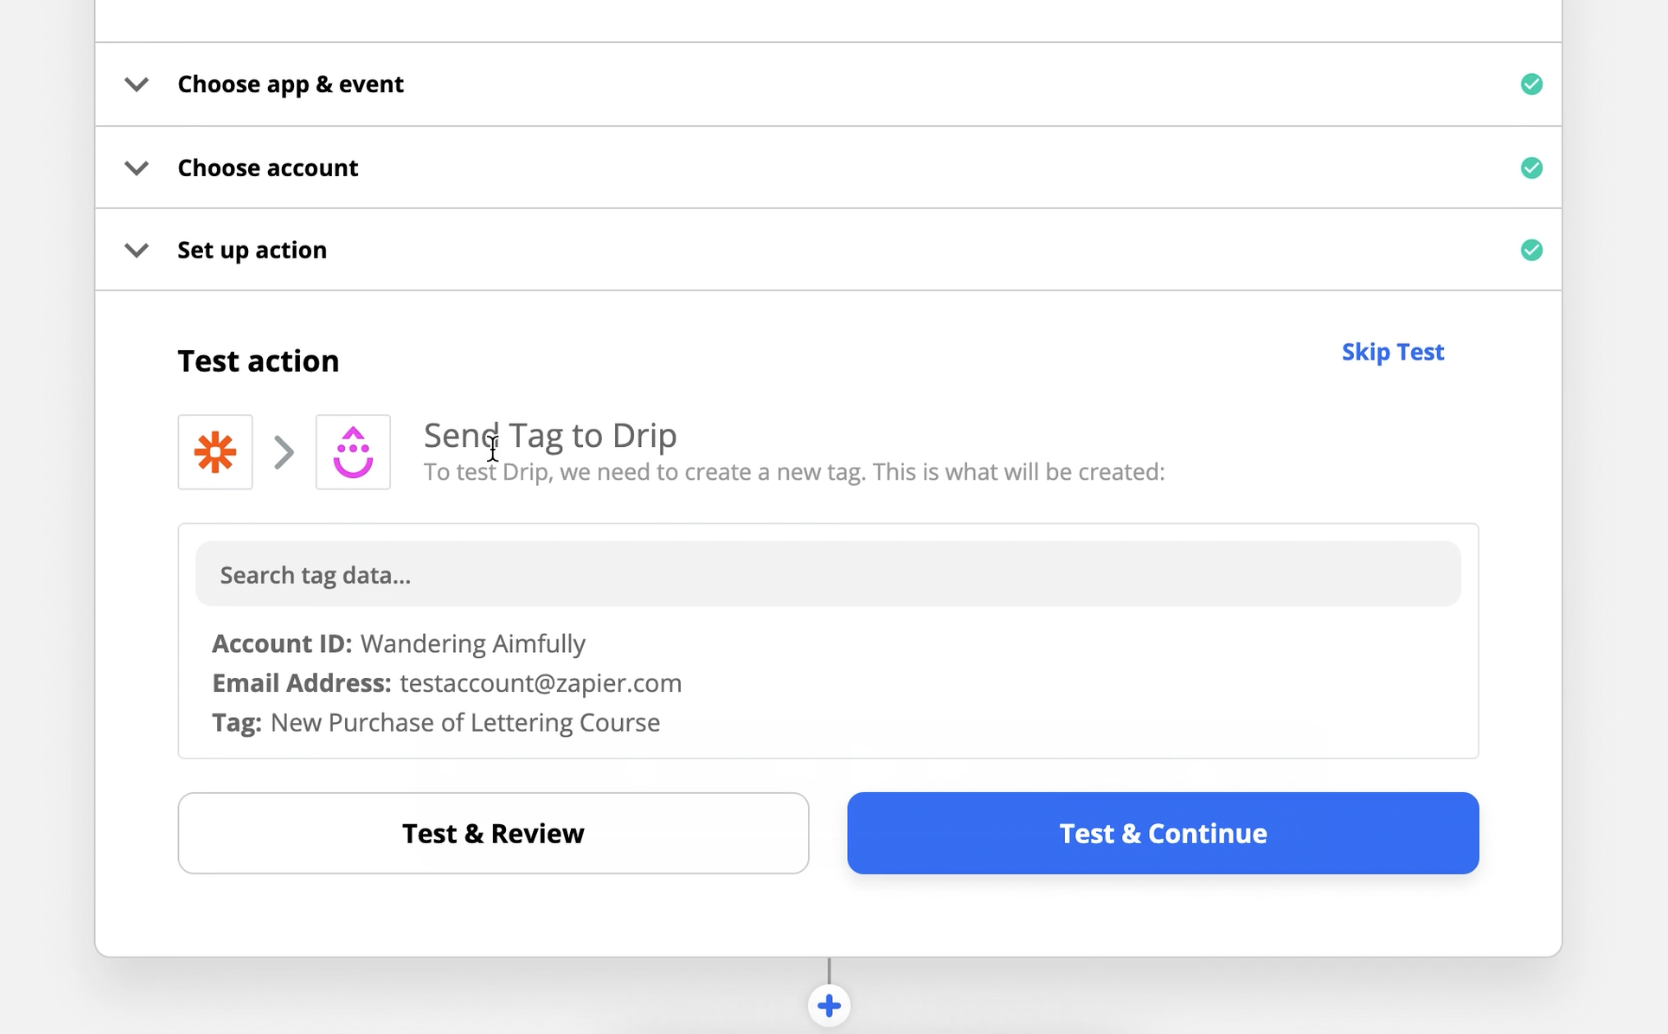
STEP #8 (FINAL STEP): The final Test and Review step.
You should do this step but *IMPORTANT* note that whatever data you selected from your Teachery Test Data will be sent to the app you choose (for example in Step #7, the email address "[email protected]" will be sent to the connected Drip account).
We highly recommend doing this test, just know the data will get sent through.
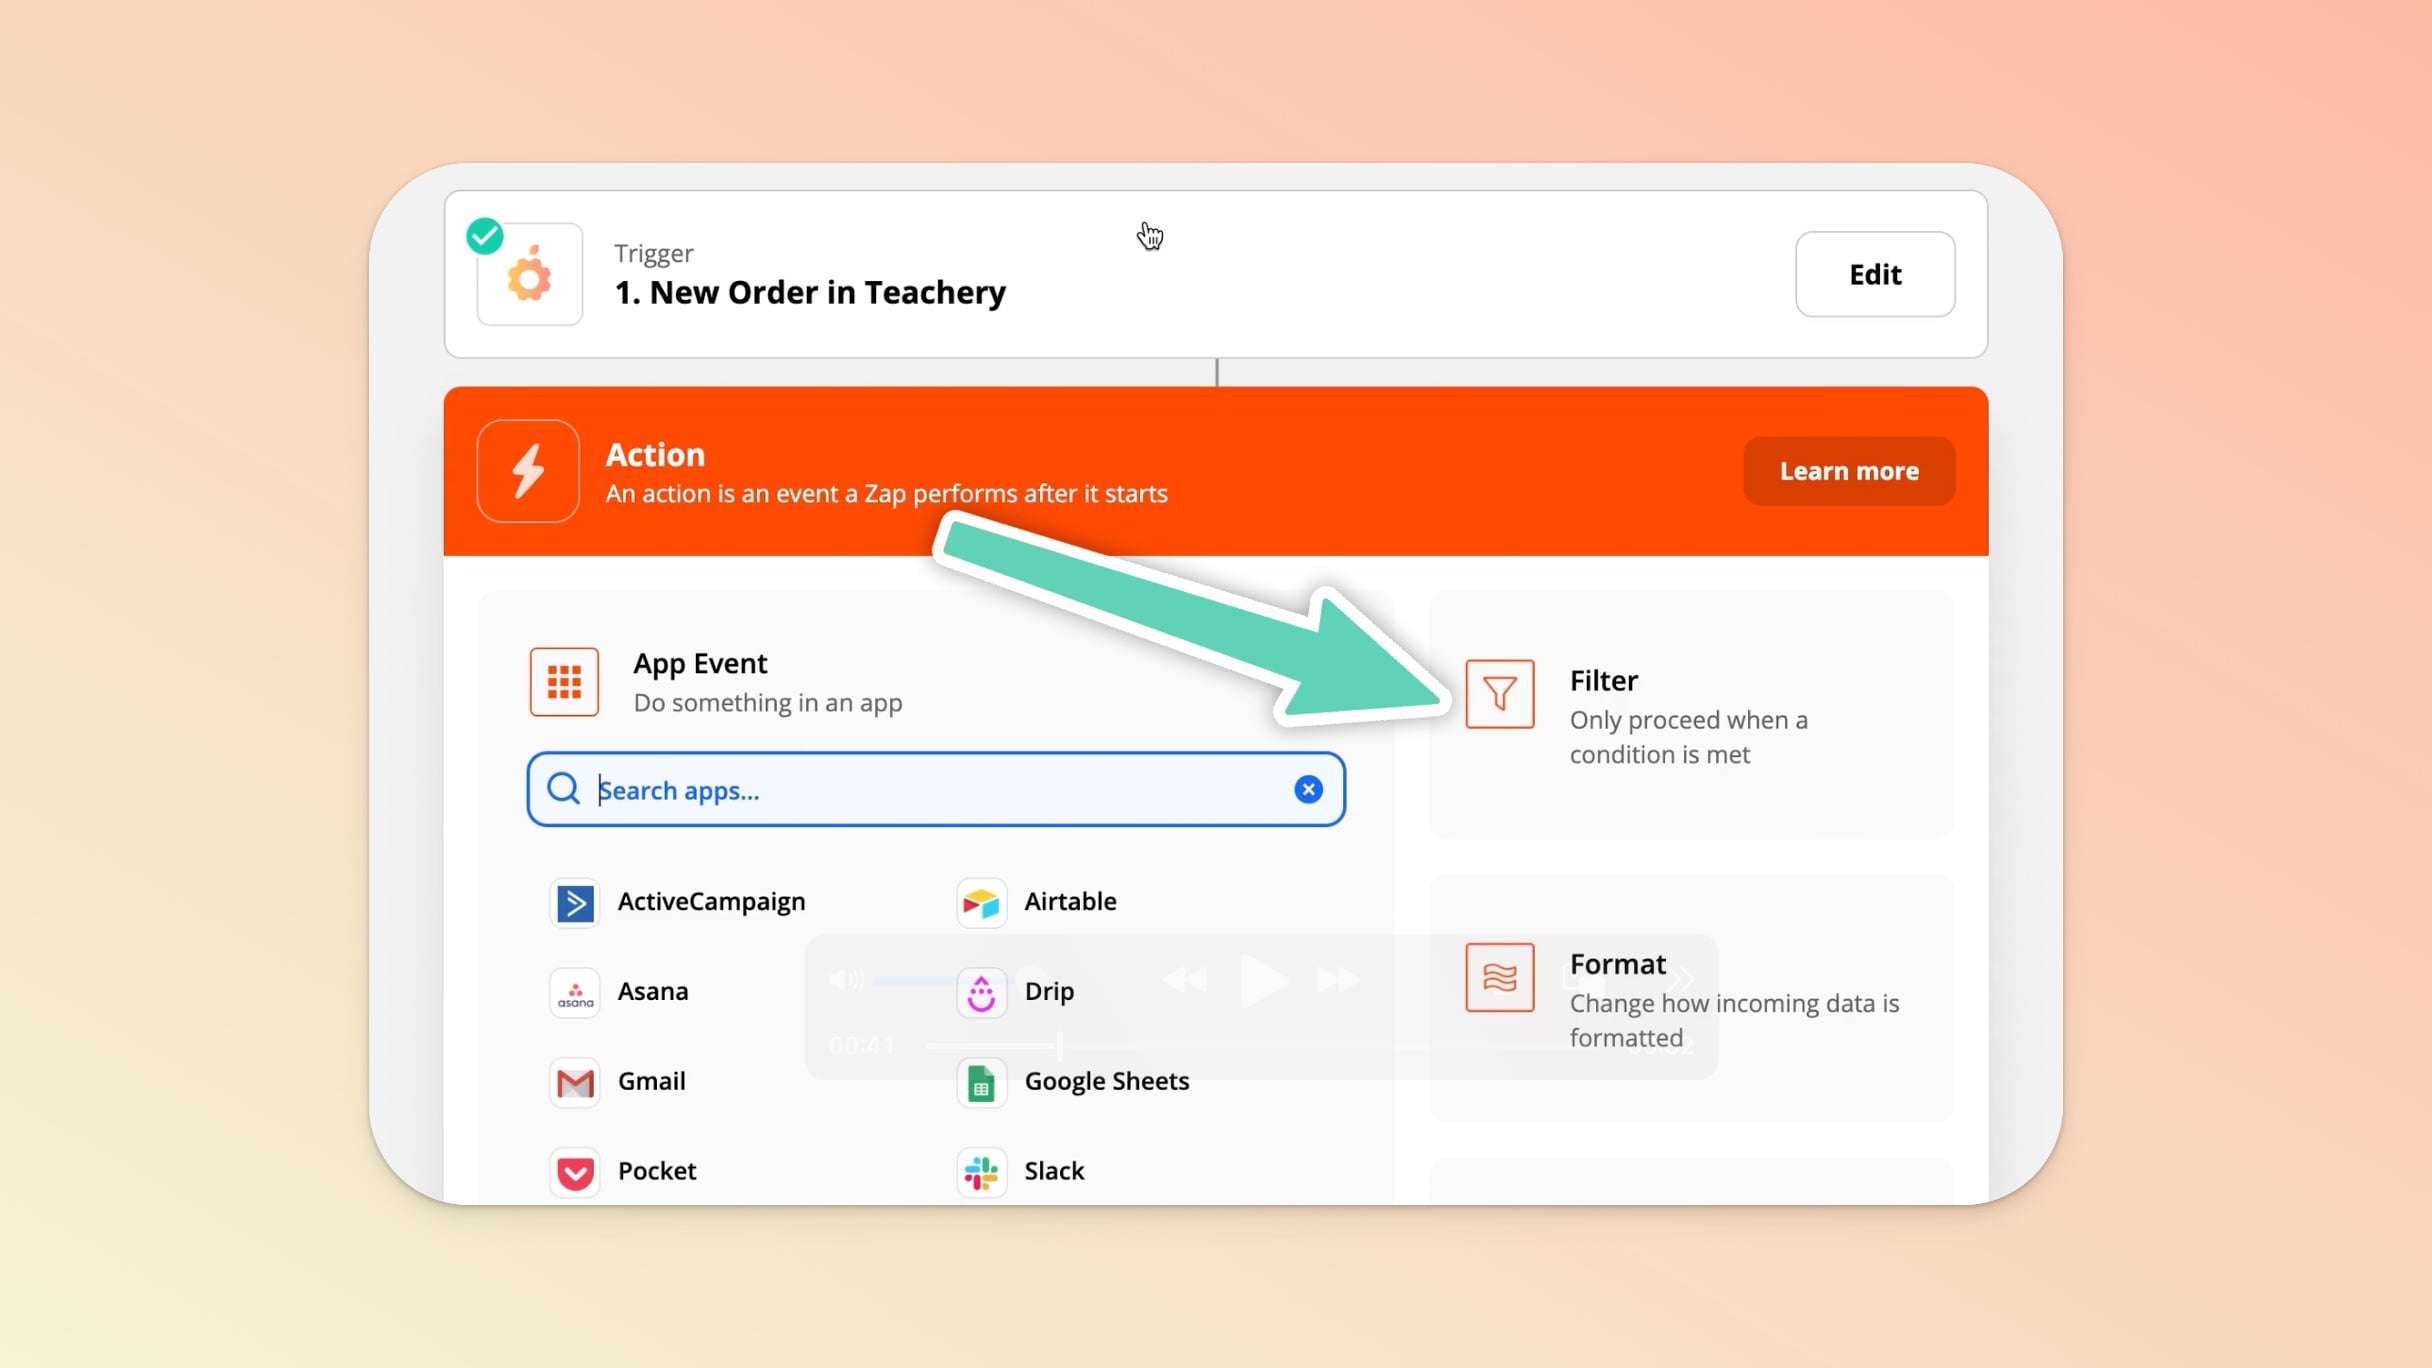
Filters are a powerful way to add extra conditions to your Zaps. Especially if you have multiple courses in Teachery, using Filters will help you select different courses when you set up your Zaps.
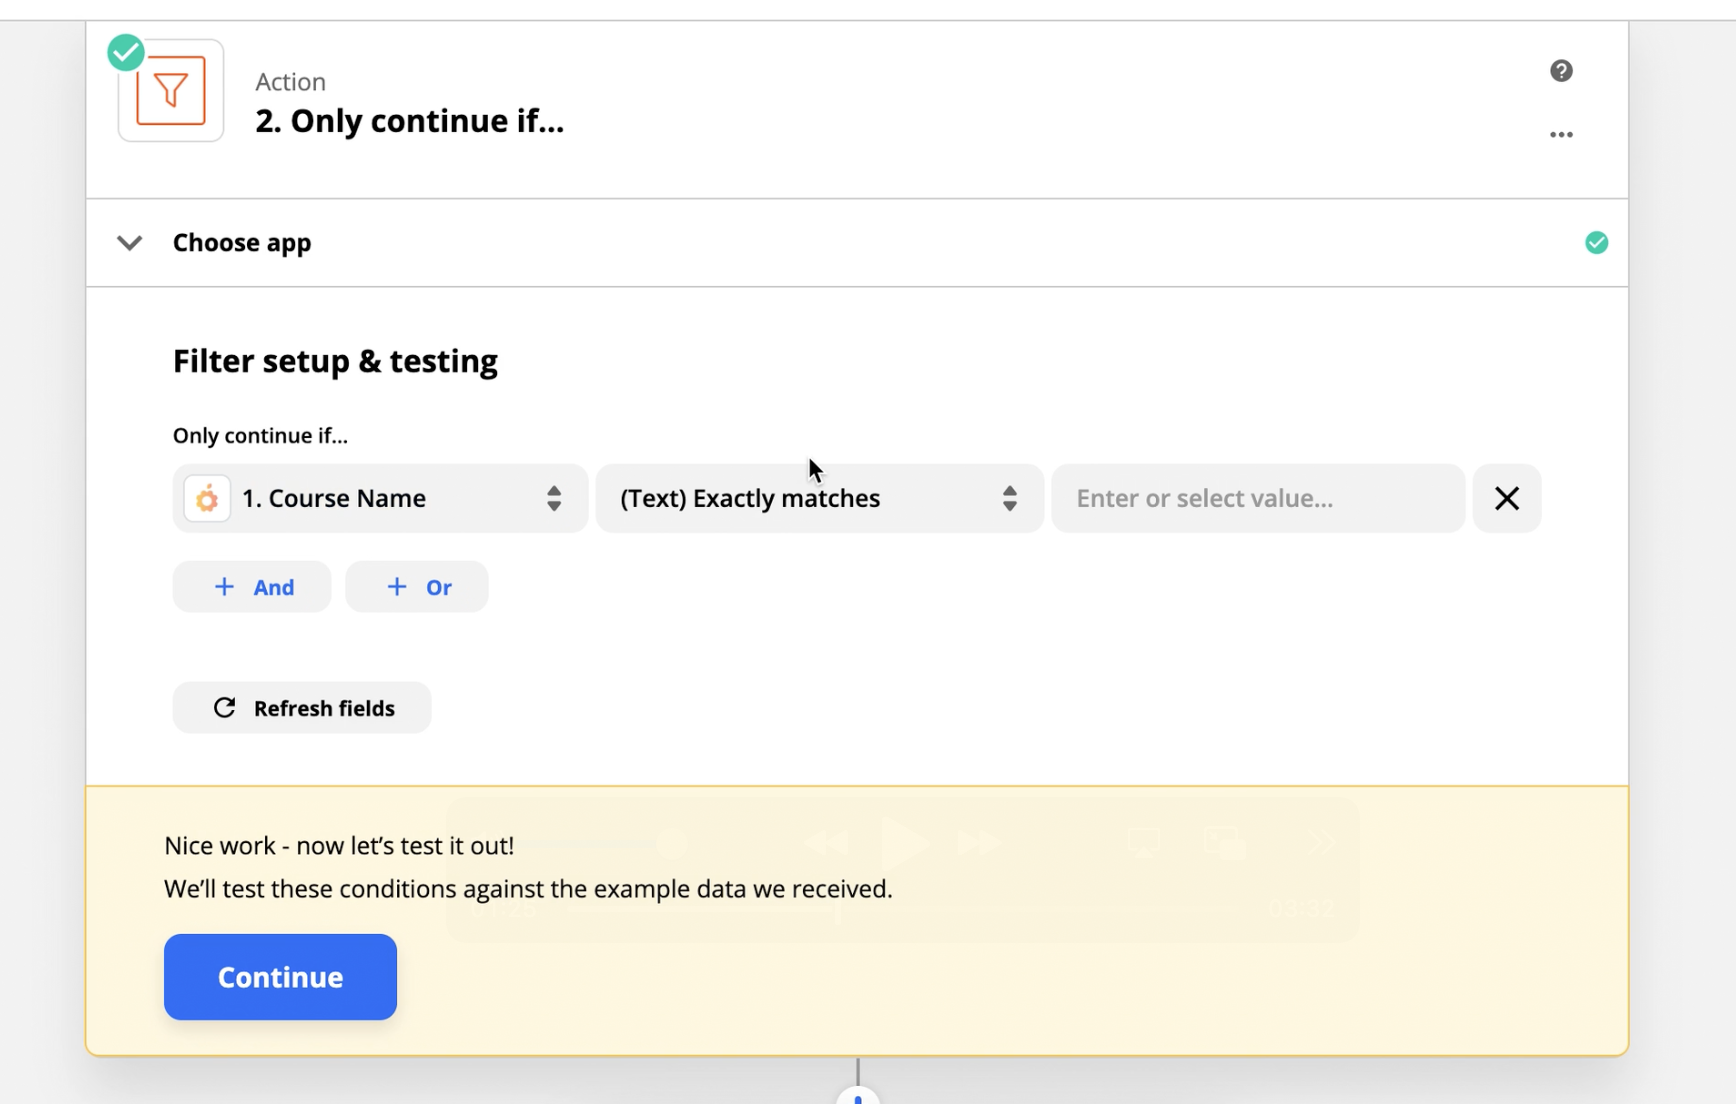
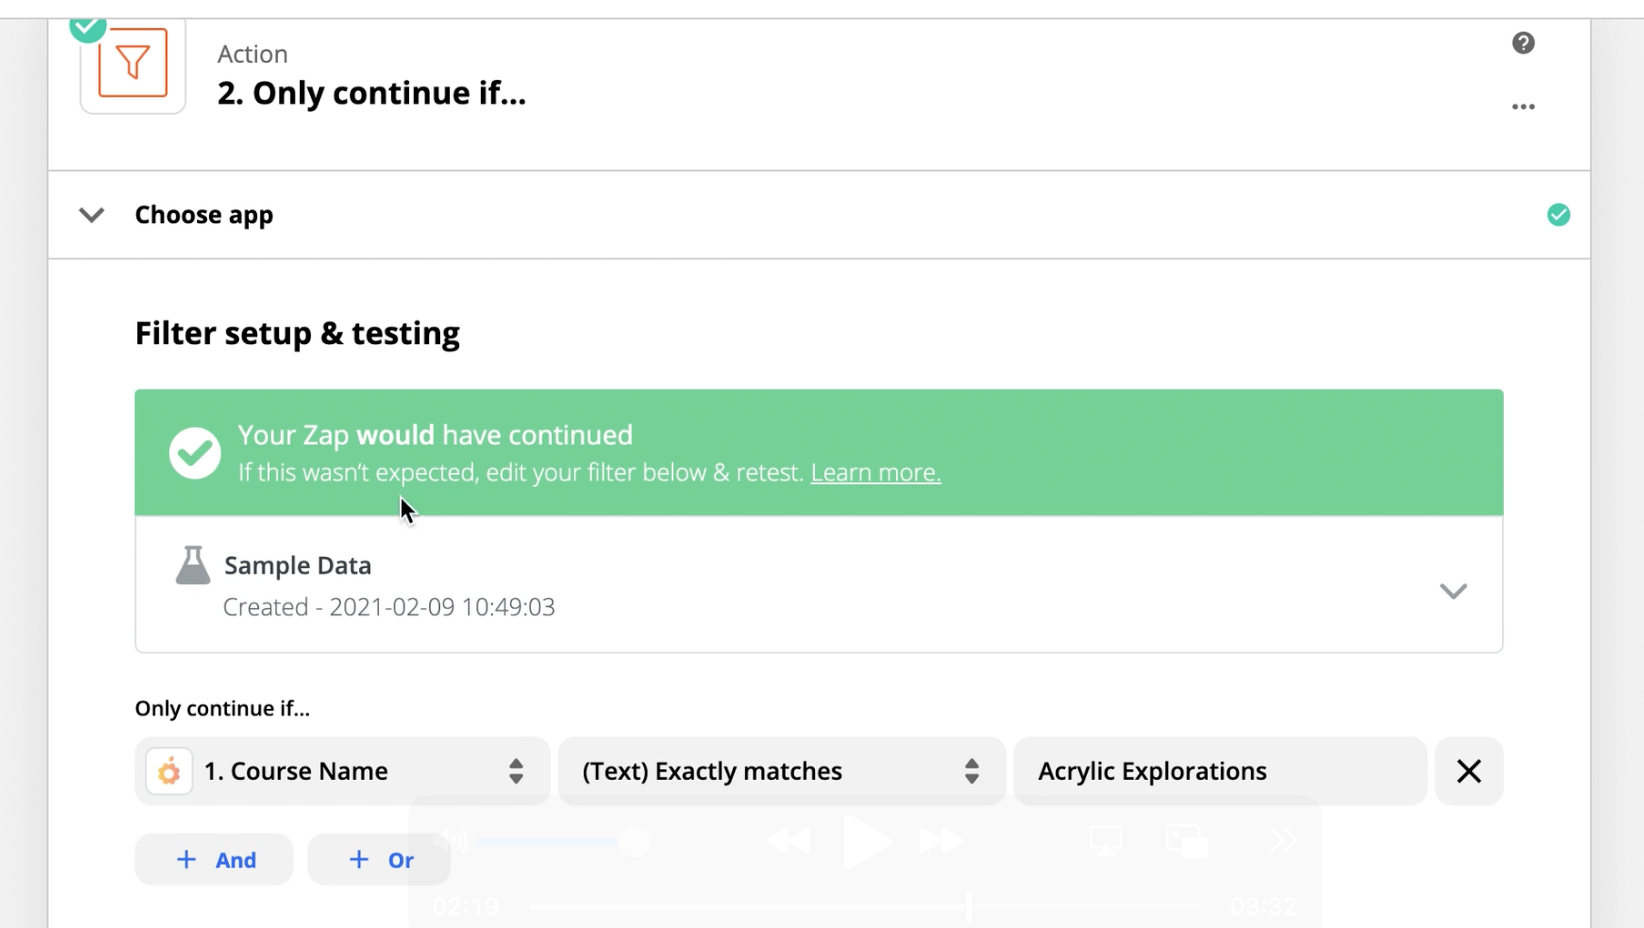
This example Filter (Only continue if...) step is how you can only have a Zap fire for ONE course if you have multiple courses in your Teachery account:
In the first dropdown option find the Course Name field
In the second dropdown option choose (Text) Exactly Matches
In the third input field type your course name exactly as you see it in the first dropdown option when you clicked to view that (ex below: Better Lettering Course)
Then you'll turn on the Filter and you can test it 👍
Also, you CAN have this same Zap send Teachery customer data to multiple sources. You'd simply click the "+" button and add a 3rd step to the Zap with where to also send the Teachery customer data.
If you want to automatically revoke a customer's access to a course based on another action, this is the Zap for you.
For example, if you take payment outside of Teachery and your customer's payment subscription is canceled, you can set up a Zap that will revoke their course access immediately.
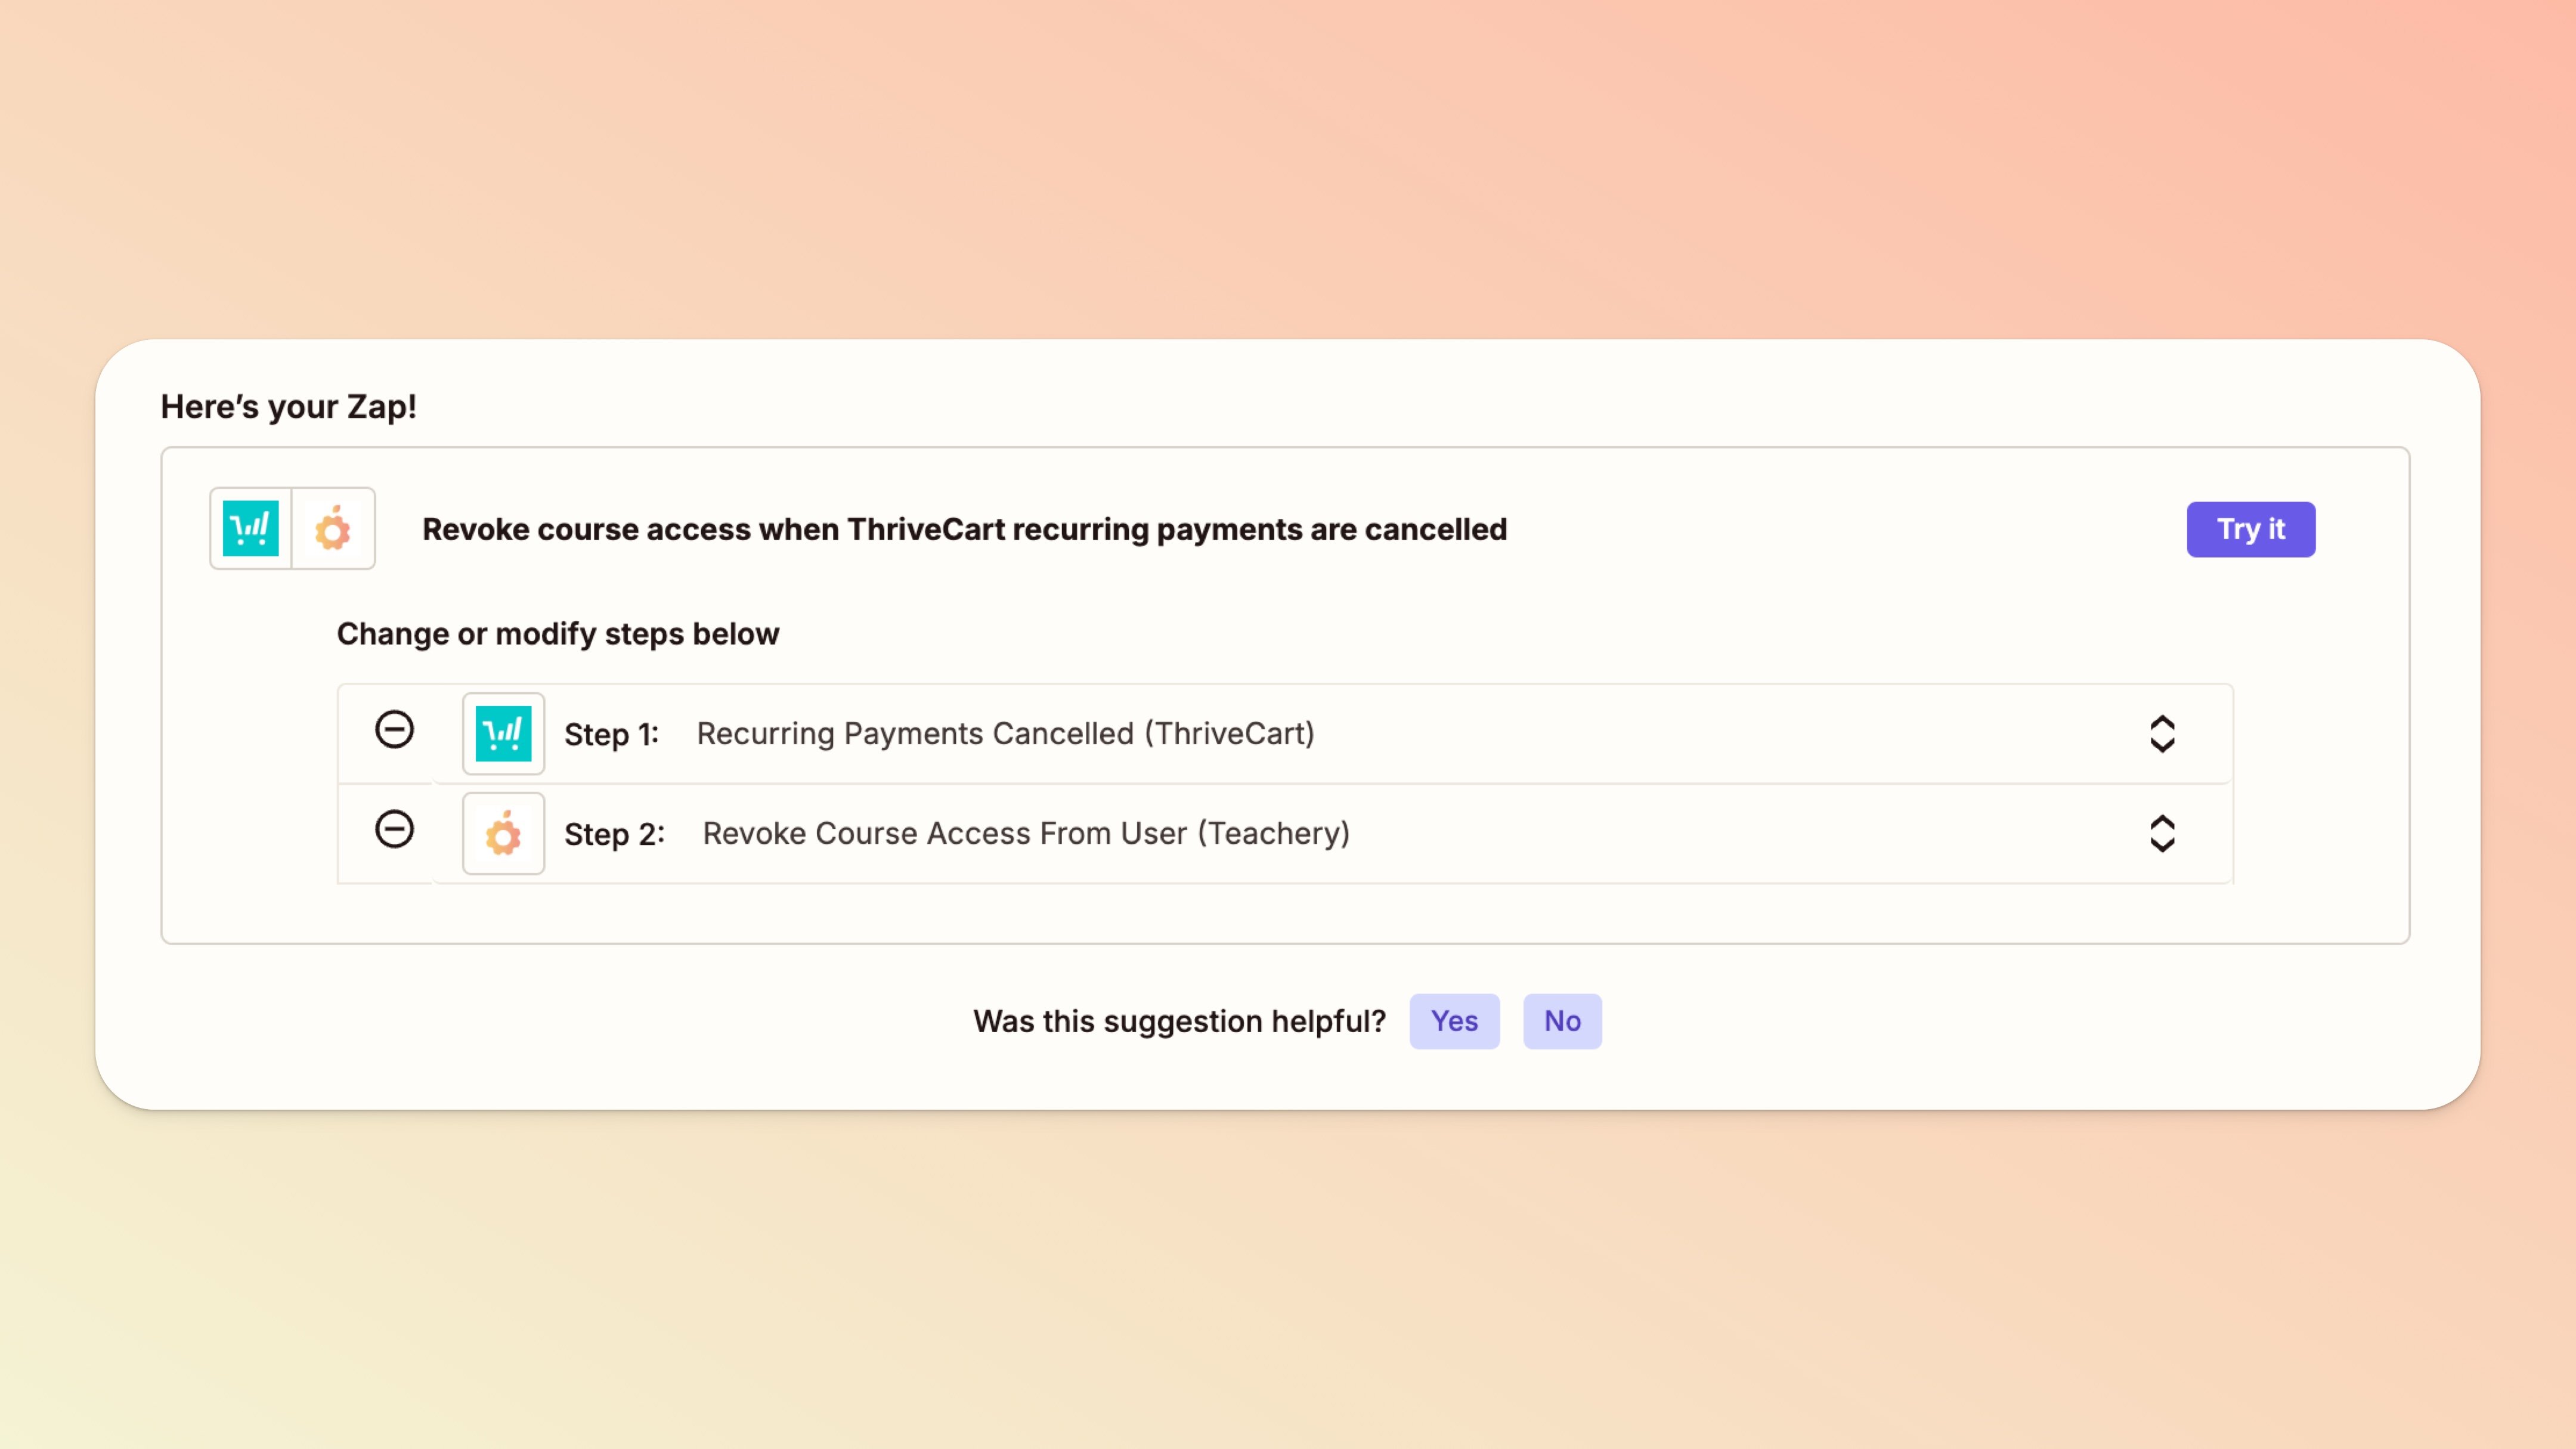
Note: Revoking course access is ALWAYS something you can undo in every customer's profile on Teachery.
Let's look at an example of taking recurring payments with Thrivecart (you don't have to use Thrivecart, that's just one example trigger we're going to share!)
Thrivecart will be the first step in your Zap and you'll find the "Recurring Payments Cancelled" trigger event for Thrivecart.
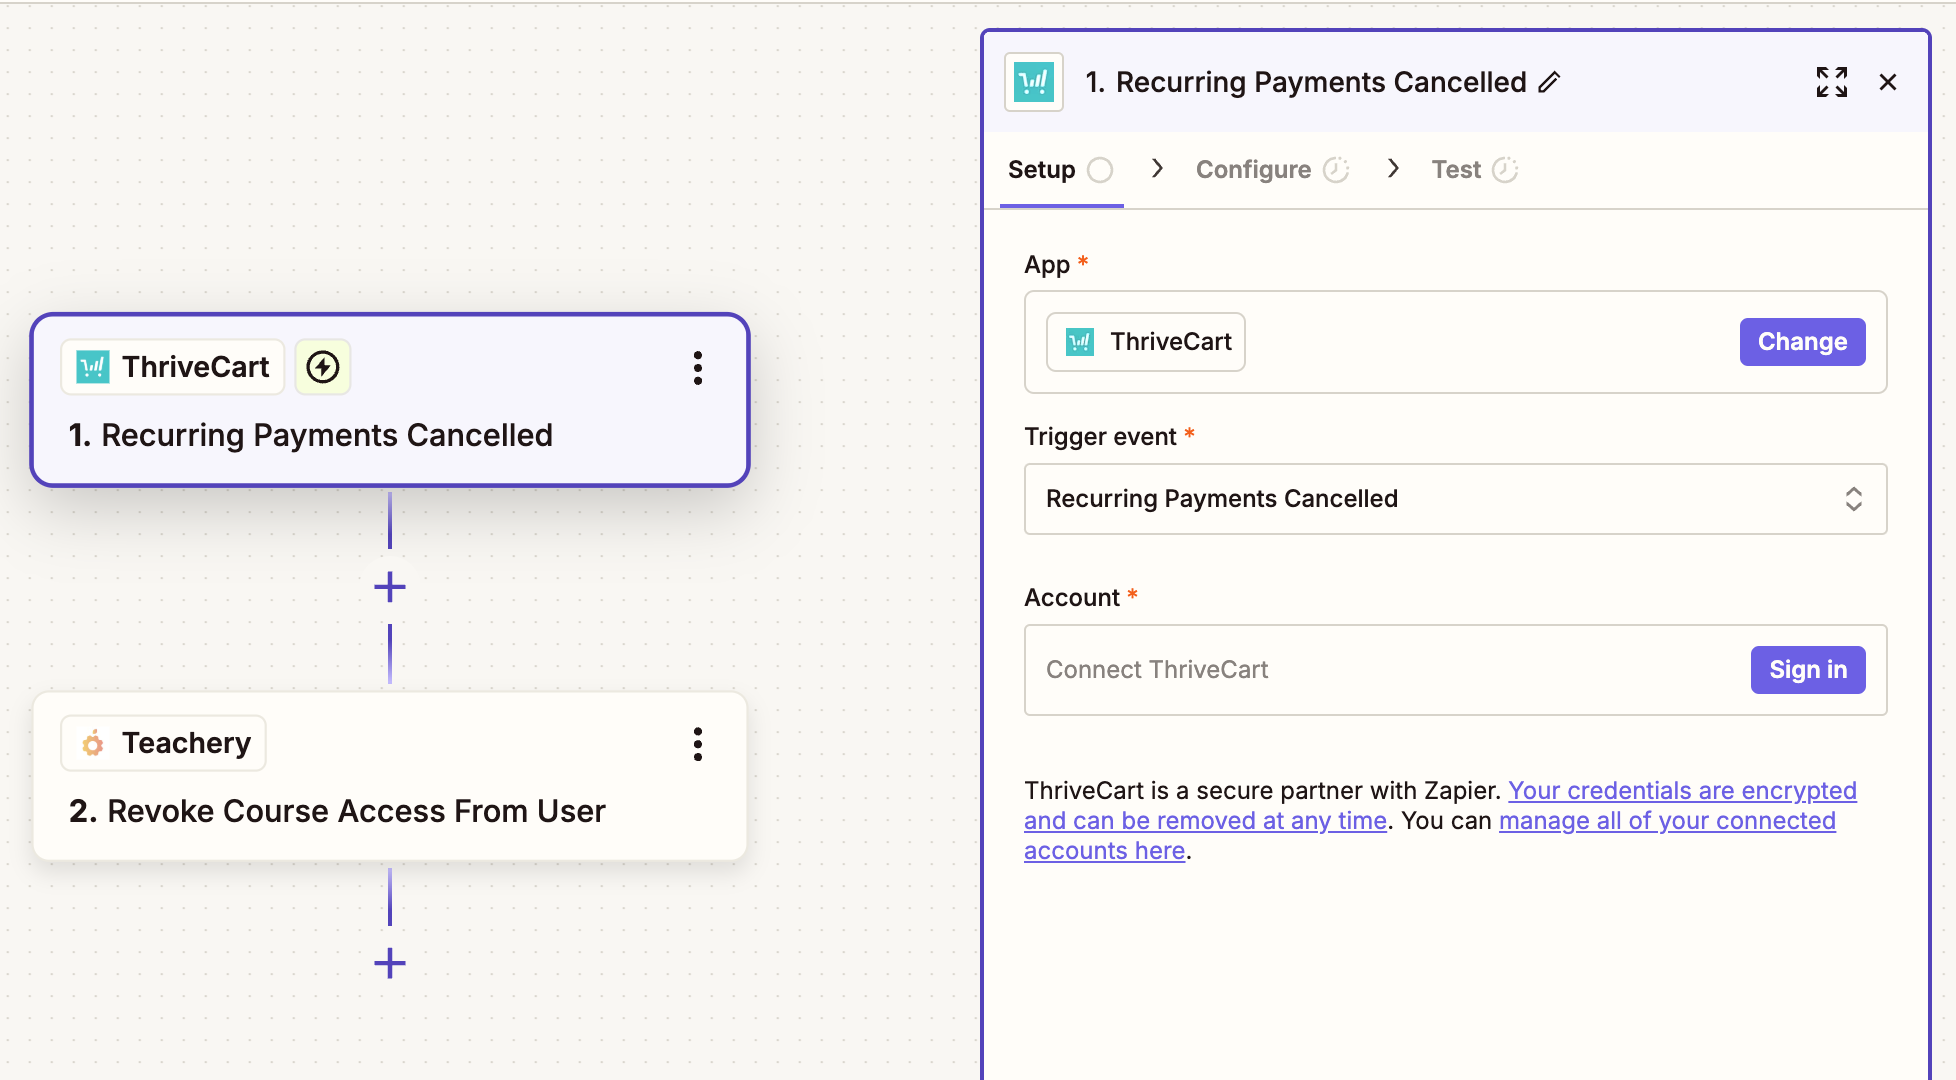
Continue with the steps in Thrivecart's set up to connect your account and pull in a piece of test data. (We recommend creating a new purchase in your Thrivecart account with your own data so you don't affect any existing customers when testing the Zap.)
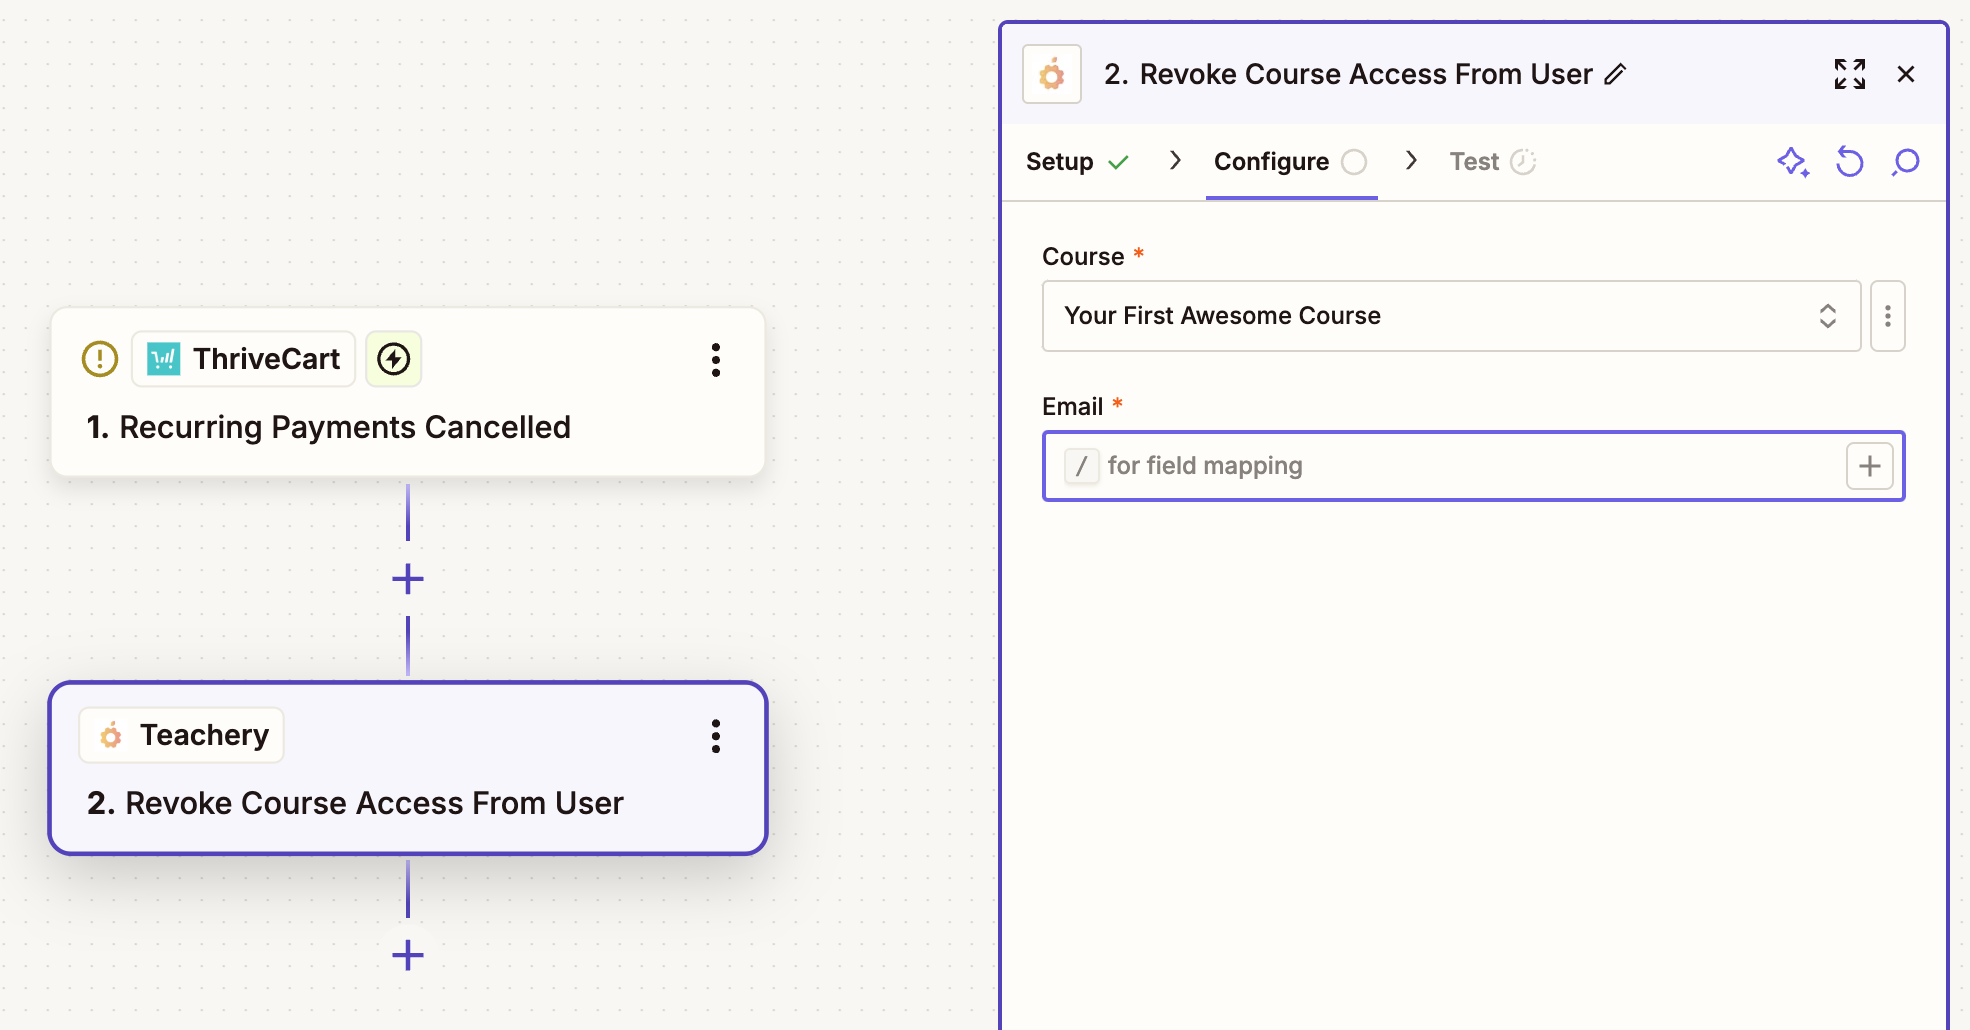
Then, Teachery will be the second trigger and you'll select "Revoke Course Access from User".
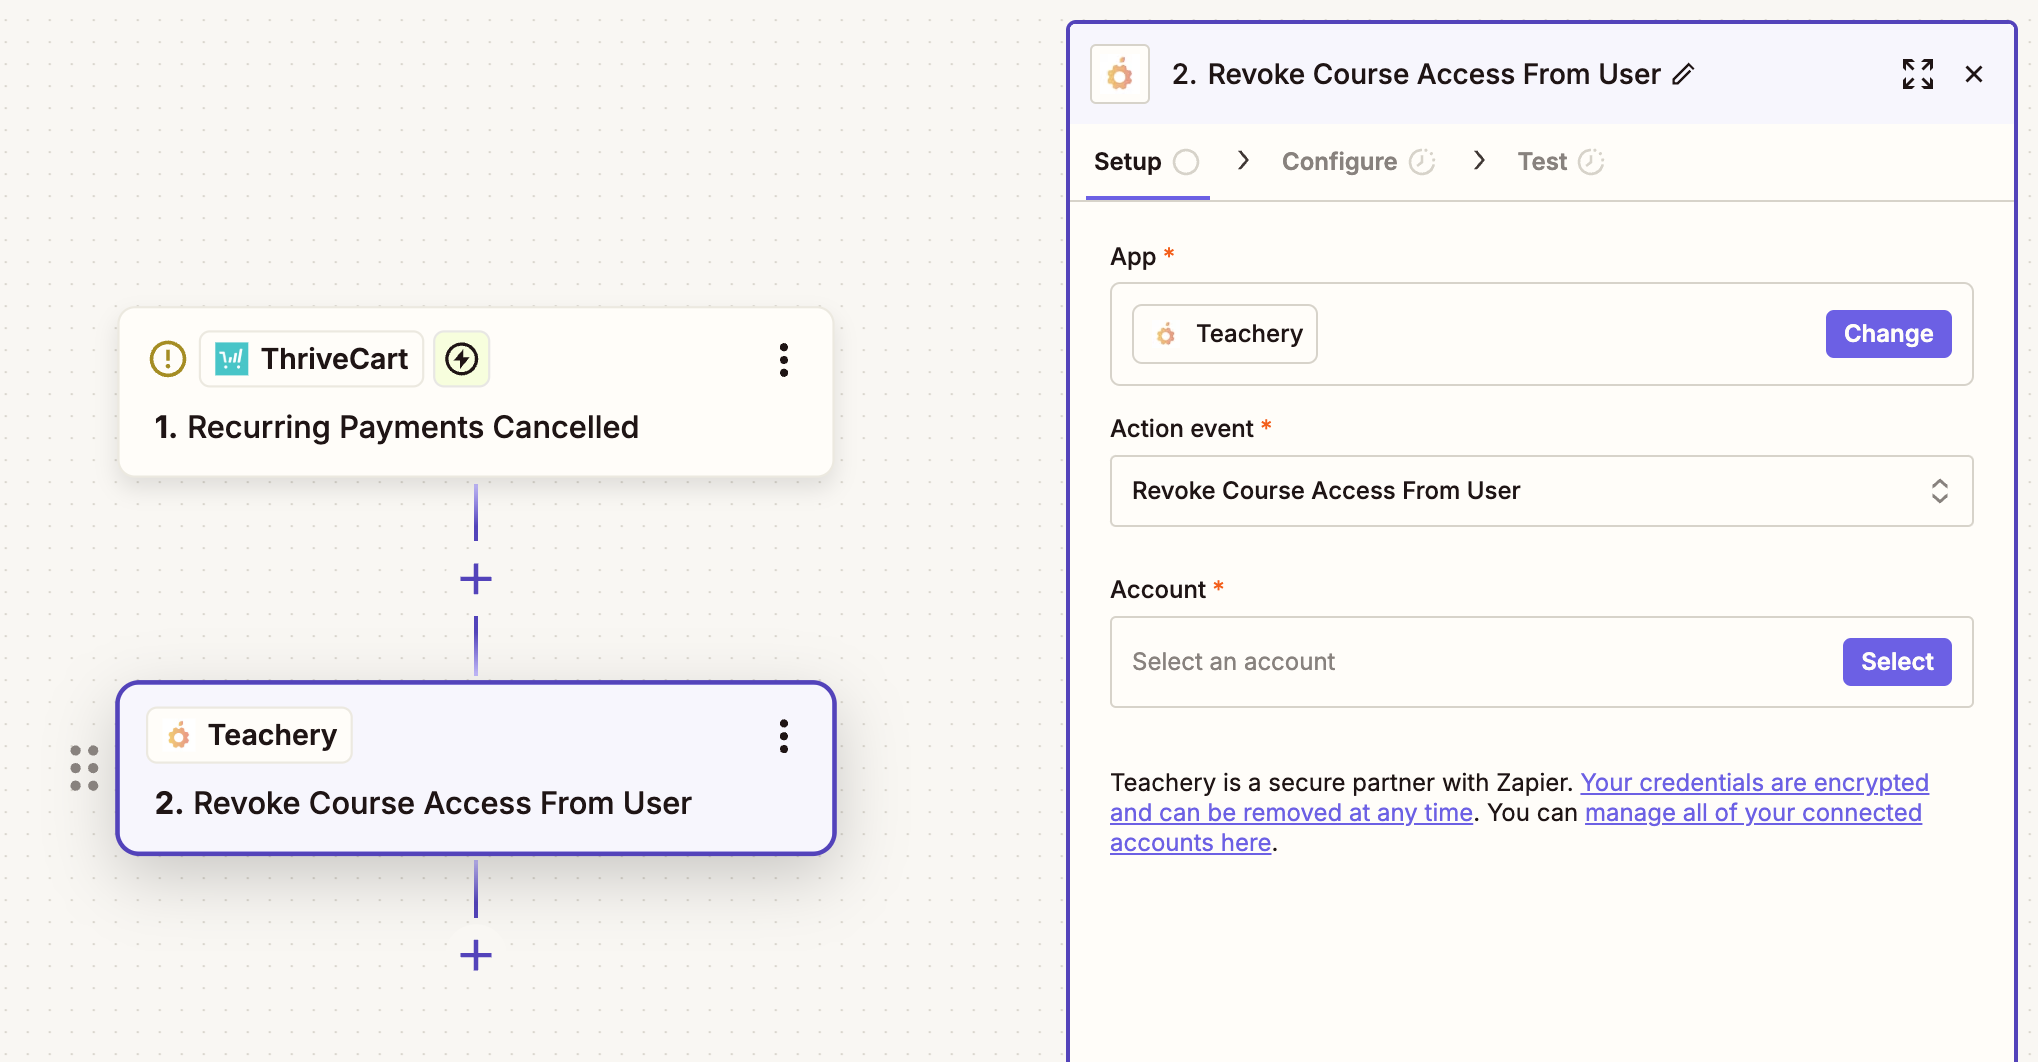
When you click Continue, you'll be asked for:
Course - You select this from your Teachery courses*.
Email - You select this from your Thrivecart test data and want to find the email field to pull from.
*If you want to revoke access to multiple courses in the same Zap, you'll simply add ANOTHER trigger of Teachery > Revoke Access (you can add as many of those as you like/need in the same Zap!)
Once you're done you can run a test or you can skip the test and turn your Zap on ✅ .
Hopefully, this will help you manage your customer's course access even if you accept payment outside of Teachery 👍👍.
Make sure to look at your "Zap History" page.
If any Zaps are NOT showing a "Success" message you can click into them to learn why the Zap may not have fired and fix the issue (and then re-run the Zap).
Here's a short video on how to find Zap History in your Zapier account:
If you use our Payment Pages (with your Stripe account added) for your Teachery courses, you can also set up Zaps to grab the payment data from Stripe and then Zap that data to other applications/spreadsheets/etc.
You don't even need the Teachery part of Zapier if you want to go this route with your Zaps, just start with your Stripe account.
Have any questions about our Zapier integration? Feel free to contact us!
