Want to time the release of your course lessons to keep your students engaged with a steady stream of content? Our Lesson Drip Schedule feature has you covered.
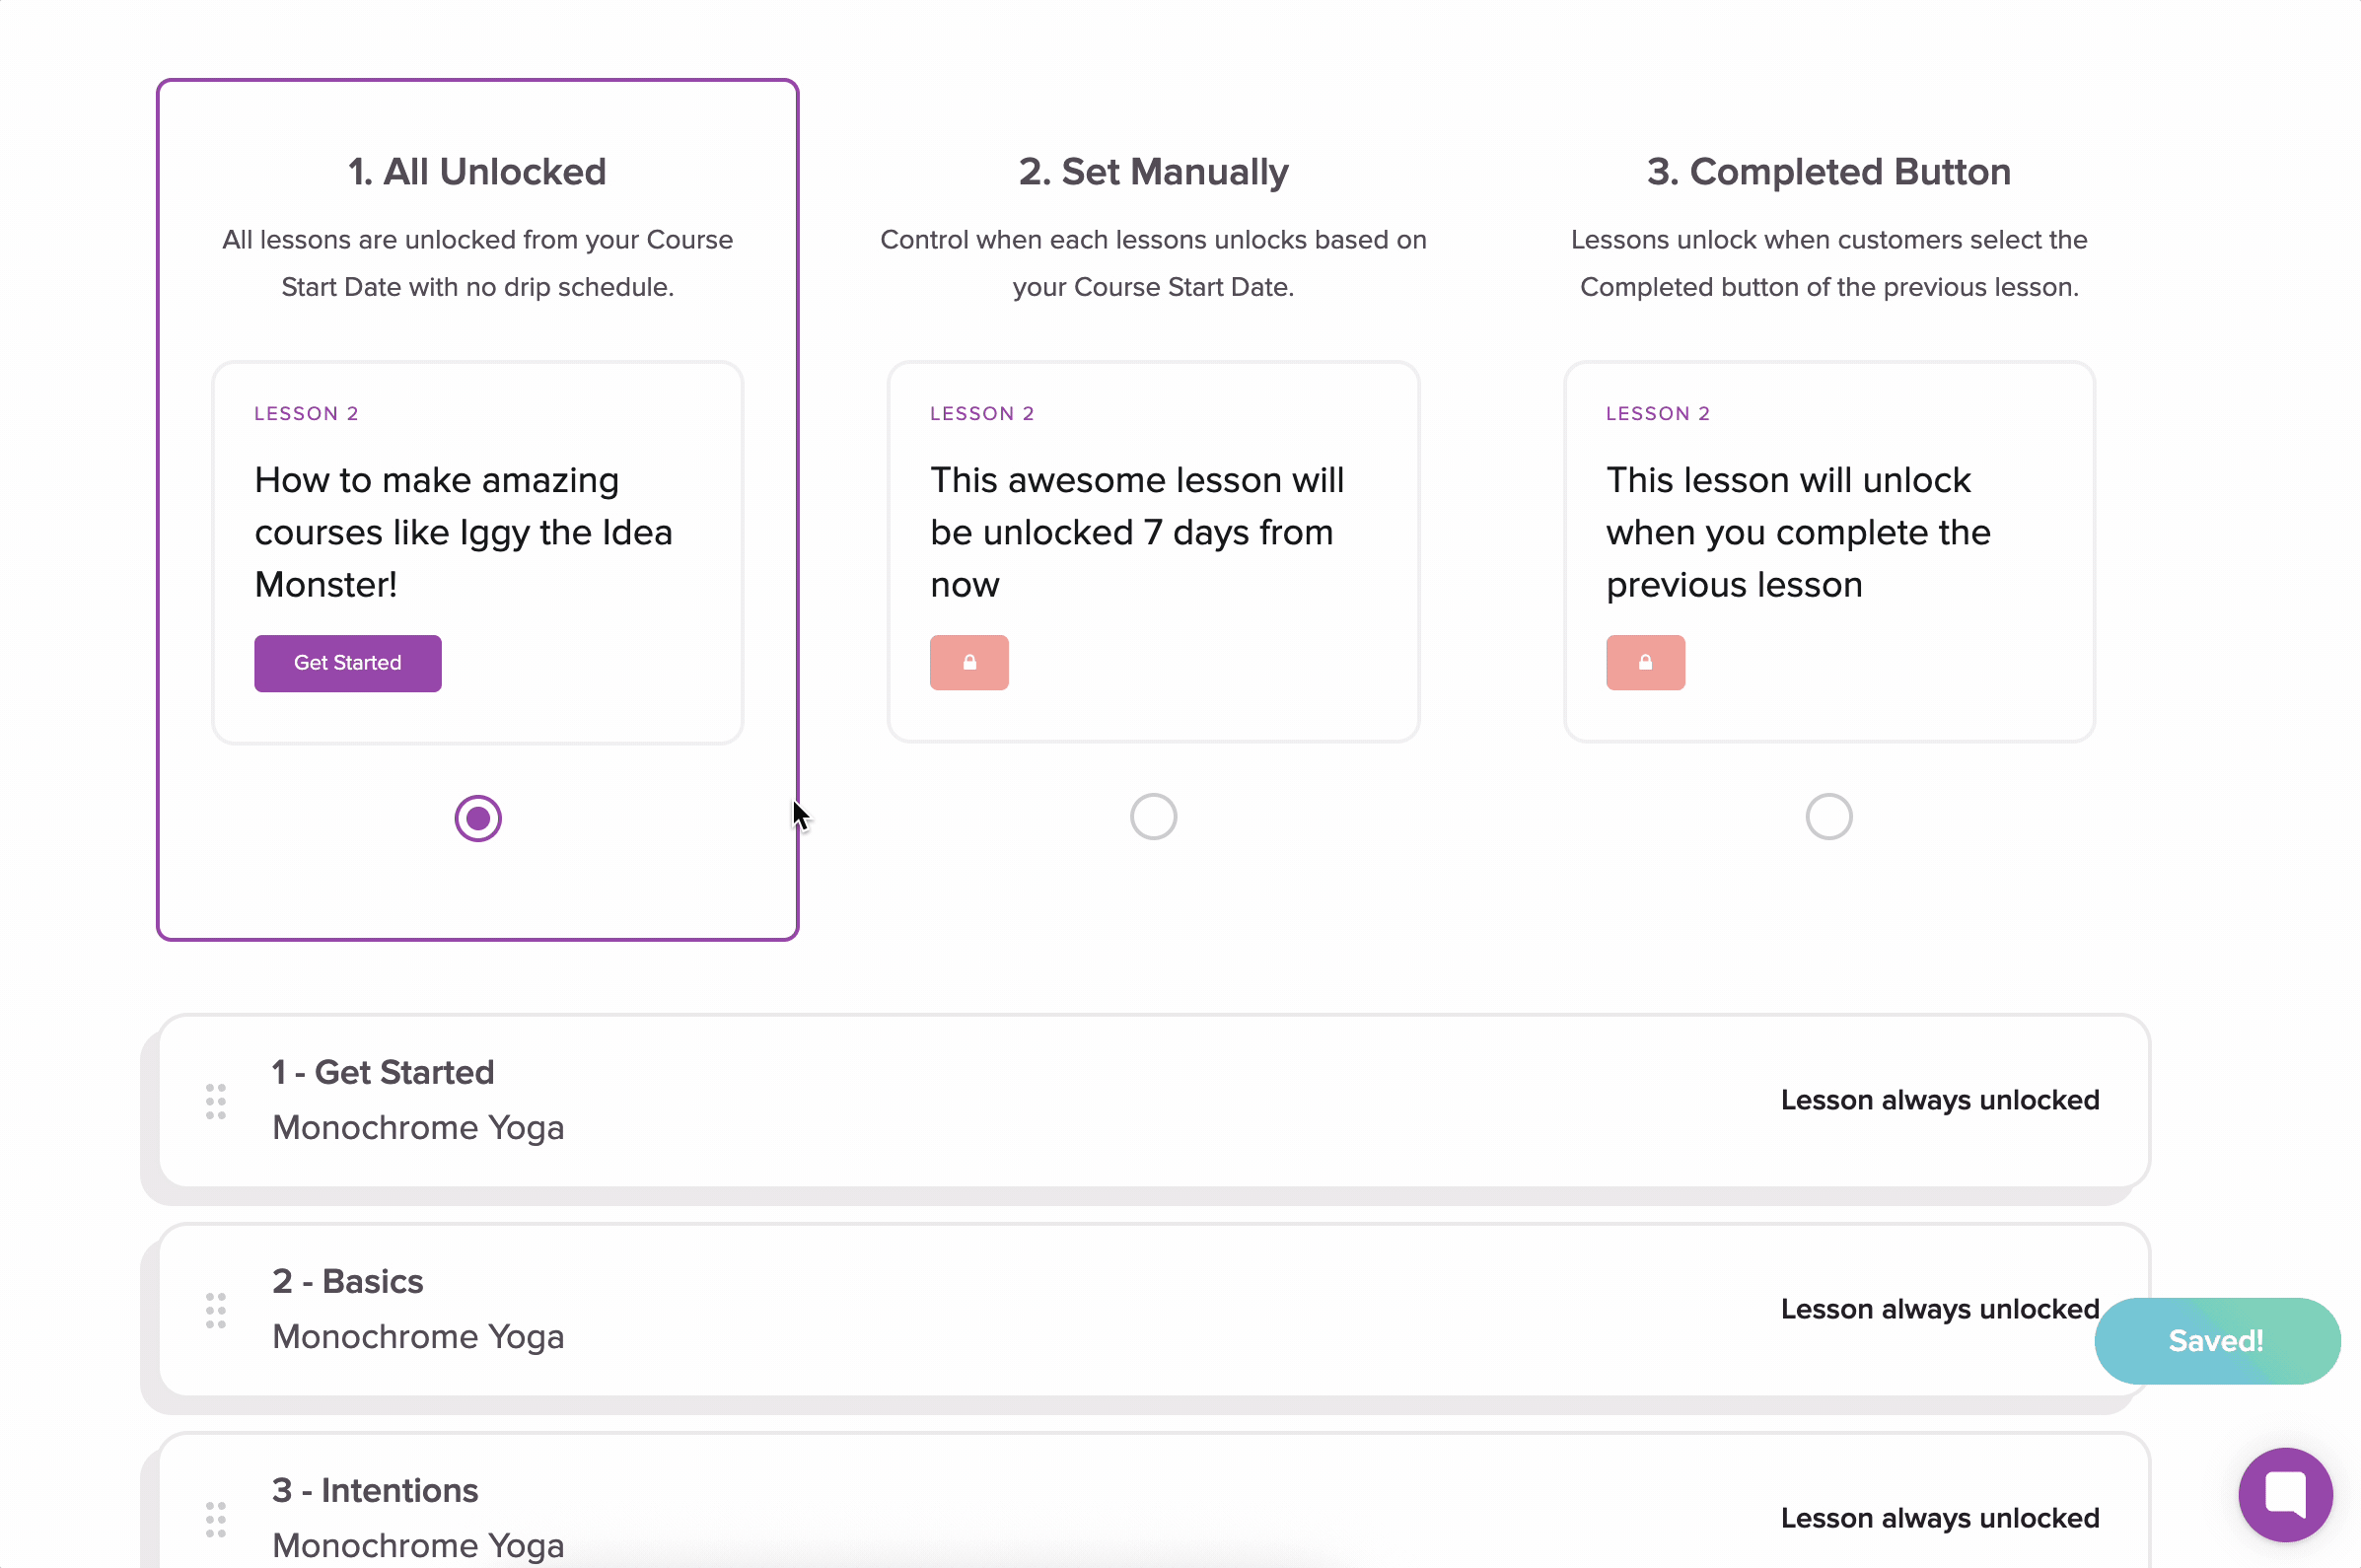
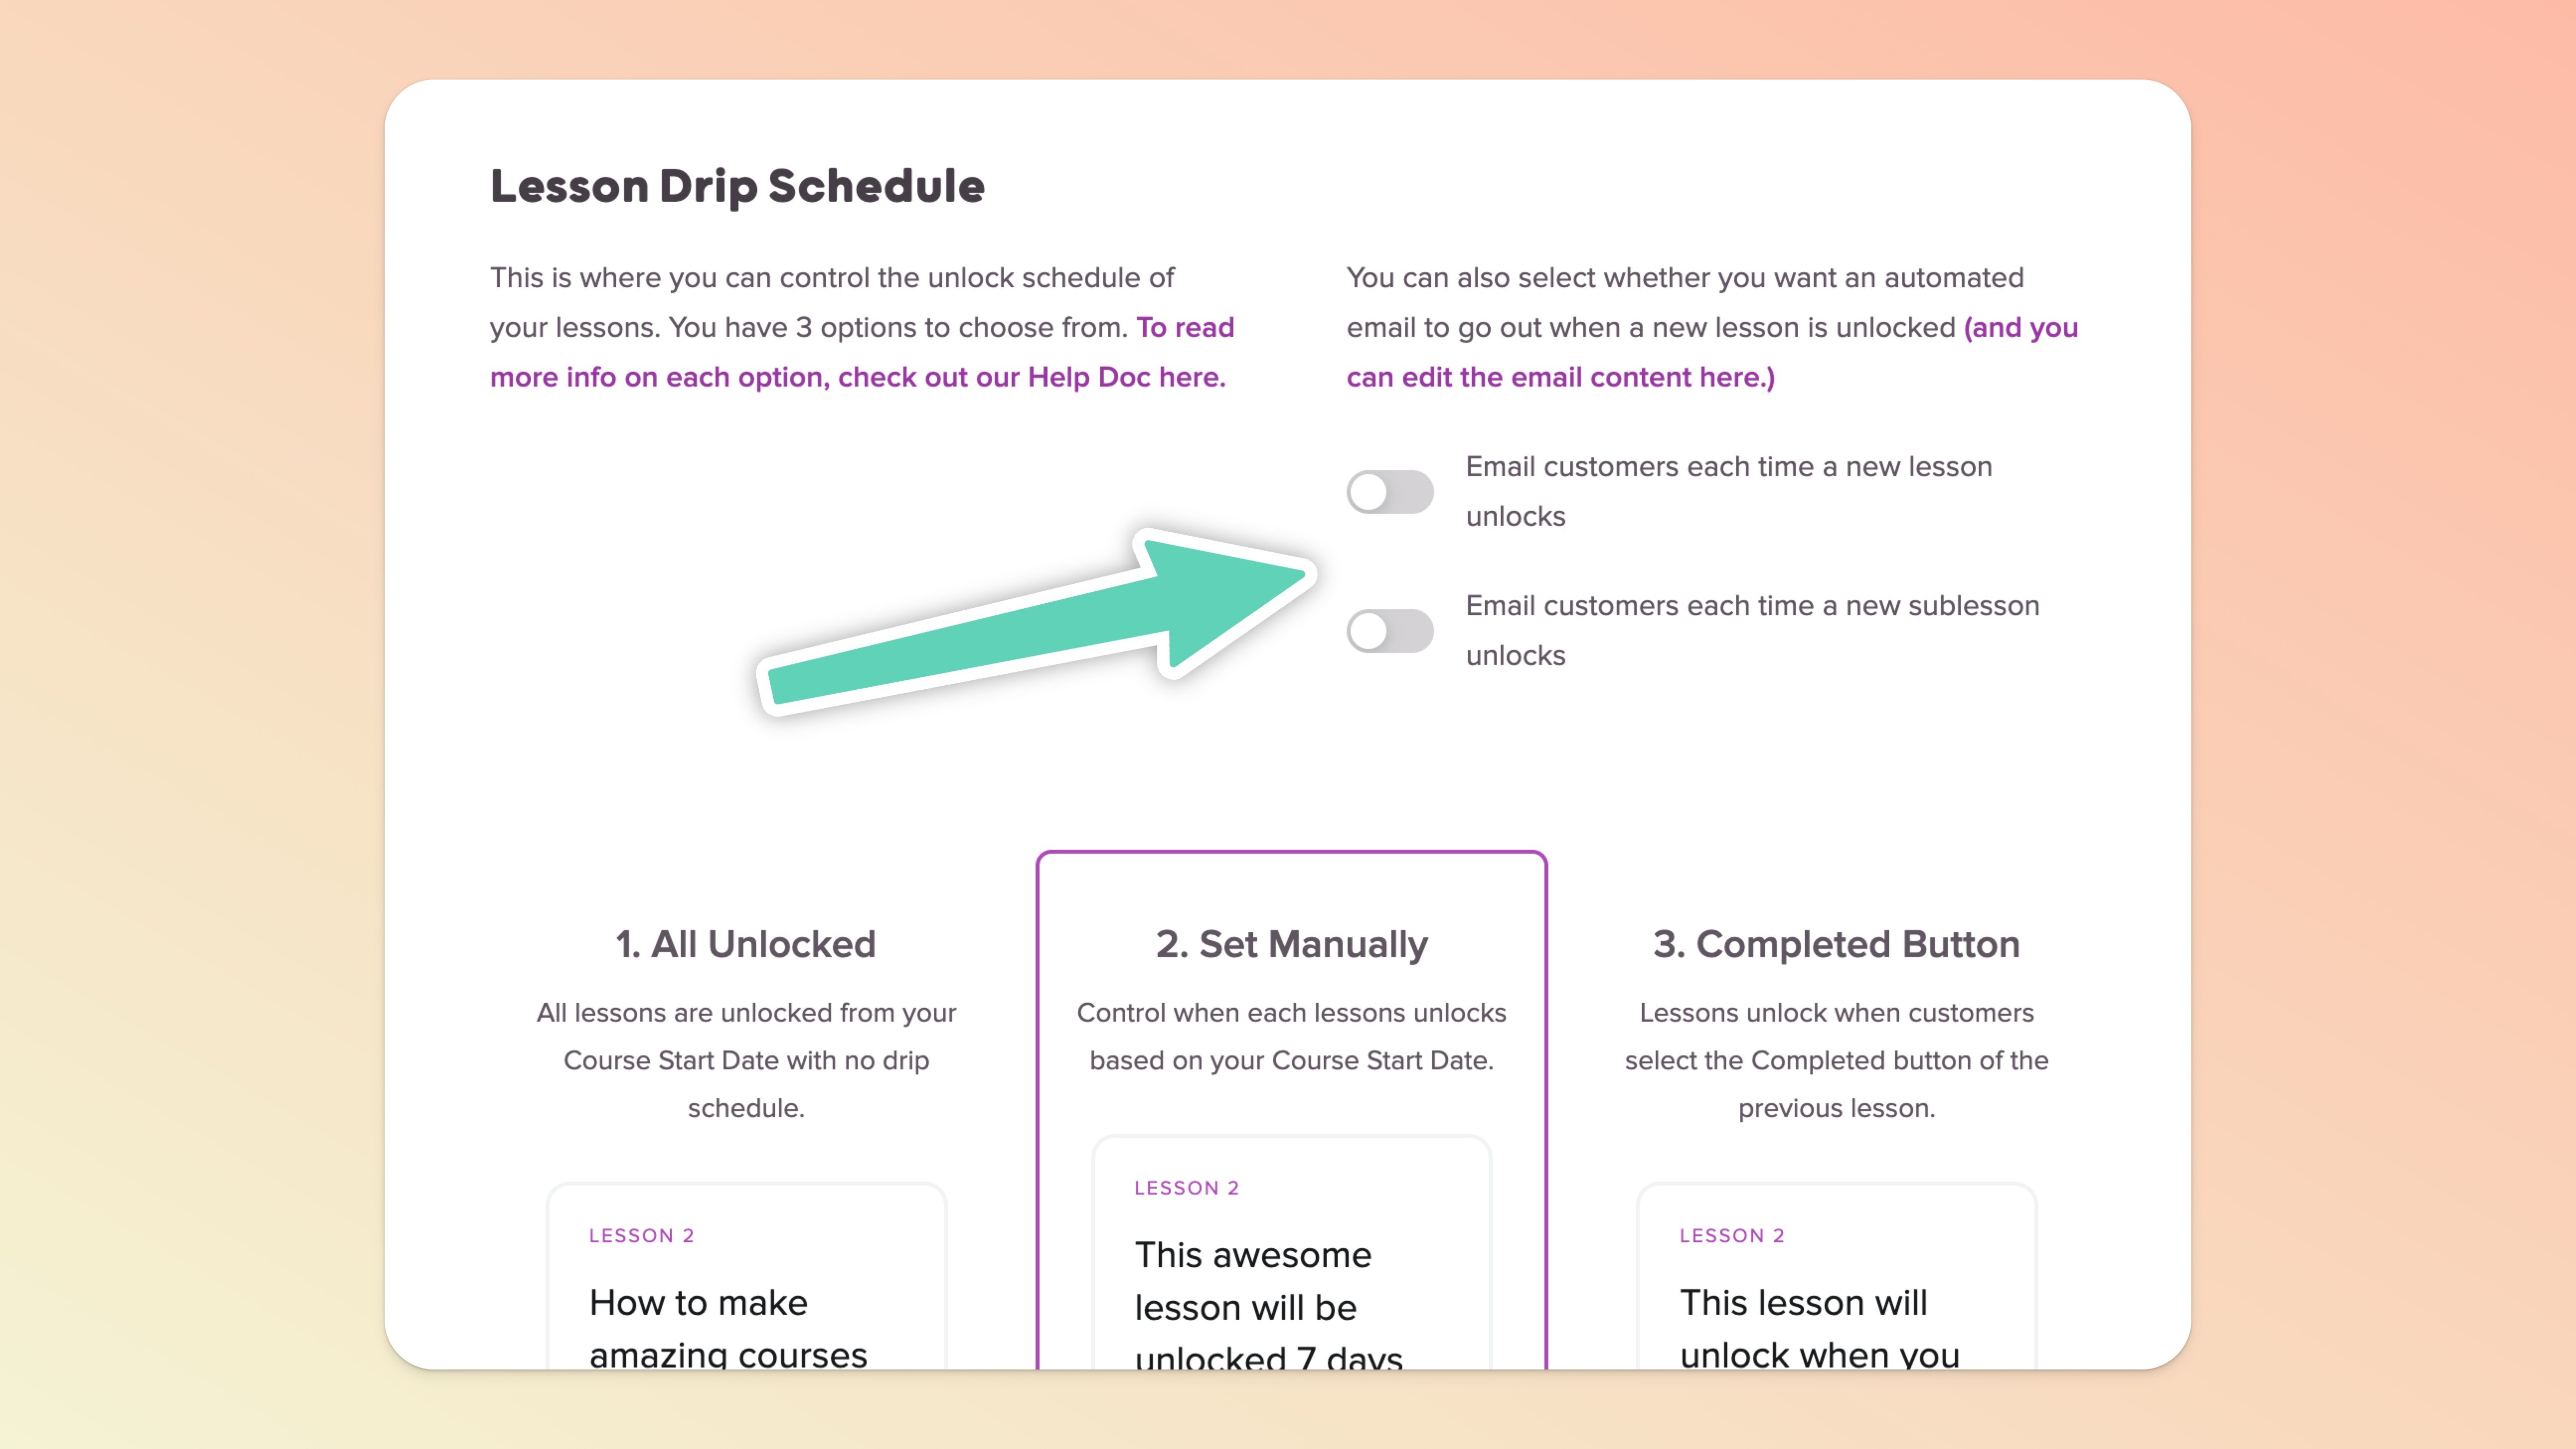
This feature works in three ways:
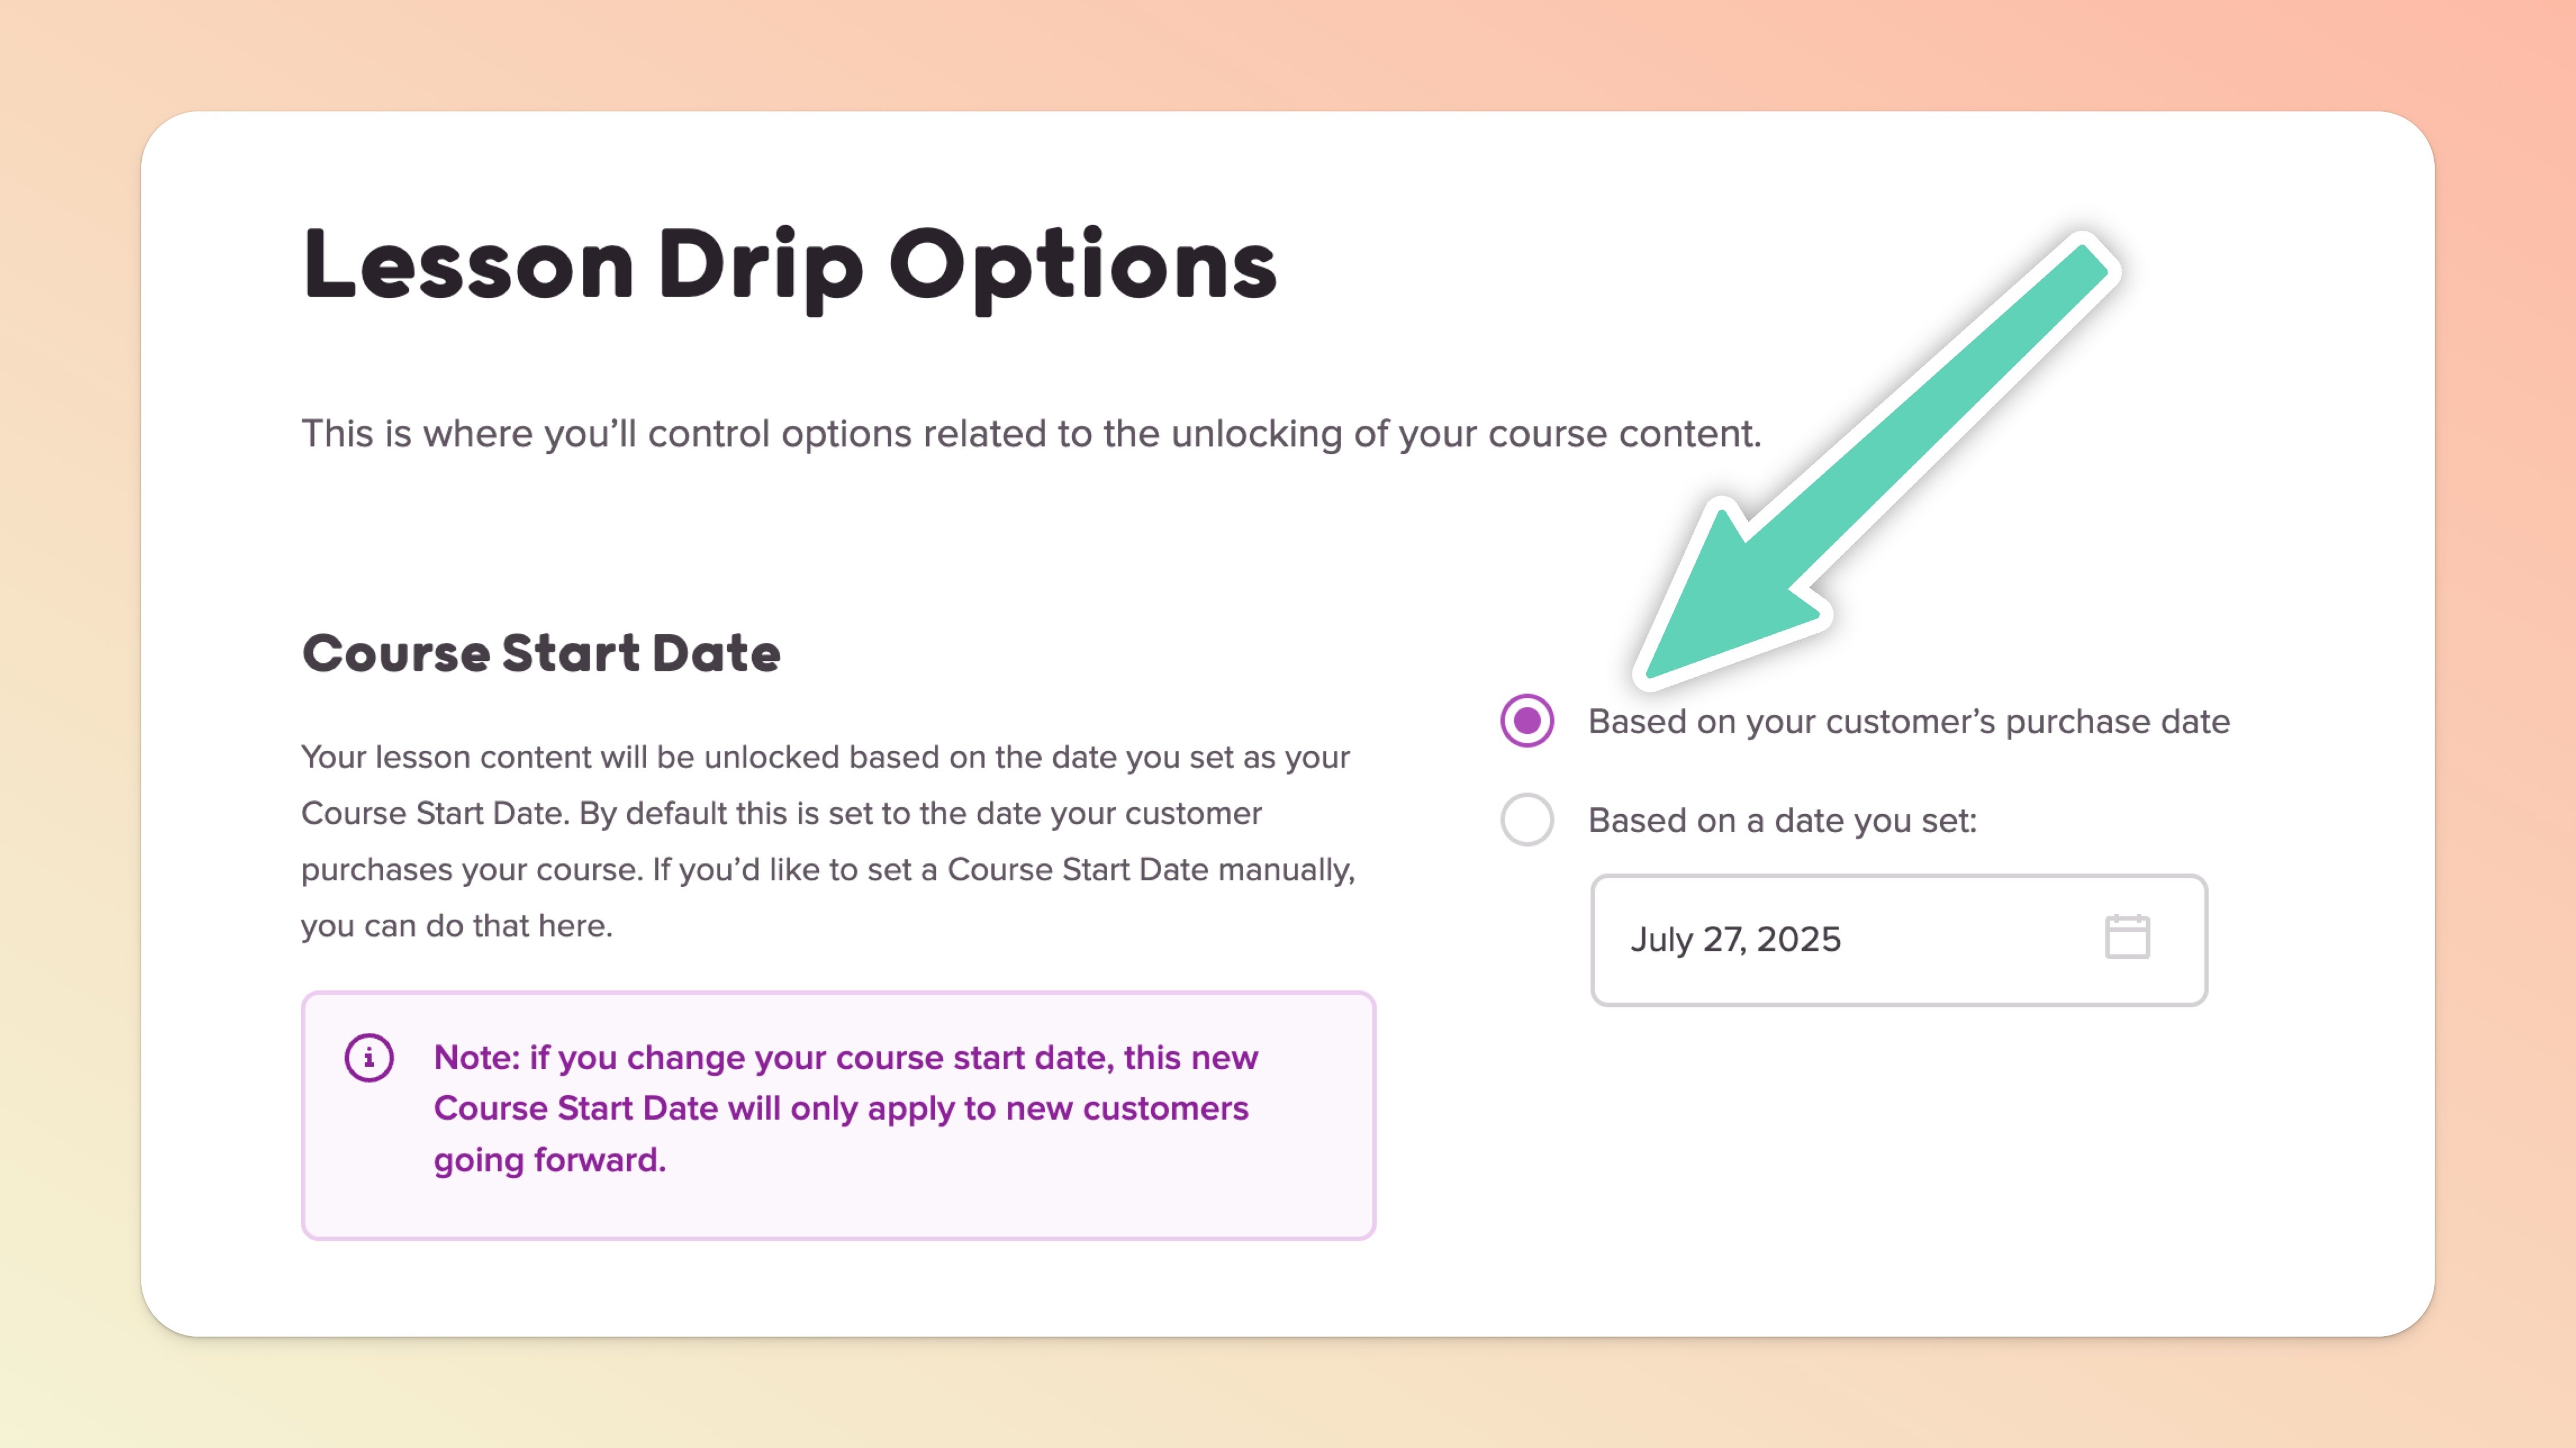
Based on the Customer Purchase Date (think of evergreen courses)
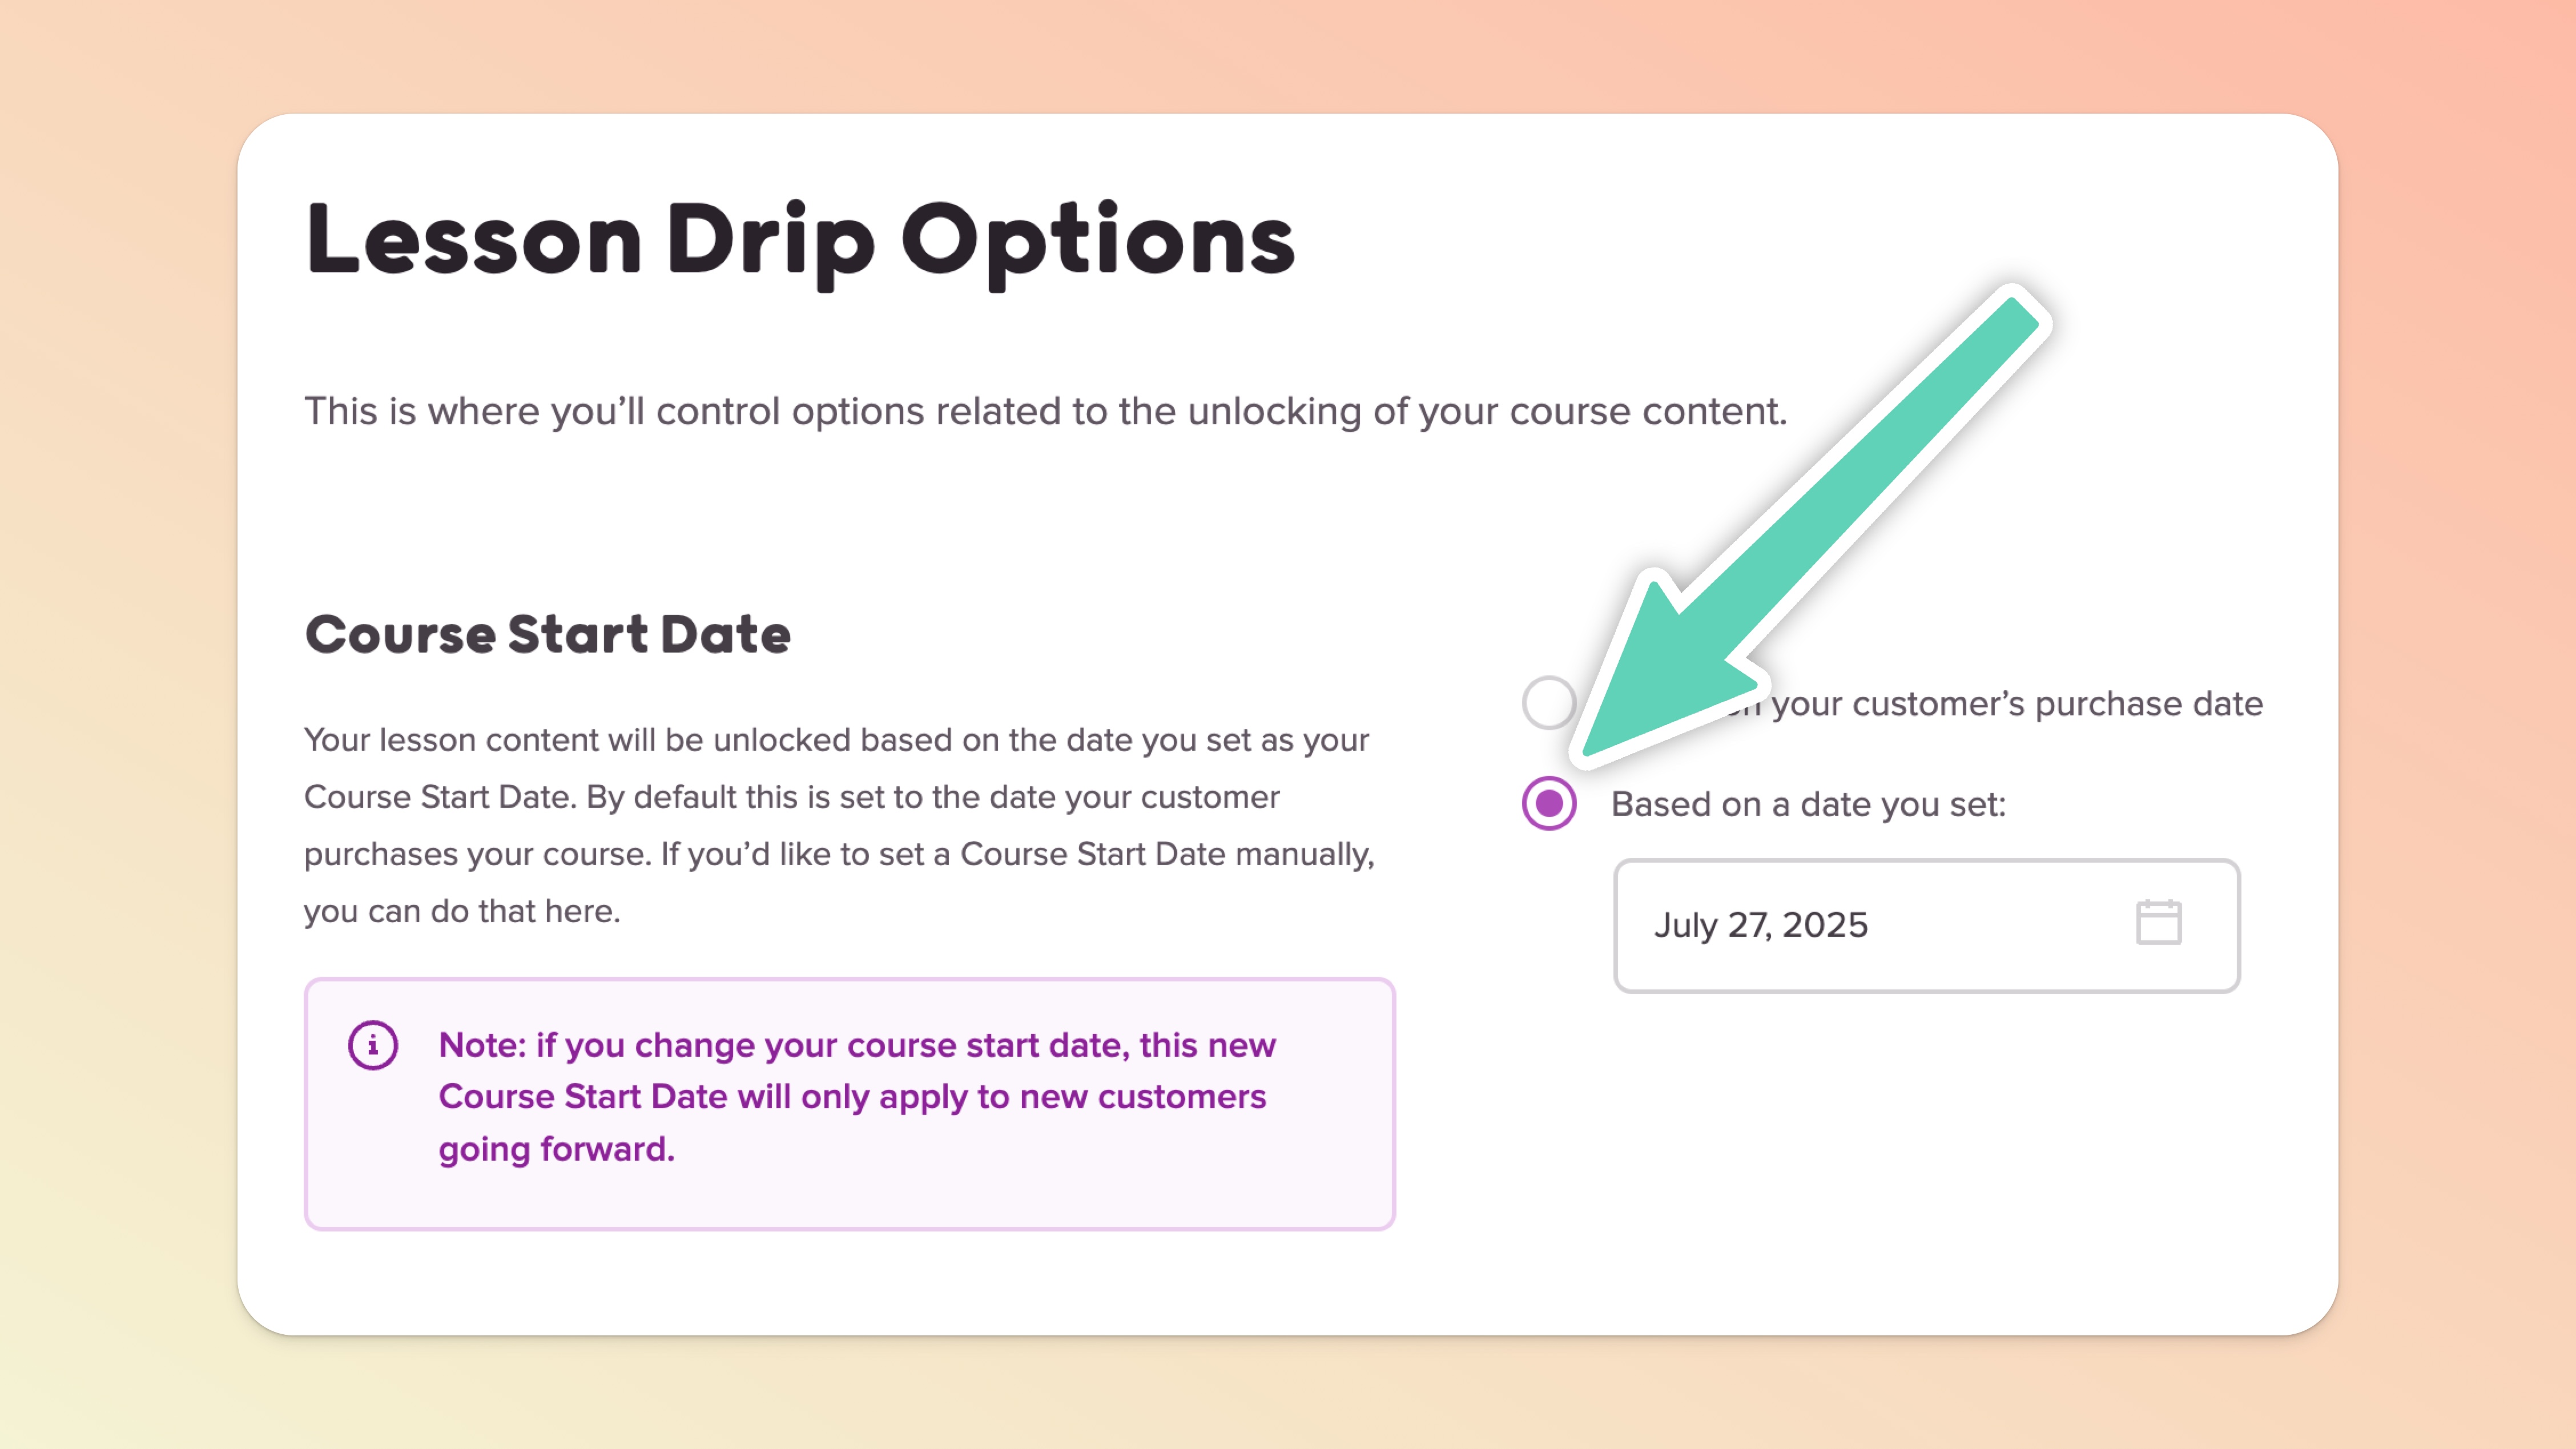
Based on a Course Start Date you set (think of these like customer cohorts who work through your course lessons at the same time).
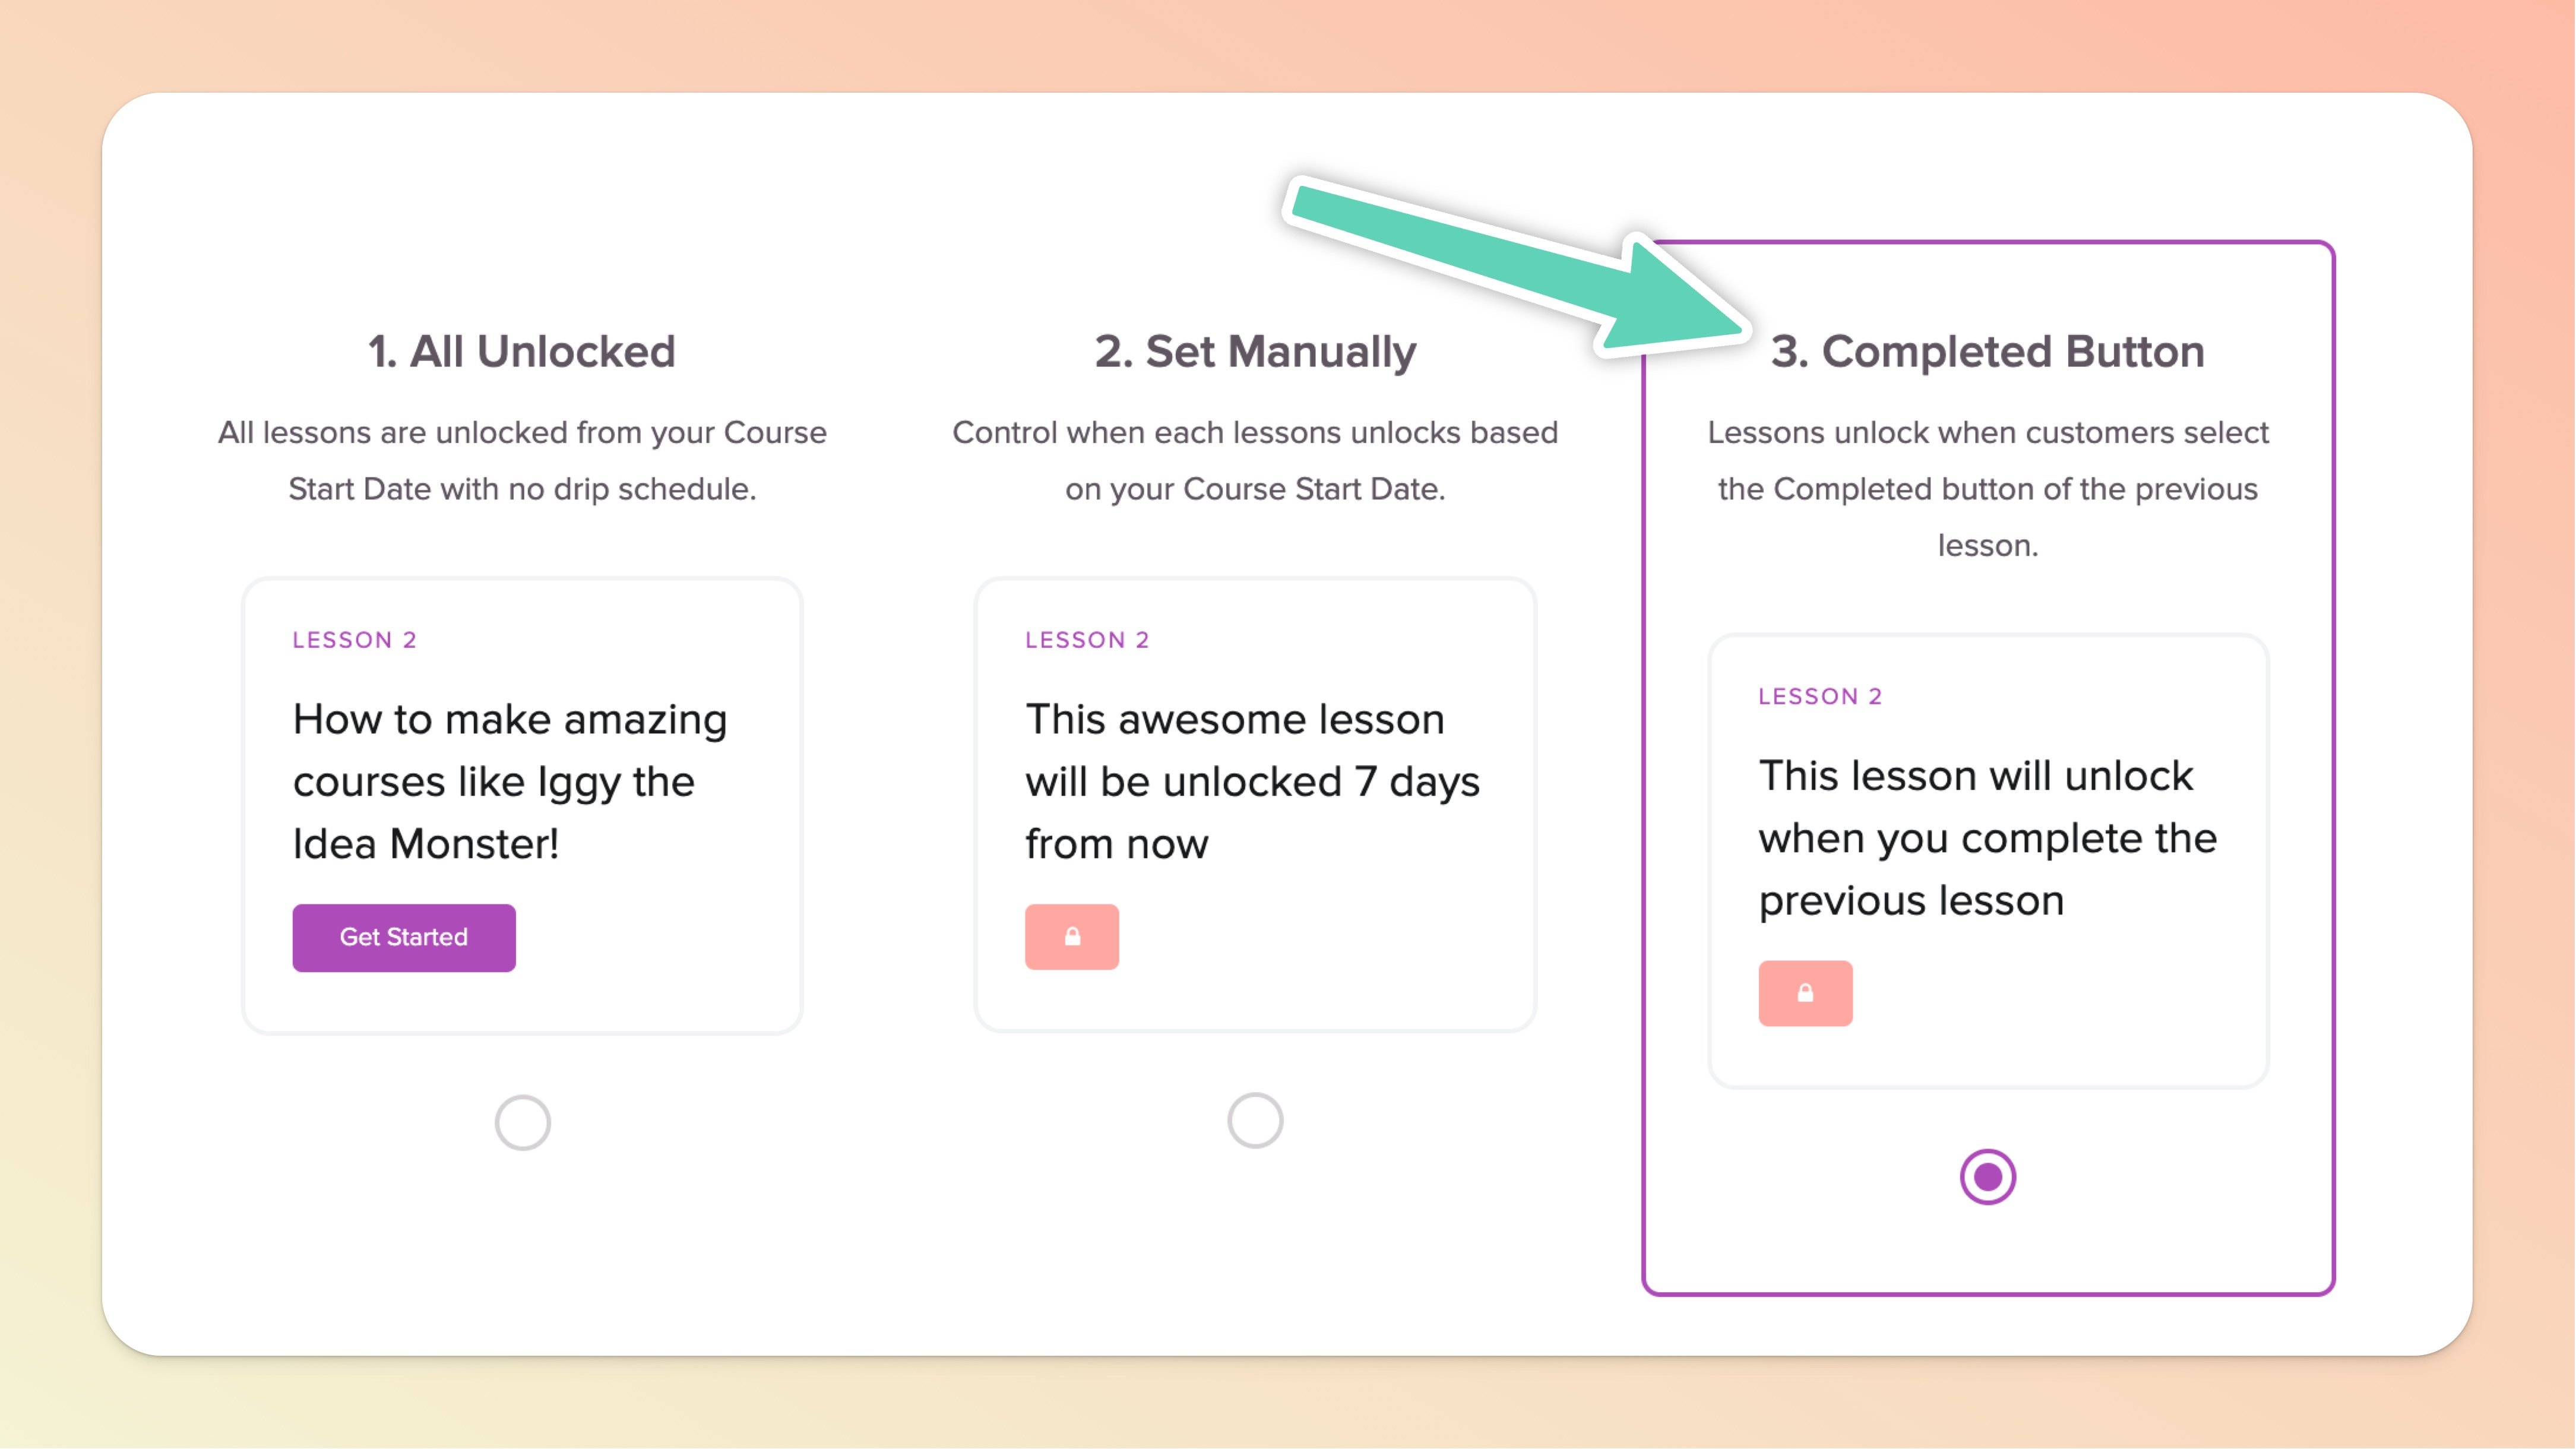
Based on the customer clicking the Completed Lesson Buttons to unlock the next lesson in your course.

Whether someone joins today or 6 months from now, the lesson unlock schedule is independent to each customer when they join!
By default, when a customer signs up for your course a purchase date is set for them behind the scenes (you don't have to do anything!)
You can set each Lesson (or Sublesson) in your course to unlock individually based on a certain amount of days. This is done in one of two places:
👉 Recommended way: Lesson Drip Options page (at the bottom of the "Course Pages" section in the left sidebar)
OR... navigate to each lesson individually, click the Actions button (top right), then click the "Edit Lesson Drip Schedule" option
Whichever option you choose, they both update each other, so you can't really go wrong!
When you're in the Lesson Drip Options page, you don't need to change anything in the first section. By default, this is set to the customer's purchase date.
As you scroll a little bit further down the Lesson Drip Options page, you'll find the Lesson Drip Schedule section. You can quickly and easily set the individual unlock schedule for each lesson.

If you need to reorganize your lessons, you can also click and drag them to sort them from this section too!
If you want to unlock a lesson that you already had an unlock schedule set on, just edit it, change the days to 0, and hit Save.

If you want to remove the drip schedule for ALL lessons, simply edit each lesson and set the unlock days to 0.
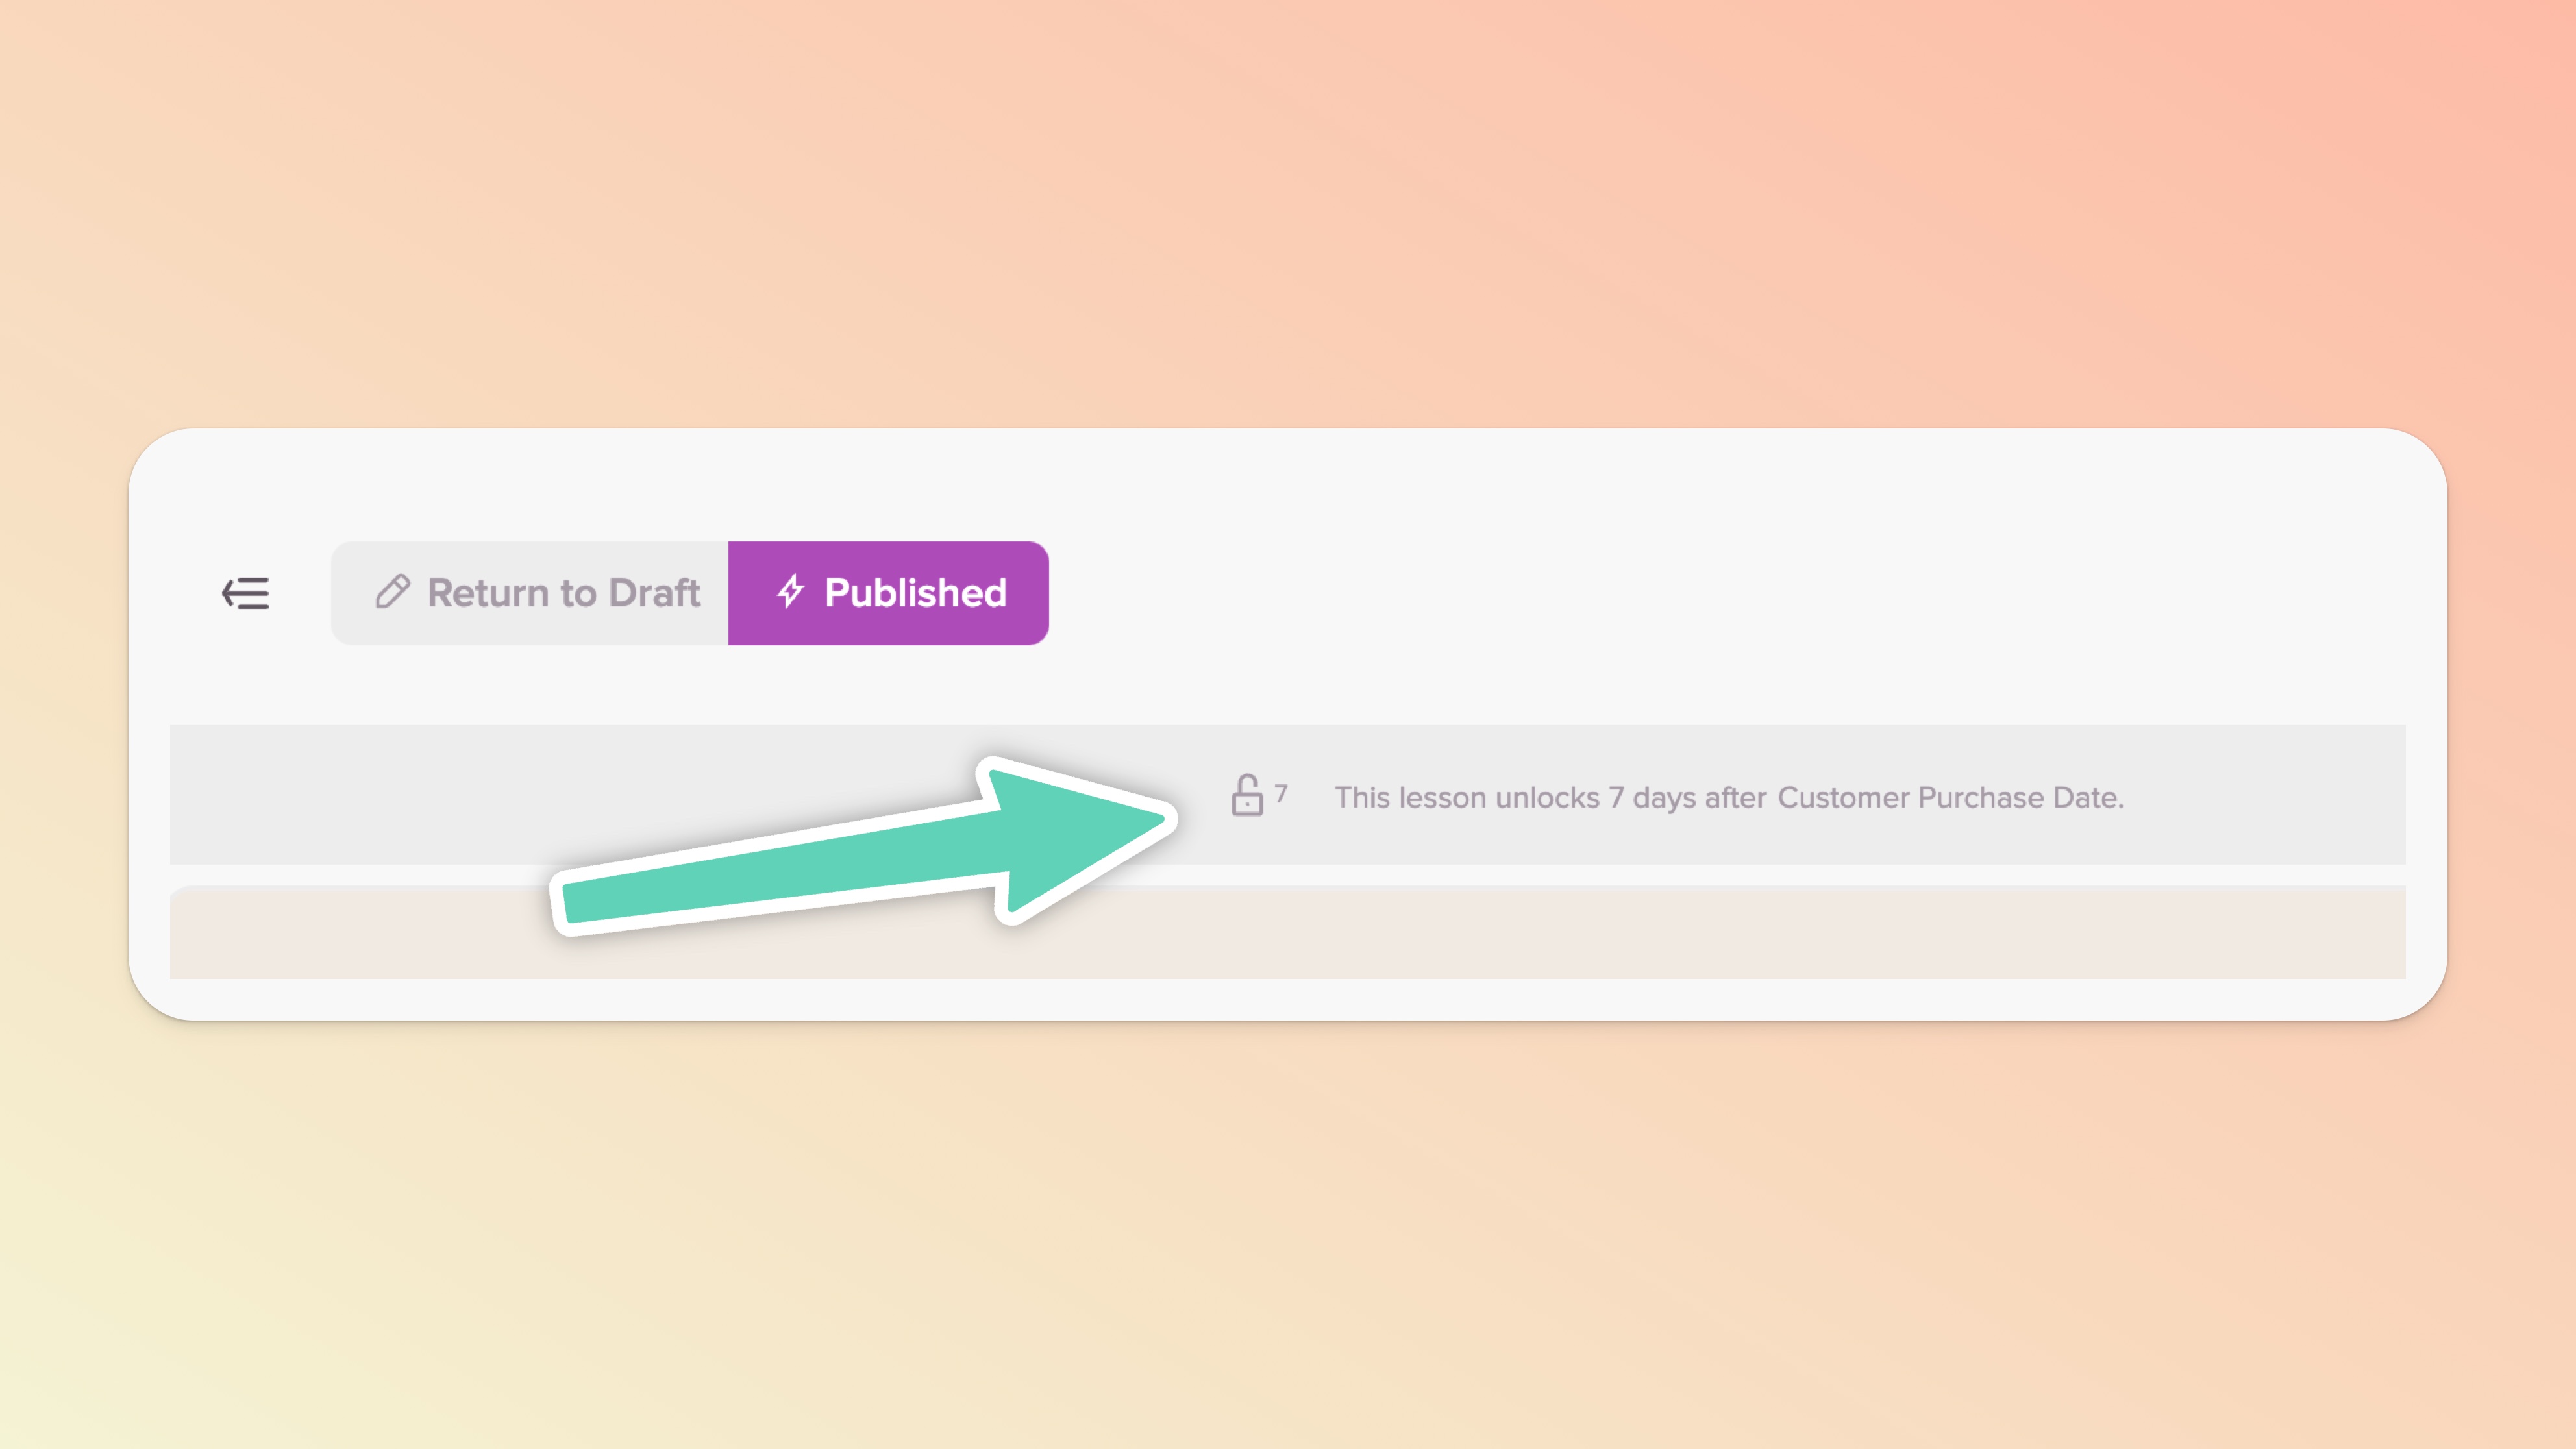
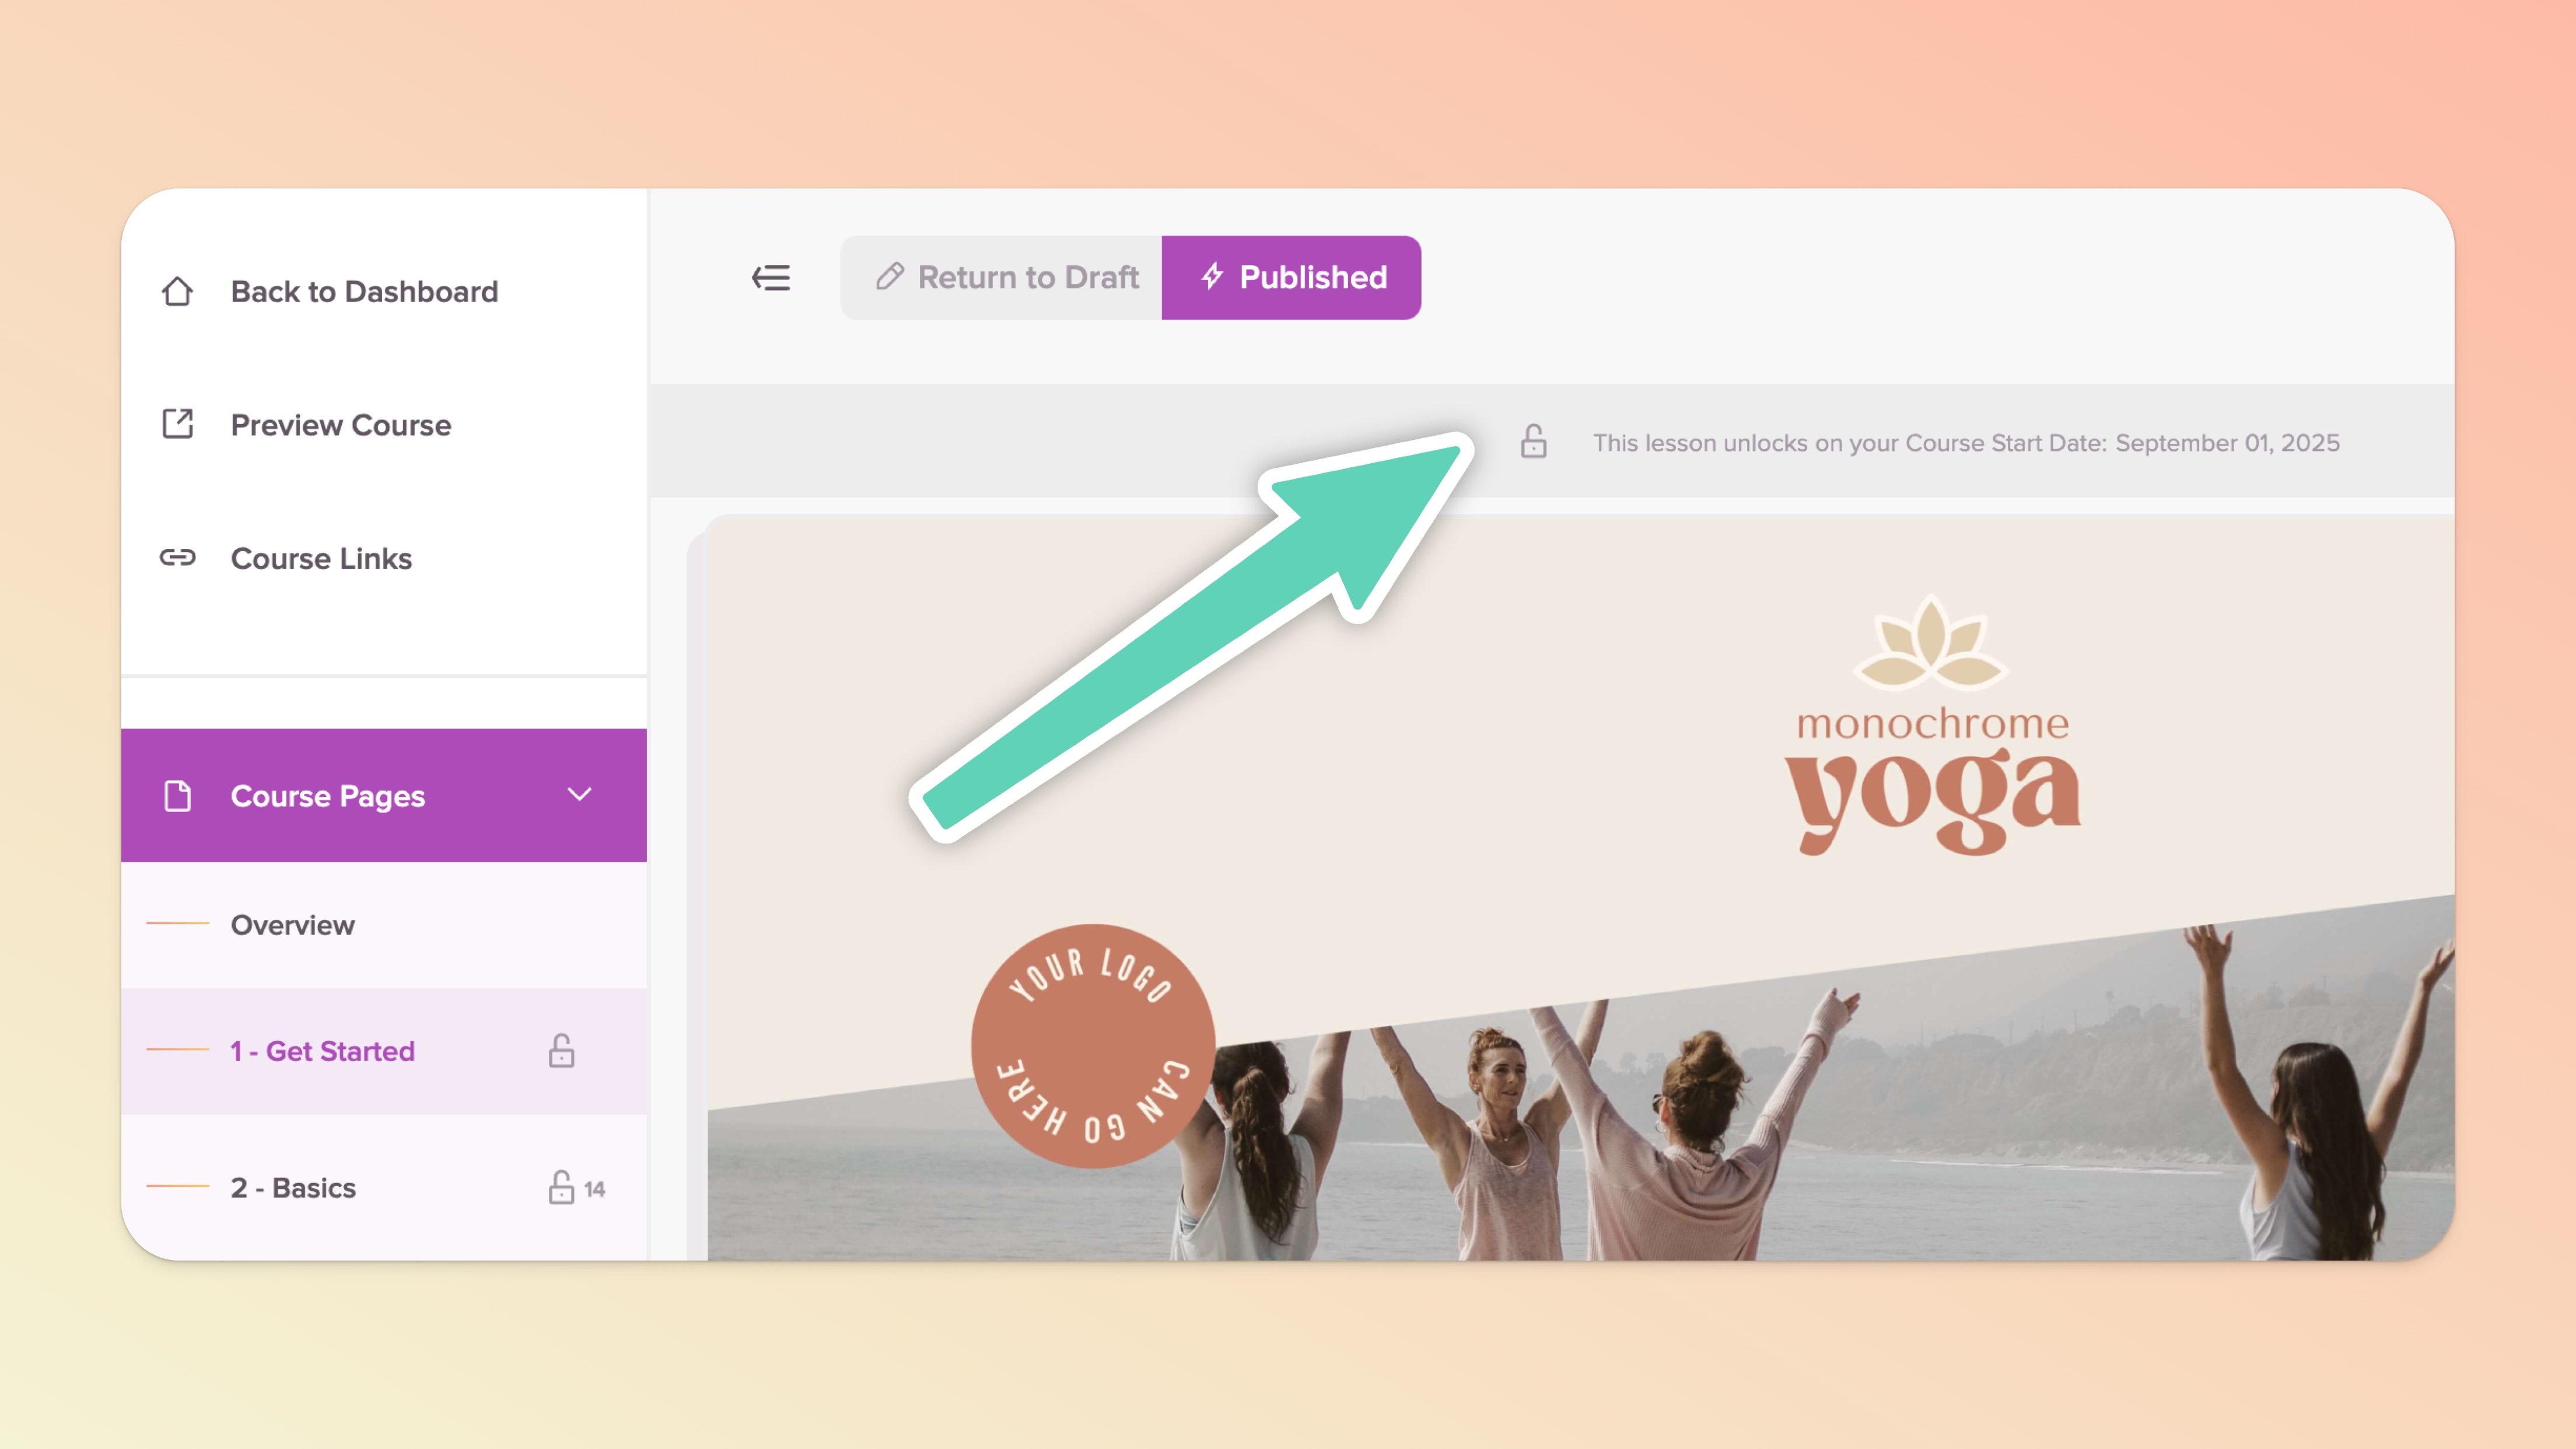
When editing your course, if you click into any lesson, when a lesson unlock schedule is set, you'll see a status bar indicating the lesson drip schedule.
For example:
If you have 0 customers and set your Course Start Date to March 1, 2035, anyone who purchases your course will have a Course Start Date of March 1, 2035.
If you had 100 customers purchase your course before March 1, 2035 AND you change the Course Start Date from March 1, 2035 to September 1, 2035, any customers who purchase your course after you change the Course Start Date to September 1, 2035 will have that new Course Start Date (the previous 100 customers will NOT be affected by this change).
You can change the Course Start Date in two places:
👉 Recommended way: Lesson Drip Options page (at the bottom of the "Course Pages" section in the left sidebar)
OR... navigate to each lesson individually, click the Actions button (top right), then click the "Edit Lesson Drip Schedule" option

You'll notice in the sidebar of the course editor all of your existing lessons will now have a day counter and an unlock icon based on when they will unlock.
In each lesson, there's a "lesson status bar" that will tell you when that lesson unlocks based on the Course Start Date (by default, with no individual lesson unlock schedule set, the lesson will unlock on the Course Start Date).
Similar to Option 1, in the Lesson Drip Schedule section, each lesson can be updated to unlock X days after your Course Start Date.

If you have a Course Start Date set and a customer signs up, you cannot adjust that customer's start date. If you adjust the Course Start Date in your course it will only affect students who sign up AFTER you've made any adjustments.
Let's say you set a Course Start Date, a customer signed up, then a month later you decided you didn't want that customer to have a lesson unlock schedule any longer. All you'd need to do is:
Go to your Customers page >>
Search the customer's email >>
Click their name to view their Customer Profile >>
Click the "Unlock All Lessons" in the actions menu ⚡️ (you're done!)
Here's a video that walks you through unlocking all lessons...
There's a simple little workaround should you want a few lessons in your course to be available right away. All you have to do is go into each lesson, click the "Edit Lesson Drip Schedule" option in the Actions (purple) button, and enter a negative number of days.
We have this feature built directly into Teachery! Head to the handy-dandy Lesson Drip Options page and scroll to the second section (Lesson Drip Schedule). You'll find a toggle you can flip on and this will open up a new email you can customize.
Here’s an example of how to send emails to your customers using Mailchimp’s Automation and Teachery’s Drip Schedule:
Step 1: Create a new list in your Mailchimp account for your course students.
Step 2: Go to Automation in Mailchimp and create a new Automation Workflow.
(Note: Automation is a paid feature in Mailchimp, so if you’re on a free account, you’ll need to start paying for Automation)
Step 3: Create your Automation sequence by doing the following…
Selecting the new List you just created
You can choose any type of Automation as they’re all customizable, but I’d choose “Educate Subscribers”
Name your Automation whatever you like (ex: Your Course Name Drip Lessons)
*IMPORTANT* On the Configure Trigger page, you must check the box to “Trigger workflow…”
Next, add 1 email. As soon as you do this, you’ll see text above it that says “1 day… change delay” Click the “change delay” link to your desired drip time (if the second lesson is set to 7 days in Teachery, set this to 7 days).
Go ahead and design your email to your liking, it can be as simple as you like letting that person know the next module is ready for them with a link to that specific course lesson (get this link by previewing your course in Teachery and navigating to that lesson’s page).
Step 4: Repeat E & F from Step 3 until you have all your drip emails done with the right time delays based on your lessons.
Step 5: Once you’ve added all your emails, confirm the Automation sequence and “Start” it.
Step 6: Come back to Teachery and login. Click into your course. Then, while in the course editor, go to your Default Payment Page (or whichever payment page you’re going to use). Click the “Connect Email Provider” button at the top right and select MailChimp. Then select the list you’ve setup Automation for.
Step 7: Make sure your drip lessons in Teachery are set to the same days as you set in MailChimp.
Optional Step 8: We recommend setting this automation up days/weeks before releasing your course so you can signup for your course and see the automation emails happen real time (and check your course lessons to make sure they match).
This lesson locking schedule option is very straightforward! Simply select the third option in the "Lesson Drip Schedule" section: 3. Completed Button.
Once this is set, any customer of your course will have all lessons locked except for the first lesson of your course 👍.
If you have any existing lesson lock schedules set, confirming this setting WILL OVERRIDE and remove those previous schedules.
If you have any existing customers, confirming this setting WILL set this lock schedule on ALL customers of your course (and re-lock their lessons if they have not clicked the "Completed" buttons).
You cannot use any sort of date-based or time-based schedule with the completed button option, it's only based on the clicking of the lesson completed buttons ✅ .
Once the Completed Button feature is turned on, when you navigate to any lesson within the course editor, you'll see the lesson status bar and the sidebar denote the completed lock setting is in place!
And there you have it! All the different ways you can lock lessons within your course!
